| Vendor Database Screen |
|
|
The Vendor Database Screen is accessed by selecting OTHER TASKS and VENDOR NUMBERS AND ADDRESSES from the Menu Bar:
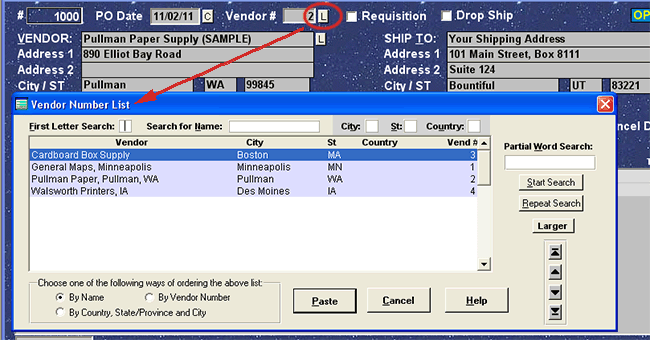
The advantage of using the Vendor Database is that you can quickly enter vendor names and addresses on the Main Purchase Order Screen. To access it, start at the Main Purchase Order Screen and click on the "L" button beside Vendor #, shown below. (Remember to click on the "L" beside Vendor #. That's the vendor database. The "L" beside the "VENDOR" blank brings up all vendors, even those you might not have entered in the Vendor Database.) You can pick a vendor from the list and its name and address will be pasted in place.
The parts of the Vendor Database Screen are explained in more detail below and has been divided up into four sections:
Top Panel (Assigned Vendor Number, Vendor and Ship-to Addresses
The Assigned Vendor Number field is found at the top of the Vendor Database Screen:
In the Vendor Number field, type in the number you want to assign to the vendor. The best way to assign a number is to bring up a list of available numbers by clicking on the "L" button. (You can also bring up the number list by double clicking in the Vendor Number blank with the mouse, pressing CTRL-L, or using EDIT pull down menu and selecting PASTE FROM LIST.) Choose and number and continue.
In this blank, type in the name of the vendor. If you delete all the records in the Vendor Information Database, "NO VENDORS IN FILE" will appear in the Vendor blank. When you are ready to enter your first vendor, delete "NO VENDORS IN FILE" and type in the vendor's name. If you've already ordered from the vendor, you can click the "L" button or double click in the Vendor blank to bring up a pop-up list of past vendors. The Vendor and Ship-to blanks have a special speed menu (accessed by clicking on the right mouse button.) From this speed menu you can copy the entire address, paste a copied address, and copy or paste specially formatted addresses. These handy functions enable you to do such things as copy an address from an email message and paste the entire address--including name, address, city, state (or province), postal code and country--without pasting each field separately. For more information, see Speed Menu.
In this blank, type in the primary address where you want the items shipped. In most cases, this will be the primary shipping address that you've entered in Basic Set-up. Rarely will you ever have to type in your shipping address. The default behavior of the program is to paste the shipping address that you've entered in Basic Setup each time a new purchase order is created. You can turn it off or on in Basic Set-up. Additionally, AnyPO has an auto-fill feature to paste your primary shipping address. To use it, click on the "P" (Paste) button and the address will be placed in the blanks. Some businesses have different shipping locations. If you're in that situation, you can set up the vendor records so that you can distinguish between the shipping locations. For some orders, you might have the vendor ship to a shipping address in Des Moines, Iowa. For other orders, you may have them ship to Omaha. That's easily done by setting up two vendor records. When the vendor is pasted on the purchase order, the shipping address is pasted along with it, saving you from having to type it. When you set up the same vendor with different shipping address, make sure you that you indicate the difference in the Summary Name by including the vendor's name and shipping location.
Middle Panel (Summary Name through Primary Fax)
Type in a summary name that will help you select this vendor from a list. If there is a "The" or an "A" in the name, use the following format: "Electrical Supply Shop, The." In this way the list will be sorted in proper alphabetical order. The Summary Name is used for the Vendor Pop-up list (illustrated above). Note that it's very important to enter something in this blank. If it's empty, you won't be able to access the vendor (on the pop-up list) when creating purchase orders.
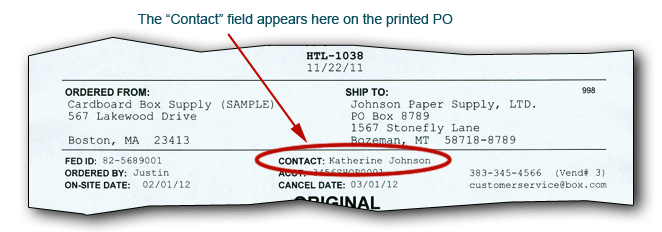
This is an optional field. It doesn't appear on the Main Purchase Order Screen and but you can designate that it appear on the printed PO. If you have a contact person at the vendor, type in the person's name here. If you enter a name here, then contact name will appear on the printed purchase order. If you don't have a contact, you can leave it blank.
Type in the vendor's primary phone number. If the vendor has two or more phone numbers, type in the number that you use the most. If the number is a long distance number or international number, include the long distance or country prefix before the number (i.e. 1-208-232-6857). If you use AnyPO's internal telephony features, you can have the program dial the number for you. The number that you enter here will appear on the Purchase Order Main Screen and on the printed PO. If you'd like to include more information (such as an extension) along with the phone number, click on the Vendor Contact Manager tab at the bottom of the screen. The Contact Manager allows you to include the names of primary contacts, fax numbers, and comments. The Dial or Copy button next to the phone blank works the same as the dial button on the Main Purchase Order Screen. More information: Phone Features
This is an optional field. It doesn't appear on the Main Purchase Order Screen and but you can direct the program to include it on the printed PO. You can use this field for a Federal ID Number, Value Added Tax Number (VAT) (used by the European Union), a GST Number (Canada) or any other identifying number. If you want this number to appear on the printed purchase order, place a checkmark in: "Include this Number on the Printed PO." Note that with some numbers (such a personal social security number), it may not be appropriate to include the number on the printed invoice. In those cases, keep the box unchecked. Canadian users, however, would include the GST Number. European Union members would include their VAT number. You can designate you own label for the field in Basic Program Set-up (FILE >> BASIC PROGRAM SET-UP AND PREFERENCES). The label appears on the printed purchase order. Here's an example what it looks like on the printed PO:
The email field matches the email field on the Main Purchase Order Screen. The address you enter here will be pasted to the Email field on the Main Purchase Order Screen along with the vendor's name and address. It will also appear on the printed purchase order. In this field, type in the vendor's email address that you would use for ordering. If the vendor has two or more addresses, type in the email address that you use the most. You can include additional email addresses in the Contact Manager. To access it, click the Contact Manager tab at the bottom of the screen.
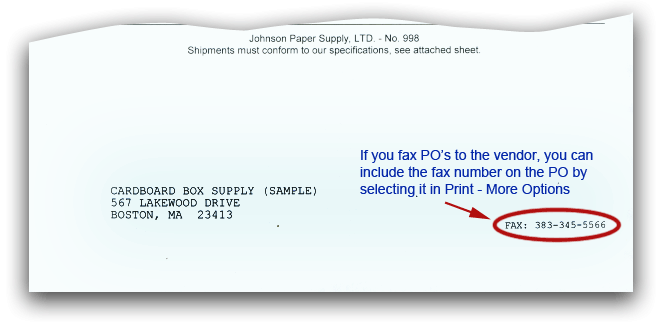
Enter the fax that you primarily use for faxing orders. If the vendor has two or more fax numbers, type in the number that you use the most. Use the Vendor Contact Manager (access by the tab on the bottom of the screen) for any secondary fax numbers. The number that you enter here will appear on the Purchase Order Main Screen. The fax number doesn't normally appear on the printed PO, but you can change that behavior by selecting "Print Fax Number on the PO" which is available in Print: More Options. The following shows the location of the fax number on the printed PO.
Bottom Panel (Discount through User Field2)
The discount field is used to indicate the typical (or most common) discount that vendor provides to you. You may or may not use this field. If the vendor provides you with price list and there is no discount, then you should leave this field empty. However, if the vendor provides you with a price list and provides a 40% discount on all the items on the price list, then this field will come in handy. Each time you paste the vendor's address to a purchase order, the discount will come with it. Use a whole number, i.e. 40 for 40% or .55 for 55%. If the discount varies depending on quantities or the type of products ordered by the vendor, it can be changed manually to the appropriate amount on the Purchase Order Screen at any time. Note that discounts are based on the selling price. For instance, a 40% discount on a $100 item is $60. A 30% discount on a $100 item is $70. Full information on this field is found here: Discounts
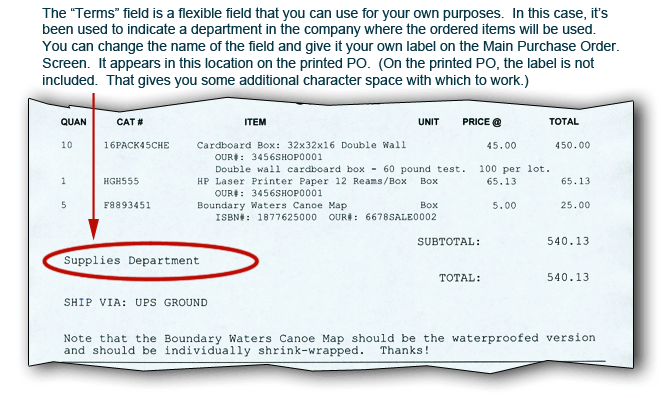
The Vendor's Terms field matches the "Terms" field on the Main Purchase Order Screen. Whatever you enter here will be pasted to the "Terms" field on the Main Purchase Order Screen along with the vendor's name and address. This is another optional field. "Terms" mean the number of days from vendor's invoice date that you have before payment is due. Normally, the vendor gives you, the buyer, a grace period in which you can pay their bill. Commonly this is 30 days, but it might be 60, 90 or 120-days depending upon the vendor. Thus, terms might be NET 30 DAYS" or "NET 60 DAYS." A vendor might provide an additional discount for early or pre-payment. If you include the vendor's terms in this field, each time you paste the vendor's address to a purchase order, the terms will come with it. That being said, for the great majority of businesses including the terms on a purchase order is not necessary. Terms are something that vendor has already established, and including it on the purchase order is redundant. That means that the field can be used for other purposes, and most businesses find it highly useful for their own needs. The field can be re-labeled. For a discussion on how to reconfigure it for other uses see: Terms Field Set-up. Below is an example of the Terms field used for departments within the business, and specifically this order is going to the "Supplies Department." If products ordered from this vendor are always allocated to the "Supplies Department" then you would want to enter "Supplies Department" in the Terms field for this vendor. If products aren't always allocated to the Supplies Department, then leave it empty on the Vendor Database and fill it in on the Main Purchase Order Screen.
This field matches the same field on the Main Purchase Order Screen. The information you enter here will be pasted to the same field on the Main Purchase Order Screen along with the vendor's name and address. FOB means "Freight on Board" (or sometimes "Free on Board"). This is the location at which you, the buyer assumes the transportation cost. For example "FOB Denver" means that you are responsible for the transportation cost starting at Denver. Whether you use the FOB field is up to you. The vendor may use other shipping methods and FOB terminology is not applicable. If so, just leave the field empty. If a vendor has a consistent FOB arrangement with you, type in the location here. A number of terms are associated with FOB. In particular, various modifiers are used to indicate whether the shipment is pre-paid, or is whether it is sent collect, etc. For more information: see FOB Terminology. You are not, however, limited to using this field for shipping related purposes. You change its contents to your liking. You can also change the label so that it better matches its use. The label is changed in Basic Set-up.
If most or all of your purchases from this vendor are taxed, place a check mark here. Whenever you paste the vendor's address to the Main Purchase Order Screen, the "Taxable" box will be checked and tax automatically added to the totals.
If items purchased from this vendor are taxed, and it requires a tax rate other than your default rate, you may enter the tax code here. More information: Setting up Tax Codes
Use this field if you always want a PO Code entered at the same time you paste this vendor to the Main Purchase Order Screen. More information: PO Code
Drop shipments are when goods are shipped to a final customer rather than the original buyer. Typically, this occurs when the original buyer has sold the goods to another party. You bill the original buyer, but the goods are shipped to the final customer. Let's explain this a bit more. We'll use three terms: customers, vendors and drop ship. Customers are the individuals or businesses who have ordered a product from you. Vendors are the suppliers from which you will obtain the product - and, in a drop ship situation - the vendor will be sending the product directly to your customer. If you place a checkmark here, the program will automatically check the "Drop Ship" box on the Main Purchase Order Screen - meaning that this is an order in which you want the vendor to ship directly to your customer. You should only place a checkmark here in the Vendor Database if you always use this vendor for drop shipments. If you use the vendor for some drop shipments to customers and some shipments to your place of business, our suggestion is to leave it unchecked. You can manually check the "Drop Ship" box on the Main Purchase Order Screen when it's appropriate. More information: Drop Shipments
These fields are available for other descriptive information about the vendor. The fields are for your use and do not appear on the printed purchase order.
This is a very handy feature of the program. If you click on the Vendor Notes button, you'll be able to write reminder notes to yourself. Anything you include here will show up at the bottom of the Purchase Order Screen in the "Notes" area. For instance, you might want to write the following note: "This vendor provides free shipping." Each time you create a purchase order for the vendor, the above note will appear, reminding that shipping is free. The Vendor Notes button serves two purposes. If you click it once, you can write reminder notes. If you click it again, Help information appears.
The Contact Manager works hand in hand with the Vendor Information Database. It enables you to keep track of the names and phone numbers of individuals that work in the stores and businesses that make up your vendors. You can reach the Contact Manager by clicking on the Contact Manager tab at the bottom of the screen. Or you can reach it from the Main Purchase Order Screen by selecting OTHER TASKS >> CONTACT MANAGER from the Menu Bar. For more information, see Contact Manager.
You can move to different vendors by pressing Page Up or Page Down on the keyboard. You can also move by using the navigation buttons in the middle right of the screen: Right arrow button ( > ). Next vendor is displayed. (Same as Page Down.) Right arrow and line button ( >| ). Last vendor is displayed. (Same as Ctrl+Page Down.) Left arrow navigation button ( < ). Previous vendor is displayed. (Same as Page Up.) Left arrow and line button ( |< ). First vendor is displayed. (Same as Ctrl+Page Up.)
Menu Bar The Menu Bar on the top of the Vendor Database Screen provides you with quite a number of options: FILE Menu. In the FILE menu, you have two printing options. You can print each product record individually by selecting FILE >> PRINT from the Menu Bar. Or you may select FORMAT & PRINT FROM SPREADSHEET. The later opens up Excel (or a spreadsheet program of your choice). You can format the list and print it. Note that you can not edit the Vendor Database from Excel. Use this for viewing and printing purposes. You can also import vendors by selecting FILE >> IMPORT. More information on importing is found here: Vendor Import. If, after importing, you find that you need to delete the imported records, you can do so by selecting REMOVE IMPORTED RECORDS. This will remove only imported vendors. Any vendors in your Vendor Database prior to sthe import will be preserved. Note that if you add one or more new vendors after doing an import, you'll lose the ability to remove the imported records. Thus, if you need to remove imported records, you should do it soon after the import and before adding any new vendors. EDIT Menu. To bring up a list of available vendor numbers, place the cursor in the Vendor Number blank and select EDIT >> PASTE from list. You can also bring up a list by double clicking in the Vendor Number blank. Select a number from the list and press OK to insert the number in the blank. To bring up a list of all past vendors, place the cursor in the "Vendor" blank and select EDIT >> PASTE from list. You can also bring up a list by double clicking in the Vendor Number blank. Select a vendor from the list and press OK to paste the vendor's name and address in the "Vendor" blanks. To move to different windows in the program, select WINDOW from the Menu Bar and choose the desired window. If you need to delete vendors, you can do so by select EDIT >> DELETE THIS VENDOR. Or you can select EDIT >> MULTI-VENDOR DELETE. (Use the Multi-Vendor Delete function if you need to delete two or more Vendors.) If you delete all the records in the Vendor Database, "NO VENDORS" will appear in the Item Name blank. When you are ready to enter your first vendor, delete "NO VENDORS" and type in the name. GO TO Menu. The GO TO menu is used to search the Vendor Database for a name, address, city, state or number. You can also activate a list of vendors and select from the list. TOOLS Menu. The TOOLS menu is used to change the order in which the vendors are listed. They are normally ordered by their vendor number, but if desired you can change the order to an alphabetical listing by Vendor, Summary Name, or City/State/Country. To change the order, select TOOLS and the appropriate order from the Menu Bar. You can also use the TOOLS menu to turn off vendor number checking. As you page through the Product Information Database, AnyPO checks to make sure that you do not have duplicate Vendor numbers. If it finds a duplicate, it will notify you. Additionally, AnyPO will not allow you to continue until you change the number. There may be times, however, when you want to turn off the vendor number checking feature. For example, you may wish to alter the other duplicate vendor number, and not the one currently showing on the screen. You may also want to turn off vendor number checking after doing an import. In either case, you can do so by selecting TOOLS >> TURN OFF VENDOR NUMBER CHECKING. If you look at the menu after making the selection, you'll see a checkmark beside "Turn Off Vendor Number Checking" indicating that the feature is turned off. You can turn it back on by selecting it again which will remove the checkmark. You should be careful about turning this feature off. Duplicate Vendor numbers create problems in the program and you should turn it off only when necessary. You can select TOOLS >> VIEW ALL ITEMS ORDERED FROM THIS VENDOR. This brings up a list of all items that you have ordered from the vendor. See below for more information on this feature. Finally, the last option (TOOLS >> SEND EMAILS TO SELECTED OR ALL VENDORS) enables you to send emails to a group or all of your vendors. This feature is described in more detail here: Vendor Database Emailing Module.
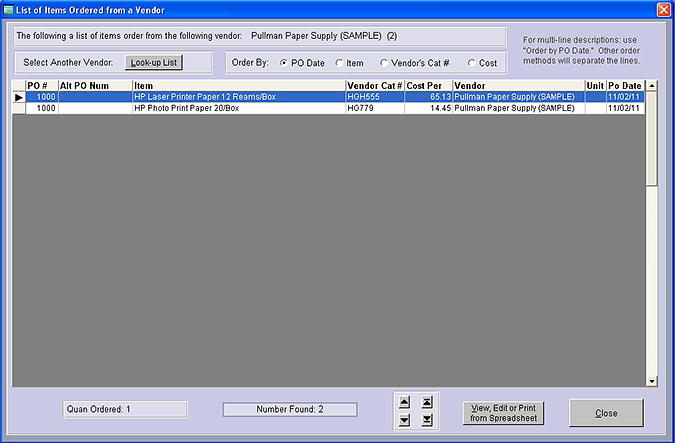
View All Items Ordered from This Vendor (Level II - III) If you select TOOLS >> VIEW ALL ITEMS ORDERED FROM THIS VENDOR, the following screen display appears:
This feature provides a complete record of all items ordered from a vendor. You can use it to track trends and do price comparisons. The list can be sorted by date, item, vendor's catalog number or cost. You may also move the data to Excel or another type of spreadsheet for printing purposes by clicking the button: "View, Edit or Print from Spreadsheet."
Speed Menu If you click on the right mouse button on the Vendor Information Database screen, the speed menu will appear. From the speed menu, you can activate the search or look-up dialog boxes and the standard cut, copy, paste menu. (Note that when the cursor is in the Vendor, Ship-to, and Zip blanks, a slightly different speed menu appears as noted above.)
|