Details on the "User Defined Fields" Page


|
Basic Program Set-Up: Details on the "User Defined Fields" Page |
|
|
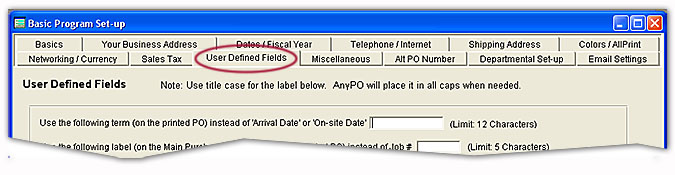
To reach the User Defined Fields Page, select FILE and BASIC PROGRAM SET UP from the Menu Bar. Click on the "User Defined Fields" tab on top of the page. The User Defined Fields page will appear.
Parts of this screen include: Use the following term (on the printed PO) instead of 'Arrival Date' or 'On-site Date' AnyPO uses the terminology "Arrival Date" on the Main Purchase Order Screen (and "On-site Date" on printed PO's). It's location on the Main Purchase Order Screen is shown below:
This means that you are asking the vendor to have the ordered products to you by the indicated date. However, if desired, you can change terminology on the printed purchase order. For instance, you may wish to use the term "Ship Date." This would mean that you want the Vendor to ship the products by the indicated date. You have 12 characters of space available. Note: Use title case for the label (i.e. Ship Date not SHIP DATE. AnyPO will place it in all caps when needed.
Use the following label (on the Screen and Printed PO) instead of Job # The "Job/Account" field is located here on the Main Purchase Order Screen:
If you don't use Job Numbers, you can use this field for other purposes. For example, you might use it for account codes. This particular field has a pop-up box associated with it. For account codes, you could list the codes in the pop-up box and select the appropriate one instead of re-typing them. To indicate pop-up box contents, select OTHER TASKS >> EDIT VIEW JOB CODE LIST. You can change things by indicating a new name. You have 5 Characters of space for this label. Note: Use title case for the label (i.e. Accnt not ACCNT. AnyPO will place it in all caps when needed. More information on how to use Job or Account Codes is found here.
Use the following label (on the Screen and Printed PO) instead of FOB The FOB field appears here on the Main Purchase Order Screen:
On the printed PO, this field appears on the same line as the shipping method. If you'd rather use a label other than FOB, indicate it here. Many businesses which purchase and ship internationally use "IncoTerms" instead of FOB terminology. You are not limited to using this field for shipping related purposes. You change its use to your liking. You have 10 characters of space available, but it's best to keep the label as short as possible. Note: Use title case for the label (i.e. Accnt not ACCNT. AnyPO will place it in all caps when needed.
Use the following Label for the Fed ID, VAT or GST Number Field (on the Printed PO) The Fed ID, VAT or GST Number is found in the Vendor Database (accessed by clicking on OTHER TASKS >> VENDOR ADDRESSES & NUMBERS). You can place a checkmark beside it if you want this number to appear on the printed PO. As long as the vendor you have entered on the Main PO Screen has a Vendor Number (in other words, it's been included in the Vendor Database), the Fed ID, VAT or GST Number will be included on the printed PO. Normally, AnyPO uses the label "ID Num" for this field, but if desired you can indicate a more appropriate label here. You have 6 characters of space available. Below is an example:
On the Main Purchase Order Screen, replace the word 'Cat #' in the label 'Your Cat #' with In the Item Area on the Main PO Screen, the second column called "Your Cat #."
If you are a re-seller, you will use this column to enter your own catalog number, ID Number or SKU (Store Keeping Unit). You'll also use this column if you use AnyPO along with AnyBook or AnyOrder. Some businesses who use AnyPO, however, may not have their own catalog or ID numbers. In most situations, you'll leave it blank, but it can be used for other purposes if needed. One of the alternative purposes for this field is to use it for account numbers. The following shows the Item Area with the name change:
If you do use it for another purpose, you may also wish to change its name in the Stock Ordering Database. To change the name in the Stock Ordering Database, select STOCK TOOLS >> STOCK ORDERING DATABASE. Once in the Stock Ordering Database, select FILE >> RE-CONFIGURE YOUR CAT # FIELD. Note that the "Your Cat #" field appears on the Main PO Screen and the printed PO. If you do use it, be aware that its contents will also be seen by your Vendors. You have 5 characters of space available.
On the Main Purchase Order Screen, replace the field label 'Terms' with The "Terms" field is located on the lower portions of the Main Purchase Order Screen:
The terms field also appears on the printed PO. If you don't include vendor terms on your PO's, you can use the field for other purposes. It can be used to categorized your PO's. For example, in the sample printed PO below, it's been used to allocate orders to departments within the business:
In the Level III program, the terms field can be used to hold a PO attachment such as quotes, spreadsheets, etc. In the illustration, below, the terms field is being used to hold attached documents to the PO:  In this example, the Terms field has been re-configured to hold an attachment to the PO. It's been re-named "Attachment." Notice the new buttons: "B" means browse and allows you to select a file. "V" means view and allows you to open and view the file.
The label that you indicate appears on the Main Purchase Order Screen The contents of the terms field shows on the printed PO, but it appears without the label. More details on the uses of the terms field are found: here. You have 11 characters of space available. Note: Use title case for the label (i.e. Message not MESSAGE. Because of space restrictions, the label only appears on the large screen size setting for the Main PO Screen. The field, however, appears on both the large and small screen sizes.
Use the following term (on the screen and printed PO) instead of 'UDF Field1' In addition to the fields, above, you have three other fields which may be used for your own purposes. These appear near the bottom of the Main PO Screen, just above the Notes area.
The first two have labels. The third doesn't include a label. All three fields also show on the printed PO. When these fields have contents, they appear just below the Vendor's name and address. You have 10 characters of space available for each label. Because of space restrictions, these fields only appear on the large screen size setting for the Main PO Screen.
Use the following term (on the screen and printed PO) instead of 'UDF Field2' As mentioned above, you have three other fields which may be used for your own purposes. These appear near the bottom of the Main PO Screen, just above the Notes area. The first two have labels. The third doesn't include a label. All three fields also show on the printed PO. When used, they are located just below the Vendor's name and address. You have 10 characters of space available for each label. The three user fields, if used, will appear on the printed purchase order. They are placed just below the Vendor's address. The same labels that you set up for the screen appear on the printed PO. If the contents of the fields don't line up properly with their label, you can make adjustments from the "Print Purchase Order" dialog box (FILE >> PRINT PURCHASE ORDER >> More Options >> Vendor Address and Field Adjustments). |