| Drop Shipments |
|
|
This is a Level III feature
A drop shipment is when you place an order with a vendor and the vendor ships the goods directly to a customer. To create a drop shipment, do the following: 1. Enter (or paste) the vendor's name and address to the Main Purchase Order Screen. 2. Place a checkmark in the "Drop Ship" box at the top of the screen
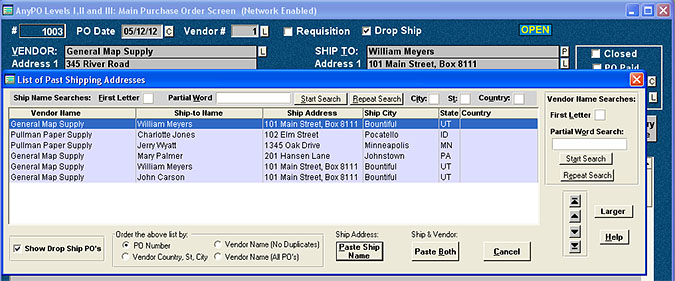
3. Enter the name and address of the customer (the name and address where the vendor should ship the goods.) By placing a checkmark in the "Drop Ship" box, you'll be able to identify which purchase orders are associated with drop shipments. It allows you to separate out your drop shipment for reports - or filter for drop shipments. It's also useful if you find that you've pasted in the wrong vendor's name and you need to paste in a new name. If "Drop Ship" is checked, AnyPO will only paste to the "Vendor" address fields. It will not paste over any information in the "Ship-to" fields. Using a Pop-up List to Paste a Customer Address If you have created a drop shipment for one customer, you may find, in the future, the need to create another drop shipment for the same customer. To locate and paste a previous customer's name and address to the "Ship-to" fields, select EDIT >> DROP SHIPMENTS: PASTE FROM SHIP-TO LIST. A convenient way of accessing this list is by holding down CTRL key and double-left-clicking with the mouse in the "Ship-to" field. You can also access it by pressing CTRL+H. Here's the pop-up list that appears:
More About the Pop-up List The list which appears when you select EDIT >> DROP SHIPMENTS: PASTE FROM SHIP-TO LIST will be filtered for any PO with the "Drop Ship" box checked. This helps limit the list to only those PO's with which you are concerned. If desired, you can remove the filter and display all purchase orders. To do that, remove the checkmark from: "Show Drop Ship PO's." Currently, AnyPO does not have the ability to sort the list alphabetically by the Ship-to Name. (It can be sorted by vendor names.) To sort by the Ship-to Name requires a database change, and we are waiting to add that ability in the future when we have a major update. Despite this temporary drawback, you can move through the list by typing in the first letter of the name or you can enter a partial name and click "Start Search." If, after clicking "Start Search," the name that appears is not the correct one, click on "Repeat Search." Additional ways of finding the customer include the following: City. When the cursor is in this box, type in the first letter of the city of the customer's address. The "City" box operates the same as a first letter search. You continue typing the first letter until you reach the desired customer. St. When the cursor is in this box, type in the first letter of the state or province of the customer's address. The "St" box operates the same as a first letter search. You continue typing the first letter until you reach the desired customer. Country. When the cursor is in this box, type in the first letter of the country of the customer's address. The "Country" box operates the same as a first letter search. You continue typing the first letter until you reach the desired customer. When you have located the proper customer, click "Paste Ship Name." This will paste the name and address to the "Ship-to" fields on the Main Purchase Order Screen. If you'd like to paste the vendor name in addition to the ship-to name, click the "Paste Both" button. You can make the pop-up list larger by clicking the "Larger" button. You can also page through the list by using the up and down VCR buttons. Scroll Wheel Configurations. The scroll wheel on your mouse can be used to scroll through the list. There are two configurations of the scroll wheel. In its default setting, the scroll wheel becomes active when you click in the list. However, you can change the setting so that the scroll wheel becomes active when the mouse is passed over the list. Under this configuration, it is not necessary to click on the vendor list. All that is necessary is to move the mouse over the list. You can tell when the scroll wheel is active by the color in the vendor list. When the background color turns white, the scroll wheel is active. To change from one scroll wheel configuration to another, click on the "Larger" button. This increases the size of the box and allows you to see an additional checkbox: "Activate scroll wheel immediately by moving mouse over vendors." Either place a checkmark here, or remove it, depending on your preference. Note: The scroll wheel configuration that you set here will also be used by the Vendor pop-up lists. Providing the Customer With a Packing Slip or Order Acknowledgment AnyPO can create a printed packing slip which you can send or fax to the customer. It also can creates an HTML and text version of the packing slip which can be emailed to the customer. Note that you do not necessarily need to use the "Packing Slip" title. For example, many businesses will use the title "Order Acknowledgment" which indicates to the customer that you have received and processed their order. You have flexibility to change the title of the document that you send to the customer. That's done from the Print Purchase Order dialog box in "More Options" Sending a Printed Packing Slip to the Customer If you are dealing with drop shipments, you may wish to print and send a packing list (or order acknowledgment) directly to the customer. (Or you may wish to provide the packing slip to the vendor that they enclose with the shipment.) That's done by selecting FILE >> PRINT PURCHASE ORDER and selecting the "Packing Slip" option (more about: printing). The packing list (or order acknowledgment) includes a listing of the item(s). Only the customer's name and address appear on the document - the vendor's name does not appear - and all prices are removed. Emailing a Packing Slip to the Customer You may also wish to email the customer a packing list (or order acknowledgment). To do, you'll want to enter both the vendor's and customer's email addresses on the Main Purchase Order Screen. Place the vendor's email address in the "Email" field, and place the customer's address in the "Notes" area. The email program is set-up so you can utilize each of the email addresses. You can place the order by sending the vendor an email with the PO attached. You can also send the customer a copy of a packing slip (or order acknowledgment) attached. The details on how that's done are found here: Email & Drop Shipments
AnyBook and AnyOrder Users If you using AnyPO in combination with AnyBook (publishing business software) or with AnyOrder (general invoicing the order processing software), we have prepared special information which describes the drop shipment process: Drop Shipments With AnyBook/AnyOrder
|