| Email Screen |
|
|
This is a Level III feature
The Internal Email Client is accessed from the Main Purchase Order Screen. Look to the right of the "Email" address field (lower, center of the screen), and you'll see three buttons. The third button ("Open") opens the internal email program and allows you to personalize the message before sending the PO to the vendor:
"Open" can also be activated by selecting OTHER TASKS >> OPEN INTERNAL &EMAIL PROGRAM - MANUAL MODE. It also has a quick key combination: CTRL+G. When you click on "Open," the Email Screen appears:
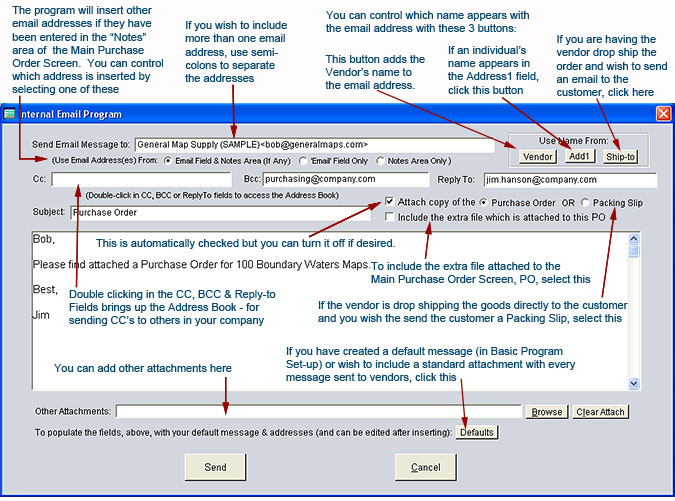
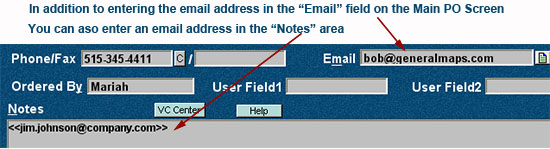
Note that in order to use the Internal Email Program, you must, first, enter some information in Basic Program Set-up. To do so, select FILE and BASIC PROGRAM SET UP from the Menu Bar. Click on the "Email Set-up" tab on top of the page. The Email Set-up page will appear: More Information Email Screen When you click on the "Open" button, a form appears on which you type out a message to the vendor. If desired you can manually enter additional names and addresses. Separate any additional addresses with semi-colons." If you have entered co-workers email addresses in the Address Book, you can insert any of those addresses in the Cc, Bcc or Reply-to fields by double-clicking in those fields and selecting the appropriate person. Attach Copy of PO By default, the email program will attach a copy of the PO. If you don't want the PO attached, remove the checkmark. AnyPO actually attaches two copies of the purchase order. One is in HTML format which looks just like the printed version of the Purchase Order, and the other is a text version of the PO. The reason for this is to make sure that your purchase order gets through to the vendor. It's rare, but some email programs will block HTML attachments. That's why AnyPO also sends a text copy of the PO. All email programs will accept text attachments. No matter how rigid an email system used by the vendor, you can always be assured that your purchase order will get through to them. Defaults Button: Default Message & Default Attachment If desired, you can insert a standardized message into the email. Do that by clicking on the "Defaults" button. The standardize message along with any CC, BC, or Reply-to addresses that you have indicated in Basic Program Set-up will be pasted in place. You can, if needed, alter the standardized text and send the email to the vendor when you are ready. In addition to the standardized message which appears when you click "Defaults," you can also have the program include an attachment. Some businesses like to include a document with every PO they send out which lists their purchasing policies. You can designate an attachment at the same time that you prepare the standardize message in Basic Program Set-up. Entering Additional Email Addresses in the "Notes" Area Normally, you enter email addresses in the "Email" field on the Main Purchase Order Screen (shown below). But if you need to send the message to two or more individuals, you can enter additional email addresses in the "Notes" area. The illustration below shows how to set things up for two individuals. When the Email Screen appears, it will include the email addresses of both individuals. (More on how to use the "Notes" area for email addresses is found below.)
Associating Names With Email Addresses You may wish to change the name associated with the email address. If the individual to whom you wish to send the email is found the Address1 field on the Main Purchase Order Screen, click the "Add1" button. If you find that you need to return to the Vendor's name, click the "Vendor" button. If the name of the individual to whom the email should go is found in the Ship-to field, click the "Ship-to" button. (If you are sending a message to the "Ship-to" person, it's probably a drop shipment situation which is explained next.) Some businesses who utilize AnyPO may instruct the vendor "drop ship" the goods directly to the customer. In such situations, the customer's name will be entered in the "Ship-to" address field. (More Information: Drop Shipments.) But, in addition, to the customer's name, you'll need the customer's email address. Usually, the vendor's address will be in the "Email" field on the Main Purchase Order Screen. That field is taken, but you can enter the customer's address in the "Notes" area (see below on how to use the "Notes" area for email addresses). Let's run through how this all works. First, you would enter vendor's address in the "Email" field, and then you would enter the customer's address in the "Notes" area (using the format described below). When you first open the email screen, both email addresses (vendor and customer) will be inserted in the "Send to" blank. You can indicate which address you want by making a selection from "Use Email Addresses" (circled below):
Let's say you want to send an email to the vendor. To do that, select "Email Field Only" (shown below). When this option is selected, the program will eliminate the customer's email address from the "Notes" area and the email will be addressed to the vendor.
If you sending an email message to the customer, select the "Notes Area Only." This will eliminate the vendor's address and email will be addressed to the customer. At the same time, you'll probably also click on "Ship-to" to insert the customer's name alongside the email address (shown below). Finally, you may also select "Packing Slip" (circled below) if you want to send the customer a copy of the items ordered and an acknowledgment that they are on their way. (Note that you have the flexibility to change the title "Packing Slip" to "Order Acknowledgment" or another suitable title by making the adjustment here: Printing More Options.)
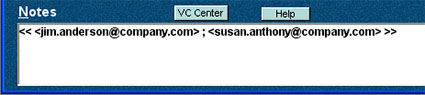
Long Email Addresses On rare occasions you may run into an email address that doesn't fit in the email address field on the Main Purchase Order Screen. In those cases, leave the email address field blank and enter the address in the "Notes" area. Surround the address in double angle brackets, like this: <<jacqueline.zimmermann@someverylongnamedcompany.com>> If you click on either the "Open" or "Auto" buttons and if AnyPO doesn't find an email address in the email address field on the Main Purchase Order Screen, it will look in the Notes area. If it finds an address surrounded by double angle brackets, it will use that address. Note that if you wish to add a name along with the above address, then you must surround the email address, itself, with a set of angle brackets: << Jacqueline Zimmermann <jacqueline.zimmermann@someverylongnamedcompany.com> >> Use of the "Notes" area in relation to email addresses is explained in more detail below. Notes Area: More Than One Email AnyPO has quite a bit of flexibility associated with entering email addresses in the Notes area. As noted above you can enter a long email address that won't fit in the normal "Email" field on the Main Purchase Order Screen, but you can also use the Notes area to enter more than one email address. To enter more than one, you must (a) separate them by semi-colons; (b) delineate each by angle brackets; AND, (c) you must include all of this in double angle brackets. For example: << <jim.anderson@company.com> ; <susan.anthony@company.com> >> Here's how it would look in the "Notes" area:
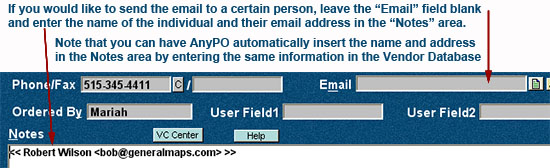
Here's an example of three emails included in the Notes area: << <jim.anderson@company.com> ; <susan.anthony@company.com> ; <orders@company.com> >> It's helpful that you include spaces between the double angle bracket and the single angle brackets. It makes it easier to make sure that you've included all the brackets, but the spaces are not absolutely necessary. AnyPO works with or without the space. However, make sure that there is no space between the double angle bracket: << or >>. Notes Area: Including Names You can include names with the addresses in the Notes area. If the name of the vendor (which AnyPO inserts) is not quite what you need, you can leave the email field blank and enter a name and address the Notes Area. Use the same rules as above: (a) separate the names and addresses by semi-colons; (b) delineate the email itself by angle brackets; AND, (c) you must include all of this in double angle brackets. Here's an example: << Susan Anthony<susan.anthony@company.com> >> Here's how it would look on the Main Purchase Order Screen:
If you are always using this individual's name when sending emails to this vendor you can have AnyPO insert the name and email address into the Notes area every time you paste vendor on the Main Purchase Order Screen. To do that enter the name and address in the Notes area in the Vendor Database. Anything in the Notes area of the Vendor Database will be pasted to the Notes area of the Main Purchase Order Screen. If the address in the "Email" field works fine for you, but you need to send out emails to others, their names and address can be included in the Notes area. Here's an example of how you enter two individuals and names in the Notes area: << Jim Anderson<jim.anderson@company.com> ; Susan Anthony<susan.anthony@company.com> >> It is not necessary to include names with all of the email addresses that you have listed. You can have a name on one and none on the other. Here's an example: << Jim Anderson<jim.anderson@company.com> ; <susan.anthony@company.com> >>
Email Limits You can include several email address but there is a space limit. The limit of the email addresses and names combined is 250 characters. If you are adding several emails, and they won't quite fit, try abbreviating the names to cut down the amount of character space. For large numbers of emails use AnyPO's built-in bulk email program.
|