Details on the "Email Set-up " Page


|
Basic Program Set-Up: Details on the "Email Set-up " Page |
|
|
This is a Level III feature To reach the Email Set-up page, select FILE and BASIC PROGRAM SET UP from the Menu Bar. Click on the "Email Set-up " tab on top of the page. The Email Set-up page will appear:
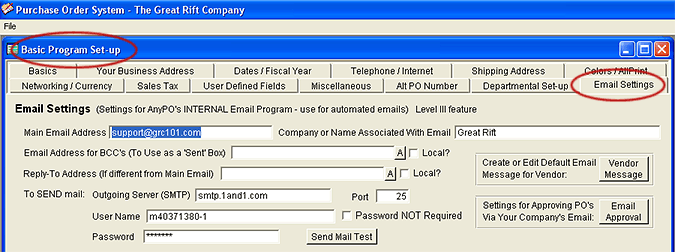 Start at the Main Purchase Order Screen and select File >> Basic Program Set-up from the menu. When the "Basic Program Set-up" screen appears, click on the "Email Settings" tab to reach the Email Set-up Page.
This feature provides you with a built-in email client. Most of your email correspondence in relation to purchasing is best done using your normal email program. But there are two purposes for which AnyPO's built-in email client is very useful:
IMPORTANT NOTE: the email account that you use must be with an Internet Service Provider (ISP). AnyPO's internal email is not designed to work with Yahoo, Gmail, HotMail and other web-based email. We can customize the program to work with web-based mail, but it does required extra charges in order to do that. ISP email accounts are very inexpensive (some less than $20 US a year). You can have multiple accounts and pick your own identifiable domain name. Here's an example that works well and is inexpensive: 1&1 Note that AnyPO doesn't use a "Sent" mailbox to store copies of your sent PO's, but you can send blind copies to another company mailbox as a way of tracking your sent mail. Also it's important to note that since AnyPO doesn't currently have receiving capabilities, you'll want to use your normal email program to monitor outgoing mail – or responses to sent mail. In order to use the email system, you need to enter the follow basic set-up values.
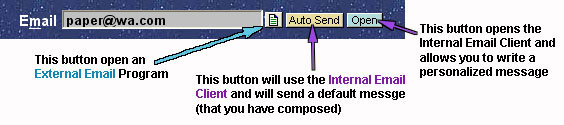
Main Email Address Type in the Email Address of the email account that you want to use to send purchase orders to the vendor. This will be the email account that AnyPO will access with its internal email program. Company or Name Associated With Email This is the name that will appear alongside your email address. In most cases, you'll type in your company name here. But you may, also, use 'Order Department' or 'Customer Service' - or if it's personal business, you may type in your own name here." Email Address for BCC's (To Use as a Sent Box) As mentioned above, AnyPO doesn't use a "Sent" mailbox to store copies of your sent PO's. Instead, you'll want to use one of your company's mailboxes to receive blind copies. This allows you to keep a record of emails sent. It serves as the default "sent" box. Most companies will use one mailbox that all employees share for purchase related emails. To set things up this way, leave "Local" unchecked. When "Local" is unchecked, the address that you enter in the BCC field is global in scope - meaning that the address is available to everyone on the network. You can, however, configure the program so that each individual has their own BCC mailbox. To that, place a checkmark beside "Local." Local means that the BCC address is only available to that workstation. You could repeat the same address if needed, but it's not automatically picked up another workstation. You have to manually enter the address again at each workstation. The "Local" checkbox, itself, is global in scope. If you place a checkmark here, all workstations will have it checked as well. That means, in general, if you select "Local" you'll need to enter an address on each workstation. However, there is trick that you can use. If you enter an address on the server computer (even with "Local" checked), that address will be picked up by any workstation in which the BCC field is left blank. That's handy to know. You can enter an address on the server, and set up a couple of the workstations with their own BCC address, and any workstations without an address will pick up the BCC address from the server computer. One last note. If you have entered email address into the internal address book, you can access the addresses by clicking on the "A" button. Reply-to Address (If Different from Main Email) This an optional field, but it may be useful for some business environments. This field, if used, is often local in scope (the "Local" box is checked). Each company employee generally has their own mailbox, and that's usually the address that will entered here. As noted above, emails in AnyPO are sent for one of two purposes. One purpose is to sent a vendor a PO. The internal email client in AnyPO is the most convenient and quickest method to send a PO to a vendor. It's done with a click of a button. (You may also conduct correspondence with a vendor, but that's best done using your regular email program.) The other use of email in AnyPO is to approve PO's. You can configure AnyPO to send an attachment to a director or a person with approval authority. When director receives the email and opens the attachment, the AnyPO program automatically starts on the director's computer and is immediately taken to the PO that needs approval. For either of these purposes, it's helpful for each person using the program to have a "Reply-to" address. To set things up this way, place a checkmark in "Local." (As mentioned above the "Local" checkbox, itself, is global in scope. If you place a checkmark here, all workstations will have it checked.) Having said this, it is entirely possible to leave this blank or to use a global setting ("Local" left unchecked). If you will be sending PO's to vendors, and won't be using the email approval system, you may wish to have all correspondence coming into one mailbox. If the "Reply-to Address" field is left blank, then all response mail will come to the Main Email Address above. Or if you enter a different address here and leave "Local" unchecked then all response mail will come to this address. You can also access the internal address book from this field by clicking the "A" button. Outgoing Server (SMTP) AnyPO needs to have the address of the outgoing email server. Look in the documentation provided by your Internet Service Provider. You should find a reference to the name of the outgoing email server. You are looking for a name similar to: smtp.company.com Type in the name exactly as appears the documentation. Port The port number tells AnyPO which doorway it should use to access the outgoing email server. It is often port 25, but another fairly common port is 587. It is also possible that it could be another number. Check the documentation provided by your Internet Service Provider. User Name This is the user name for your email account. The user name may be provided to you - or it may be a name that you create. A combination of your user name and password allows you to send emails. Check your email provider's documentation for details. Password This is the password that you use to send emails. (The password to send - and receive - emails is almost always exactly the same.) Type the password into this field. Password NOT Required This field is almost always left unchecked. It's very rare for email programs not to require a password for outgoing mail Send Mail Test Click this button to test your email settings. You'll be able to enter an email address. Use an email address that you can access. Then try sending an email. If you do not receive the email, then you'll want to re-check your settings. Vendor Message Button By the press of a button, you can email a vendor a purchase order. This feature allows you to prepare a standardize message to go along with the PO. (The button that you press is the "Auto Send" button found on the Main Purchase Order Screen near the email address.) To access a form which allows you to compose the standardized message, click on the "Vendor Message" button. A form will open which on which you can write short cover letter to go along with PO's being emailed to vendors. Along with the standardized message, you'll also be able to indicate any CC's, BCC's or Reply to addresses you want included. You can also access the standardized message, by clicking on the "Open" button. This brings up an email form on which you can type a type a personalized message, but, additionally, you'll find a "Defaults" button on the email form which when clicked will insert your standardized message (and CC, BCC, etc). Here's what the "Auto Send" and "Open" buttons look like on the Main Purchase Order Screen:
Email Approval Button Depending on your business, you may wish to use email to request approval of some or all PO's. You can select a menu choice on the Main Purchase Order Screen (ORDER TOOLS >> SEND EMAIL FOR APPROVAL) to request that a department head or a director approve a purchase order. This feature allows you prepare the program for that purpose. By clicking the "Email Approval" button, a dialog box opens on which you can indicate where "request for approval" emails should sent, along with other information. For more information, see: Using Email to Approve PO's Incoming Email Settings Incoming email features are planned for a future update to the program. External Email Feature If you don't have a Level III program, you can use an external email client. Email programs that you can use include Microsoft Outlook, Outlook Express, Thunderbird, Pegasus, etc. By typing in an email address in this blank and clicking the button, you can test to see if AnyPO is able to activate your email program. In order to do the test, you need to have an email program installed on your computer. If the test doesn't work, you may need to make an adjustment in Windows. For trouble shooting information, see Email and Websites. Check here if you do not wish to use the Email feature. If you would rather not use the email feature in AnyPO, you can check this box and whenever you click the button beside an email field, the address will be placed in the clipboard. You can then open an email program and paste in the email address.
|