| General Printing and Printing Purchase Orders |
|
|
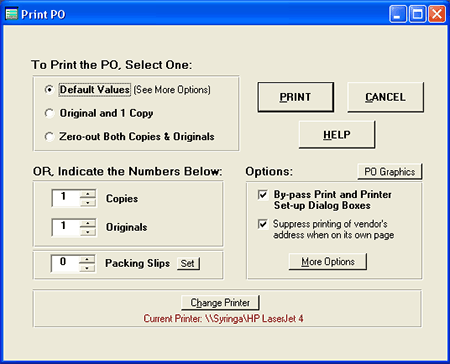
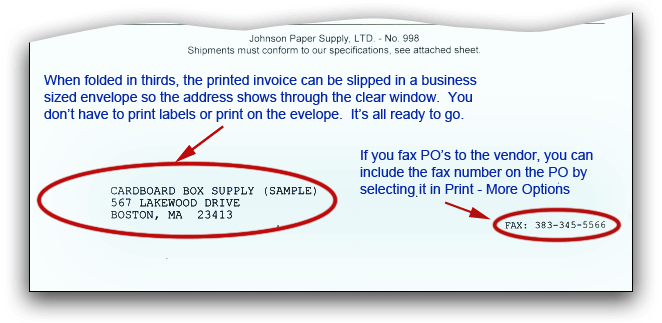
To print a purchase order or packing slip, make sure that the purchase order you want printed appears on the screen. You can use Page-Up or Page-Down to get to it. When you arrive at the proper purchase order, select from the Menu Bar: FILE and PRINT PURCHASE ORDER. Or click on the "Print" button on the bottom right of the screen. In either case, the Print Dialog Box will appear: You can select from several different options on the top half of the screen, including printing a printing one original and one copy, or other combinations. If desired, you can also set the number of copies and originals on the bottom half of the screen. Note: You'll also see an option for packing slips. This is a Level III feature which allows you to print a special packing slip. It can be used in situations where you might order an item and have the vendor ship the item directly to the customer. The packing list includes a listing of the item(s) and can be sent directly to the customer. Only the customer's name and address appears on the packing list, and all prices are removed. The first choice on top of the screen is "Default Values." Default values are set by clicking the "More Options" button on the Print Dialog Box. If you always need two copies and one original each time you print a purchase order, you can set these numbers as default values so they always appear when the Print Dialog box is activated. Make sure that you always print one copy of each purchase order for your records. If you are ever faced with hard drive failure, combined with losing the data on your backup disk, the printed purchase orders will allow you reconstruct your past orders and continue operating your business. The Print Dialog Box gives priority to your choices on the bottom half. If you make changes there, that's what will be printed. If no changes are made, then whatever is selected on the top half will be printed. Preparing a Purchase Order for Mailing You'll notice that after printing a purchase order the vendor's address will appear at the bottom of the printed purchase order as shown below:
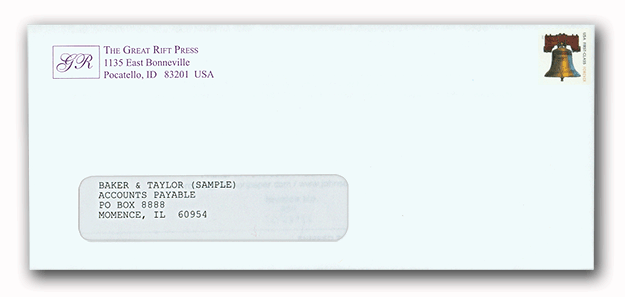
The address is lined up on the paper so that when folded, it will show up in the window of business envelope. This is a handy feature and makes things much easier for you since you don't have to address envelopes. To prepare a purchase order for mailing, fold it into thirds with the writing on the outside. Make sure the bottom of the purchase order sticks out (¼ or ½ inch) beyond the folds. This way when the bottom of the purchase order sits against the bottom of the envelope, the address will be properly lined in the window. Here's an example:
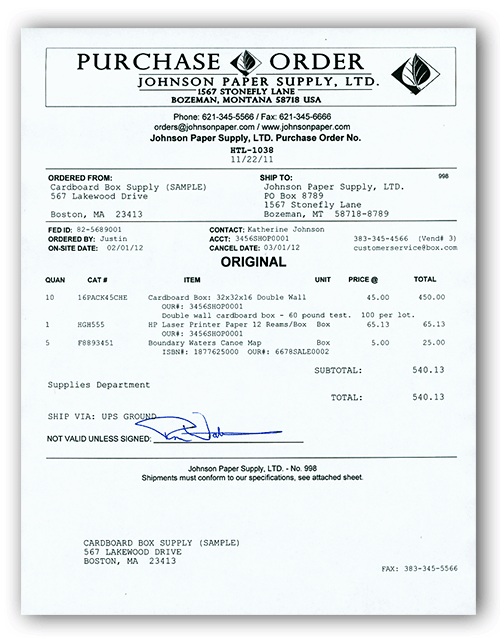
AnyPO uses a standard windowed envelope. Be aware that there are also non-standard sized envelopes on the market. To make sure you purchase the correct envelopes, print out an purchase order. Take the PO to the store where you purchase your envelopes. Fold the invoice with the writing out as described above. You want the very bottom of the PO to sit against the bottom of the envelope, not the folds. Place the PO in the envelope and make sure the address lines up correctly in the window. (Note: if you already have a non-standard sized envelope, it is possible to adjust the placement of the address. See Address Adjustment for more information.) Most businesses purchase their envelopes from a local printer. That way you can have your return address (and logo, if desired) printed on the envelope (as shown in the example above). Be sure, however, to bring an purchase order with you to the printer and make sure the address lines up properly in the window of the envelope they will be using. With a normal purchase order, the vendor's address is printed at the bottom. In Level III, you also have the option of printing a packing slip. A packing slip would be used in a situation where you order products from a vendor, but the products are sent directly to a customer. This feature allows you to create a "Packing Slip" which you can send to the customer - or it can be provided to vendor to enclose along with the products. In the case of a Packing Slip, the customer's name (the "Ship-to" name) is printed at the bottom. Thus, if needed, the packing slip can be placed in a windowed envelope, attached to the package and used as a shipping label. Stopping a Print To stop a print job, press the <ESC> key on your keyboard. Note that by the time you press <ESC> some or all of the pages may have already been sent to the printer queue. If not all of the pages have printed, you can cancel any remaining pages by selecting your printer from the Windows control panel (or task bar) and choosing the 'Cancel Printing' menu option." Purchase Order Graphics If desired you can add graphics or logos to the purchase order. For more information: Purchase Order Graphics. Options By-pass Print and Printer Set-up Dialog Boxes. This is one of two ways in which you can change printer or print settings. (Also see, "Change Printer" below.) To use this method, take the checkmark off of "By-pass Print and Printer Set-up Dialog Boxes." Print and Printer Set-up are the normal dialog boxes which appear whenever you print in Windows. Since going through these dialog boxes every time you print an PO is time consuming, they are by-passed as a convenience. If you ever want to make a printer or printer setting adjustment, however, it's just a matter or removing the checkmark. Suppress printing of vendor address when on its own page. If you have a long list of items that you are shipping, there may not be enough room on the page to print the item list and the address. However, if need be, you can tell the program to print the address on a separate page. On the Print Dialog Box, remove the checkmark from the box labeled: "Suppress printing of vendor address when on its own page." This will allow a separate sheet of paper to be printed with the vendor address (for purchase orders) or shipping address (for packing slips - if you use that feature) in the correct position for windowed envelopes. Packing Slips. This is a Level III option. This feature is used primarily by businesses that utilized drop shipments. A drop shipment is when you place an order with a vendor and the vendor ships the goods directly to a customer. If the vendor is sending the goods directly to the customer, you may wish to provide the vendor with a packing slip to enclose with the order. Or you may wish to provide the customer with the packing slip. You are not, however, limited to the title "Packing Slip." Rather, you may wish to use the title "Order Acknowledgment" which indicates to the customer that you have received and processed their order. You can make changes to the title in More Options. If you select this option, the document that is printed includes your company's name, the customer's name and address and a listing of the item(s) they ordered. Note that vendor's name and address does not appear, and all prices are removed. More information: Drop Shipments Preview / PDF File Print In "More Options," you can turn on a feature which allows you to preview purchase orders, and to create and print PDF files. For more information, see More Options. Change Printer By clicking on this button, a dialog box will appear from which you can select a different printer. You can also change printers by removing the checkmark from "By-pass Print and Printer Set-up Dialog Boxes." More Options Click on the "More Options" button for additional purchase order printing options. Create HTML File and Print The HTML Print button has been removed. Newer Microsoft Operating Systems no longer support it. By clicking on this button, an HTML file named PO.htm is created. Once the file is created, the default browser prints the file. Since this feature uses calls directly to the Windows operating system, it may not work with all printers. Nonetheless, we wanted to include it in event that it helpful to some users. This feature may be useful in a couple of different ways. It creates an HTML file which you can edit if desired using an HTML editor. It also provides an additional way of printing should you have problems with other printing methods. Secondary Print Engine Note: The Secondary Print Engine (which was created for very old print drivers) is no longer needed. Manufacturers have long ago updated their print drivers, and it is no longer necessary. If your printer works fine with other software, it should work fine with this program. The program simply sends information through the existing print drivers installed by Windows. However, compatibility problems sometimes exist, and a secondary printer engine is available should you have any problems. To activate it, click on "Secondary Print Engine." Sample Printed Purchase Order The printed sample PO shown below incorporates the company logo in the top several lines of the purchase order: More Information. The sample includes a signature line, but there are other approval methods. You can add or remove the signature line in Printing More Options.
|