General Information


|
Product Information Database: General Information |
|
|
If you don't want to worry about using catalog numbers (or SKU's), you can simply type-in an item and its price on the Invoice Screen. The program will work fine without catalog numbers. However, it is much easier if you assign catalog numbers to your products. If you do, you'll be able to select from a pop-up list and have AnyOrder enter products on the invoice for you. It's easy, quick, and, by far, the best way to go. Also, if you would like to keep track of your inventory, find out how many products are sold or create royalty reports, then you'll want to make sure that you have assigned each of your products a catalog number. Catalog numbers are kept in the Product Information Database. To get there, select PRODUCT TOOLS >> PRODUCT INFORMATION AND CATALOG NUMBERS. The Product Information Screen will appear:
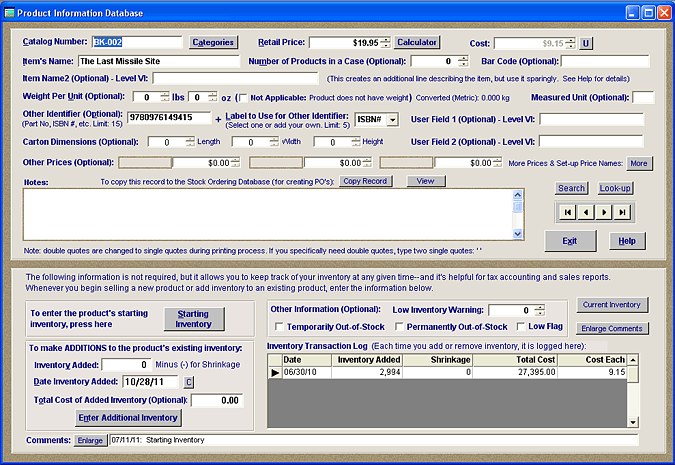
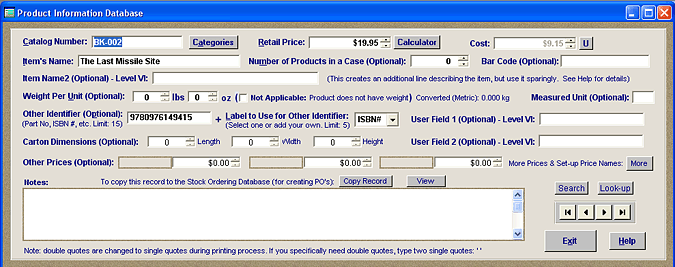
AnyOrder uses the terms Product Information Database and Product Database interchangeably. Be sure to enter information in the first three blanks: catalog number, retail price and item's name. The other blanks are optional. The following information has been divided into three sections:
Top Half of the Product Database Screen Many of the fields on the Product Database Screen are optional. There are only three that require information. Those three include: catalog number, retail price and item's name. The following shows the top half of the screen:
More information on each of fields on the Product Information Screen are found below:
When you enter catalog numbers or SKU's, choose a catalog number that is easy for you to remember. You can use letters, numbers, or a combination of letters and numbers. The only restriction is that you can't use a forward slash. The forward slash is reserved for categories (described next). You can use up to 15 characters. (Note: if after issuing a number of invoices, you decide to change a catalog number, see the following information: Changing Catalog Numbers.)
If you carry a number of products, you may wish to place them in categories. For instance, you can place all books in a category, all maps in another category, etc. A category is a prefix added to the catalog number and consists of one or two letters and a forward slash. By clicking the "Category" button, the Category Prefixes dialog box appears on which you can set up categories. More information: Categories. In the second blank (retail price), enter the item's suggested retail price. (In the United Kingdom, you may use the term "base price.") This is your highest price, the price on which discounts are calculated. For instance, if you provide some of your customers with a 40% discount, the amount charged to them will be the item's retail price minus 40%. The maximum retail price accepted by AnyOrder is 99,999.99. Since the typical small publisher doesn't deal in products costing more than a couple of hundred dollars, this ought to provide plenty of flexibility.
The "Calculator" button opens the "Mark-up Calculator" dialog box. You can use this feature to calculate retail price from the wholesale or manufacturing cost. More information: Mark-up Calculator. The "Cost" field is the per unit cost of the product. If you purchased the item, it would be the cost you paid for it plus any shipping or ancillary costs. If you manufactured the item, it would be the per unit costs which go into creating the item. The cost field will be automatically filled in when you enter inventory information at the bottom of the screen. When entering inventory information, you'll be asked to enter the total cost of the inventory, and from this information AnyOrder calculates the per item cost. As time goes on and as you make more inventory entries, AnyOrder will automatically re-calculate per item cost. (Information on how cost is calculated is found here.) It's best to have AnyOrder calculate the cost you enter inventory, but you can also manually enter the cost. That's done by on the "U" (Unlock) button or selecting TOOLS and UNLOCK COST BLANK. This field is optional. You don't have to use it, but you'll find it very, very useful in several respects. Firstly, if you plan to keep track of your inventory, and you enter cost figures, you'll always be able to know the total cost of your inventory at any given time. Secondly, with cost information on each of your products, AnyOrder can calculate the all important "Cost of Goods Sold" figure. "Cost of Goods Sold" or COGS is essential for creating income statements, annual reports and doing your taxes. And finally, it is also used by AnyOrder to calculate gross profit on the sales of each product.
In the third blank, enter the item's name. The available space for the name is 36 characters. (Note that it's good practice to use only the first 33 characters. This leaves room for a non-tax designator should you need it and should be enough room for most product names. If not, you may need to abbreviate somewhat to fit in the allocated space. There are two restrictions with Item Names: 1) Refrain from using double quotes ("). Double quotes can interfere with internal processes which take place within AnyOrder. If you need double quotes use type in two single quotes: ''. 2. A back slash followed by NT (\NT) means "don't tax this item." You should avoid using "\NT" in a catalog number unless a particular item is never subject to tax. The \NT designator is used when you have a series of items on an invoice that are all taxed. By adding \NT at the end of an item's description you can remove it from being taxed. If you never have taxed sales, then it's not necessary to use the \NT designator. More Information Note that "NO PRODUCTS" will appear in the Item Name blank when all products in the Product Information Database have been deleted. If you find "NO PRODUCTS" in the item name, just erase it and type in a product name.
Level 6 (and higher) feature. This field is provided if you have a particularly long item name and it just doesn't fit in the first blank provided. If it all possible, try to use only one line for the name of your item. Inventory reports, product reports, copying, importing, and exporting all are much easier when the item name can be kept to one line. (Think of the item names that appear on grocery receipts. It is possible to abbreviate item names and still keep them understandable.) However, if it's not possible to keep the item name to one line, this field is available. When you paste the item to the Main Invoice Screen (by using the product pop-up list), both lines will be pasted at the same time and both lines will appear on the printed invoice.
Enter the number of items found in a case. For example, if the product is a book, you would enter the number of books found in a box. This is optional--and is for your information only. In this blank enter the ISBN, Part Number or any other identifier that you wish to appear on printed invoices. An "other identifier" is not required, but it is recommended that book publishers enter the ISBN number here. Most buyers use the ISBN number to order, and you'll want it to appear on your invoices. If the product is not a book, you can also enter a part number to provide your customers with an additional identifier beyond the catalog number. Part numbers may consist of numbers, letters or a combination of numbers and letters. Or you may enter a color or size or some other identifier. You have 15 characters available.
Give the "Other Identifier" a label. If it's an ISBN number, select ISBN from the drop down list. If it's a part number, select Part Number. Other choices on the drop down list are Item #, Size, and Color. You can also type in your own label for the identifier. (The length of the label is limited to 5 characters.) The label will appear on printed invoices just before the identifier. Here's an example: ISBN# 1877625043.
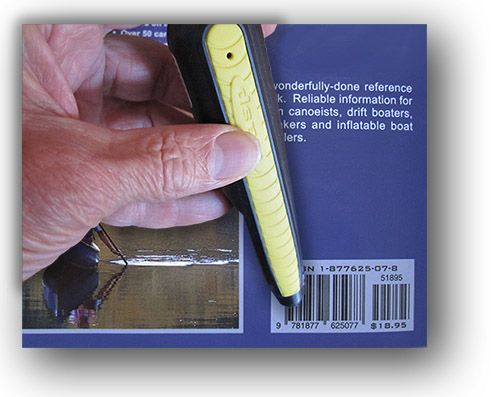
This blank is used to enter the numbers that make up the product's barcode. It's optional, but you'll want to use it if you plan to use Level 5 (or higher) program to scan products directly to your invoices. Even you have one of the lower levels, you may want to type in the barcode. If you ever upgrade to Level 5 or higher, you'll be all set to take advantage of the program's scanning capabilities. For more about barcoding, see Barcode Features. If you have the Level 5 program, the best way to enter the barcode is to scan it. There two ways to scan the number. The first is to place your cursor in the Barcode field, and the scan the item. As long as the Barcode field is empty, the barcode number will be scanned and pasted in the field. The second way to scan in the number is to open up the Barcode dialog box, by selecting TOOLS >> SCAN BARCODE & PASTE. Or you may press F8 on your keyboard. With the Barcode dialog box open, you can scan the product and the number will be entered for you.
If you don't have a scanner, type in the small numbers which appear under the barcode. Once you have barcodes entered, you'll be able to scan a product's barcode, and AnyOrder will automatically enter the name of the product, catalog number and price in the Item Area on the Main Invoice Screen. For more information on scanning product barcodes, see Scanning Product Barcodes You can also use this field to set-up your own product barcodes. If you are selling products in chain and retail stores, you will, of course, want to use product's proper barcode. Barcodes are assigned by the international agency which controls barcode numbers for your industry. For example, book publishers use the Bookland EAN barcode. Many general products use the UPC system. But, if you produce and sell products which are not sold in the normal market place, you have the option of using your own system. For example, if you're an artist or craftsperson, you may wish to use your own system to barcode your work. Additionally, you can use your own barcode system if you sell your products directly to consumers without going through other retailers. One of the features available to you in the Product Information Database is the ability to print barcode labels for your products. To do so, you need to start by making up a barcode number and entering it in the Barcode field. If desired, you can use your catalog number for the barcode number. To copy the catalog number to the barcode field, select TOOLS >> COPY CATALOG # TO BARCODE FIELD. Once you have a value in the barcode field, you can create barcode labels by selecting FILE >> PRINT BARCODE LABELS. (For more information: Printing Barcode Labels.)
AnyOrder will calculate the total weight of an order if you provide the item's weight. You don't have to enter a weight. It's optional. However, you may find this feature helpful since it allows you to calculate the shipping cost of an order. If you primarily work in the Metric system, you can change the units to kilograms. (Weight measurements are changed in Basic Set-up.) Be sure to enter the weight per unit. To figure this, you'll need a scale which measures in pounds and ounces (for the English system) or grams or kilograms (for the Metric System. If you don't have a scale, you can usually find one in the lobby of most post offices. Place one book (or one item) on the scale. Whatever the scale reads is the amount that should be entered in this blank. Note for Metric measurements: the kilogram blank allows for three decimal places. Thus, a product that weighs 5 grams would be entered as .005 kilograms.
Some items don't have weight. If you sell ebooks, software (over the Internet), consulting services, etc. then you'll want to check this box for such items. The reason that it's a good idea to check this box is that AnyOrder will not calculate total weight if it is missing the weight of one or more items in an order. When this box is checked, however, AnyOrder knows that it's OK to go ahead with the calculations. It just leaves out non-weight items and calculates the total weight of the rest.
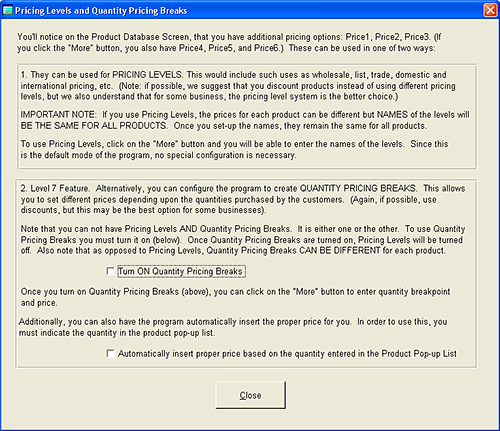
This area of the Product Database Screen is for different pricing options. There are two ways to use this:
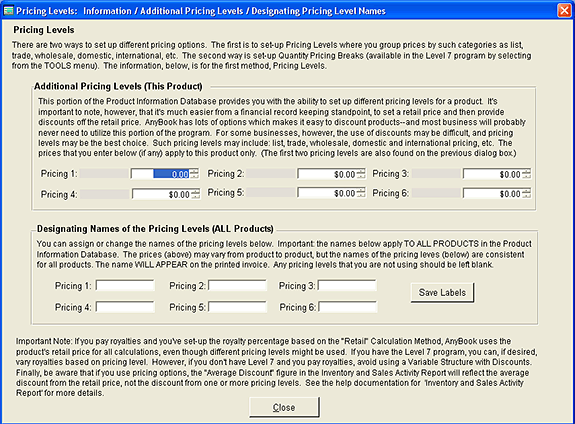
Each of the two options above are explained in more detail, below: If desired you can establish different pricing levels for the product. It's important to note, however, that it's much easier from a financial record keeping standpoint, to set a retail price and then provide discounts off the retail price. AnyOrder has lots of options which make it easy to discount products--and most business will probably never need to utilize this portion of the program. For some businesses, however, the use of discounts or different catalog numbers may be difficult, and you may need establish different pricing levels. Such pricing levels may include: list, trade, wholesale, special quantity, domestic and international pricing, etc. To set up pricing levels, click on the "More" button (beside "More Prices and Set-up Pricing Names.") The "Pricing Levels" dialog box will appear:
In the bottom half of the dialog box, you'll be able to establish names for each of the pricing levels. The names that you establish will be the same for all products. This means that you'll want generic names that would apply to any of products. You'll want to establish the names first. Type in the name and then click on "Save Labels" to save the information. After you click on "Save" the names will appear in the upper half of the dialog box. It's in the upper half of the dialog box that you can set the price for each pricing level. The prices that you establish are for that product only. (In other words, unlike the names that apply to all, the prices apply only to that product.) Once you have pricing levels established, you access them by activating the Product Pop-up List (click on the "Add" or "Place" buttons, the light blue buttons on the Main Invoice Screen.) From the dialog box that appears, select the product you want and the quantity. You'll have a choice of the pricing level. Select the appropriate level and its associate price will be pasted in the Item Area. You can see the pricing level on the Main Invoice Screen by extending the Item Area to the far right (by clicking on the right arrow just above the Item Area) The small column at the very end of the Item Area is the pricing column. Because of space restrictions, the pricing column isn't labeled, but it's the last column when the Item Area is expanded all the way. Pricing Levels are indicated by a number. To view a list of your Pricing Levels and the associated number, click on the "Toggle" button. The Alternative Product Entry Screen will appear. The Pricing Levels are listed on the right side of the screen. To paste the appropriate price associated with a pricing level, you must use the Product Pop-up List or Alternative Product Entry Screen. It's not possible to change a price by directly typing in a pricing number. However, but by activating the Product Pop-up List (or Alternative Product Entry), you can select a pricing level and the appropriate price will be pasted in the Item Area If you have the Level 6 or 7 program you can establish pricing levels for your customers. If you sell to one customer at certain pricing, you can designate the default pricing level in the Customer Database. Then, when you activate the Product Pop-up List, the default pricing level will be pre-selected. You can override the default if need be, but with this feature you no longer have to select the pricing level each time you activate the pop-up. The system works the same in the Alternative Product Entry dialog box with the default pricing level appear on the Product Pop-up List upon activating it. We want to remind you, however, if you don't need to use pricing levels, its best use discounts to provide lower prices to selected customers. Important Note: If you pay royalties and you've set-up the royalty percentage based on the "Retail" Calculation Method, AnyOrder uses the product's retail price for all calculations, even though different pricing levels might be used. If you have the Level 7 program, you can, if desired, vary royalties based on pricing level. However, if you don't have Level 7 and you pay royalties, avoid using a Variable Royalty Structure based on Discounts. Finally, be aware that if you use pricing options, the "Average Discount" figure in the Inventory and Sales Activity Report will reflect the average discount from the retail price, not the discount from one or more pricing levels. See the help documentation for the Sales Activity and Inventory Report for more details. Quantity Pricing Breaks - Level 7 Feature In the Level 7 program, you can configure the program to create QUANTITY PRICING BREAKS. This allows you to set different prices depending upon the quantities purchased by the customers. (Again, if possible, use discounts, but this may be the best option for some businesses). Note that you can not have Pricing Levels AND Quantity Pricing Breaks. It is either one or the other. To use Quantity Pricing Breaks you must turn it on (described below). Once Quantity Pricing Breaks are turned on, Pricing Levels will be turned off. Also note that as opposed to Pricing Levels, Quantity Pricing Breaks CAN BE DIFFERENT for each product. To turn on Quantity Pricing Breaks select TOOLS >> CONFIGURE FOR QUANTITY PRICE BREAKS. Place a checkmark beside "Turn ON Quantity Pricing Breaks."
Additionally, you can also have the program automatically insert the proper price for you. In order to use this, you must indicate the quantity in the product pop-up list. How does this work? You begin by activating the product Pop-up List by clicking on the "Add" button on the Main Invoice Screen. When the Product Pop-up List appears, you'll select the product and indicate the quantity. When you click on "Paste," the product is pasted to the Item Area, and depending upon the quantity that you've entered, AnyOrder will automatically select the proper price. If you'd like to use this feature, place a checkmark beside: "Automatically insert proper price based on the quantity entered in the Product Pop-up List." Once you have the program configured for Quantity Pricing Breaks (as described above), you can enter the quantity breaks and prices for each product. To do that, click on the "More" button on the Product Database Screen. A dialog box appears which allows you to enter the quantity breakpoint and the price. This allows you to set-up quantity pricing breaks. The quantities and prices that you indicate, are for each product. In other words, you'll want to set this up for each product for which you provide pricing breaks. The "Quantity" field should start with a number. (It can be followed by character, but the first part of it should always be a number.) The number that you enter is the "greater than" quantity at which the price break begins. For example, if you enter quantity of 4 and a price of $5.00, below, that means the price of $5.00 would begin at quantity of 5. Always start with Pricing1 and then go to Pricing2, and Pricing3 and so on. Don't leave any gaps. In other words, don't fill out a price for Pricing1 and Pricing3 but leave Pricing2 empty. That's a no-no. You don't have to completely fill out the list. You may have some products with 5 pricing breaks and others may only have 2 pricing breaks. That's quite all right. You can apply Quantity Pricing Breaks in one of two ways: Product Pop-up List. The Product Pop-up List is activated from the Main Invoice Screen by clicking the "Add" or "Place" buttons. At the bottom of the Product Pop-up List beside "Pricing" is a drop down box. By selecting the desired quantity breakpoint from the box, the price will be changed to the appropriate amount. To make this even easier, turn on the"Automatic Insert" feature (described) above. If you've turned this feature on, it's not necessary to select from the drop down list. All you need to do is to enter the quantity on the Product Pop-up List and then click on the "Paste" (or "Paste & Continue") button, and AnyOrder will automatically select the correct price based on the quantity. Alternative Product Entry Screen. The Alternative Product Entry Screen is activated by clicking on the "Toggle" button on the Main Invoice Screen. The Alternative Entry Screen has same quantity break options as the Product Pop-up List, but it also two additional useful features. On the screen, you'll see two buttons beside "Quan Check:" "This Item" and "All Items." These are helpful if you've entered products directly into the Item Area or if you've used the Product Pop-up List and neglected to enter quantities. If you click "This Item" button, it looks up the current product's quantity pricing breaks and depending upon the quantity, it will paste in the proper price. If you click on the "All Items" button, the program runs through all of the products listed in the Item Area, assigning the correct price based on the quantity. Note that if you pay royalties and you've set-up the royalty percentage based on the "Retail" Calculation Method, AnyOrderuses the product's retail price for all calculations, even though different quantity pricing breaks might be used. If you have the Level 7 program, you can, if desired, vary royalties based on Quantity Pricing Breaks. However, that would be unusual. Normally, if paying royalties, you would use Pricing Levels (such as domestic, international, etc.) instead of Quantity Breaks. If you don't have Level 7 and you pay royalties, avoid using Quantity Breaks along with a Variable Royalty Structure combined with Discounts. Finally, be aware that if you use pricing options, the "Average Discount" figure in the Inventory and Sales Activity Report will reflect the average discount from the retail price, not the discount from one or more quantity breaks. See the help documentation for the Sales Activity and Inventory Report for more details.
This field is used for products that are sold by the unit. For example, if you sell fabric, you may sell it by the yard. AnyOrder can handle entering items which are fractions of a unit. For example, you may sell 2.5 yards of fabric. Fractional amounts of an item are entered in the Alternative Product Information Screen. If you have such products, this is where you enter the unit by which the item is sold. It could be pounds (LB), kilograms (KG), ounces (OZ), feet (FT), inches (IN), meters (M), centimeters (CM), grams (G), etc. You can also use this feature to bill out hourly services. In that case, you would use HR for hours. A total of 3 spaces are provided.
Level 6 - 7 Feature. These fields are available for your use. They may be used for the product's manufacturer, additional identification characteristics, or other information concerning the product. This information does not appear on the printed invoice, but you can access it by clicking on the light blue "View" button found on the Main Invoice Screen. You can assign your own labels to the user fields by selecting TOOLS >> RENAME USER FIELDS.
Two additional features allow you to move records from the Product Information Database to the Stock Ordering Database. The Stock Ordering Database is used by AnyPO, the Purchase Order System. If you have products that you purchase for resale, you'll want to have a record for the product in AnyPO's Stock Database. That allows you to issue purchase orders for the product. The other advantage is that when the product is received, AnyPO will automatically update your inventory levels. To move a product from the Product Information Database to AnyPO's Stock Database use the "Copy Record" button. Note that AnyOrder will do a check for the product first. If it finds the product with the same catalog number, it will notify you. Additionally, if you're not sure if the product is in the Stock Database, you can also use the "View" button.
Previous versions of AnyOrder used the Notes area for inventory information. Inventory information is now handled by a new Inventory Transaction database. It's a simpler and more efficient method than the use of notes. (If you are a previous AnyOrder user, you'll want to keep the inventory notes, but all new inventory data will go into the new database which is accessible at the bottom of the Product Database screen. After considerable time has past, you can delete the old inventory information from the notes.) If needed, the Notes area can be used for more detailed information about the product. This information won't appear on the printed invoice, but it can be helpful when customers have questions about products. You can easily access it at any time by clicking o the "View" button on the Main Invoice Screen. The "View" button is also available on the Product Pop-up list. ("View buttons are only with the Level 6 -7 program.)
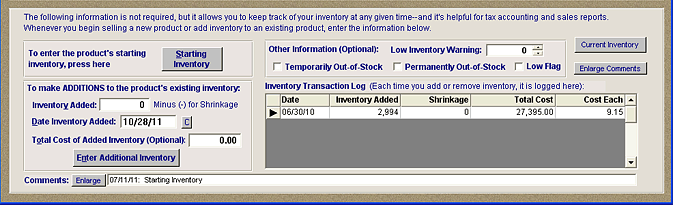
Inventory Area (Lower Part of the Screen) The bottom half of the Product Information Screen can be used to enter information about inventory and the item's cost. This information is not required, but if you'd like the program to keep track your inventory, you'll want to enter it. The bottom half of the screen looks like:
Level 4 and Higher This portion of the Product Information Database is optional, but, if used, it helps you keep track of low or out-of-stock inventory items.
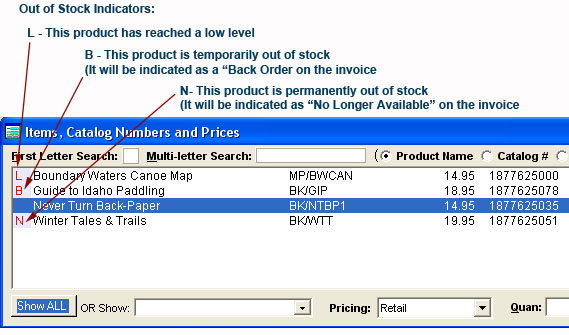
The Product Pop-up List is used to enter products on the Main Invoice Screen. Here's what each of the indicators look like in the Product Pop-up List:
All of three indicators ("B," "N," and "L") provide a visual reminder of the product's stock status while doing order entry. Additionally, when the product is entered on the invoice, the product will be automatically be assigned a sales code of "B" (for back ordered) or "N" (for no longer in stock). And, lastly, the "B" or "N" codes will appear on the invoice with an explanatory message to the customer. (No change of the sales code occurs if the indicator is "L.." The checkboxes "Temporarily Out-of-Stock" and "Permanently Out-of-Stock" can be automatically turned on when an inventory report is created. (See Inventory Report) The Low Inventory Warning blank is used if you want to be alerted when the product's inventory reaches a certain level. Enter the desired level in the blank. If you've entered a level, then a warning will appear on the Inventory Report Screen. You can use the warning to remind you to order more of the product. This is optional. If you don't enter a number in the blank, no low inventory warnings will be triggered. Additionally, in the Level 5 (or higher) program, if you have Real Time Inventory processing turned on, AnyOrder will automatically trigger a message if one of your products has reached the low inventory level. Unlike the Level 4 program, it's not necessary to run daily inventory reports. AnyOrder will internally keep track of the inventory levels of your products. For more information, see Real Time Inventory Processing. When Real Time Inventory triggers a low inventory message, it also places an "L" beside the item in the Product Pop-up List. The "Low Flag" field indicates whether an "L" appears on the pop-up list or not. If the "Low Flag" is checked, then an "L" appears. If it's not checked, no "L" appears. Whenever you add inventory in the Product Database (described next), AnyOrder will automatically remove the "L" indicator. (It also removes out-of-stock and permanently-out-of-stock indicators.) The Product Database is the primary way to add inventory, but there are other methods as well. If you do use other methods (such as Inventory Reconciliation or directly changing the Inventory File), AnyOrder doesn't automatically remove the "L." But, in those cases, you can easily remove the "L" by removing the checkmark. (Note that you can also remove the "L" directly in the Product Pop-up List by pressing SHIFT and right double-clicking.)
Use this button to enter a starting inventory level for the product. Click on the button and a dialog appears on which you can enter the amount of inventory. For more information see: Products: Starting Inventory
Use this field to enter additional inventory (after you have entered a starting inventory level.) You can also reduce inventory by entering a negative number. Along with the amount of added inventory, enter the date and the total cost of the inventory. Then click on the "Enter Additional Inventory" button. For more information: Adding Inventory.
When you use the "Starting Inventory" and "Enter Additional Inventory" buttons, AnyOrder automatically makes an entry in the Inventory Transaction Log. This provides you with a record of each time you add inventory. If desired you can add comments to the individual transactions. Select the desired row in the Transaction Log, then in the "Comments" field, type in any supplemental information that you wish to include. There is a limit of 250 characters. If you really need extra room, you can use the Notes area to supplement it, but it's more convenient to try to abbreviate your comments enough to fit in the space provided. The comments area can be expanded by clicking on either of the "Enlarge" buttons. This provides a little extra room to read or type in comments. When finished, click on the "Close Window" Button.
You move from product to product by pressing Page Up or Page Down on your keyboard. To add a product, go to the last product and press Page Down--or you can select GOTO from the pull down menu and choose NEW ITEM. You can also move to different products by clicking on the navigation buttons on the middle right of the screen. Right arrow button ( > ). Next product is displayed. (Same as Page Down.) Right arrow and line button ( >| ). Last product is displayed. (Same as Ctrl+Page Down.) Left arrow navigation button ( < ). Previous product is displayed. (Same as Page Up.) Left arrow and line button ( |< ). First product is displayed. (Same as Ctrl+Page Up.)
If you click on the right mouse button on the Customer Information Database screen, the speed menu will appear. From the speed menu, you can activate the search or look-up dialog boxes and the standard cut, copy, paste menu. (Note that when the cursor is in the Bill-to, Ship-to, and Zip/Postal Code blanks, a slightly different speed menu appears as noted above.)
The Menu Bar on the top of the Product Information Screen provides a number of features and functions.
FILE Menu. The FILE Menu provides the following options: Print this Record. You can print each product record individually by selecting FILE and PRINT THIS RECORD from the Menu Bar. Print List of All Records. You can include all products in one summary report by selecting FILE and PRINT LIST OF ALL RECORDS. The remainder of the options are only available on Level 4 programs and above. Form & Print from Spreadsheet. Level 4 and above. If you have the Level 4 program and above, you can select FORMAT & PRINT FROM SPREADSHEET. This opens up Excel (or a spreadsheet of your choice). Once in Excel, you can format the list and print it. Note that you can not edit the product database from Excel. Use this for viewing and printing purposes. Move Transaction Data to Spreadsheet. Level 4 and above. If you want to view or print data in the Inventory Transaction log you can move it to Excel by selecting the appropriate menu item. Note that this report shows only catalog numbers. If you have the Level 6 or 7 program you can download a macro which converts catalog numbers to item names. From the Main Invoice Screen, select HELP >> OBTAINING REPORT MACROS for details on this and other macros. Import. Level 4 and above. You can also import products by selecting IMPORT. More information on importing is found here: Product Import. If, after importing, you find that you need to delete the imported records, you can do so by selecting REMOVE IMPORTED PRODUCTS. This will remove only imported products. Any products in your Product Information Database prior to the import will be preserved. Note that if you add one or more new products after doing an import, you'll lose the ability to remove the imported records. Thus, if you need to remove imported records, you should do it soon after the import and before adding any new products. Print Barcode Labels. Level 5 and above. If you have the Level 5 (or higher) program, you can print barcode labels by selecting PRINT BARCODE LABELS. Use this when you are setting up your own barcoding system. This feature produces labels which utilize the Code 39 barcode. While you can use Code 39 for a number of different purposes, you should be aware that the books use the EAN system and a great many products use UPC codes. Both of those systems are different than Code 39. If you need to print product barcode labels that will be used in chain stores and other retail business, you'll want to purchase special barcode printing software. However, you may find that AnyOrder's internal Code 39 printing capability will come in handy for a variety of uses. You can use it to mark boxes for internal inventory purposes. You can use it if you produce products which are not sold in the normal market place. For example if you're an artist or craftsperson, you can barcode your own work with it. You can also use AnyOrder's barcode labels if you have your own store and you want to use your own barcoding system. When you select this menu, the "Print Barcode Labels" dialog box will appear. This dialog box is nearly identical to the dialog boxes that appear when you print mailing labels. For more information, see Printing Barcode Labels.) The label printing system in AnyOrder works in tandem with Microsoft Word or other word processing programs, and, by doing so, it provides you with a vast array of label printing possibilities. A sample barcode label has been included with AnyOrder. You can use the sample as a starting point and re-work it so it fits your needs. Before using this feature, you should also read the information about barcodes found in Barcode Features. EDIT Menu. The EDIT Menu provides the following options: Cut, Copy, Paste. In the EDIT menu, you can Cut, Copy, or Paste. Delete This Item. If you need to delete products, you can do so by select EDIT >> DELETE THIS ITEM. Multi-Product Delete. Level 4 and above. If you have the Level 4 program or higher, you have the option of using EDIT >> MULTI-PRODUCT DELETE. Use the Multi-product Delete function if you need to delete two or more products. Delete all Products. Level 4 and above. Additionally, Level 4 or higher users have the option of deleting all products. This would only be used when first starting to use the program. You can use it to clear out practice products that you have added. You can also use it if you had imported products and needed to remove all of them and start over. In order to use it, you must turn the safety off first by selecting DELETE SAFETY. If you have set-up a program administrator, only the administrator can access the "Delete All" function. Note about Deleting Products. If you delete all the records in the Product Information Database, "NO PRODUCTS" will appear in the Item Name blank. When you are ready to enter your first product, delete "NO PRODUCTS" and type in its name. Note that you can set up user levels to prevent access to the delete functions. Undo and Remove Row from Transaction Log. Finally on the Edit menu, you have two functions dealing with the Transaction log. The first is UNDO AND REMOVE ROW FROM TRANSACTION LOG. This will remove a row in the Inventory Transaction Log which contains your inventory information. The row to be deleted is indicated by the large POINTER ARROW. Make sure the pointer is at the row you want to remove. In addition to deleting row, it will also undo the transaction. In other words, if you added 100 units to the inventory, it will remove the 100 units. Special Transaction Row Delete. The last option is SPECIAL TRANSACTION ROW DELETE. In almost all cases if you've made a mistake and need to delete a row from the Inventory Transaction Log, use EDIT >> UNDO: REMOVE ROW FROM TRANSACTION LOG. It will undo the transaction, removing the row AND properly re-adjusting levels in the Inventory File. This function, on the other hand, is a special deletion option. It will delete a row but it will not make any adjustments in the inventory file. You should only use it when you are absolutely sure it will not adversely effect the inventory. You may use this if you need to clear everything out and start over with entering inventory. In that case, make sure that the inventory in any old inventory files has been removed. You may also use this after you've manually made changes in inventory levels by using PRODUCT TOOLS >> INVENTORY FUNCTIONS >> 'Manually Update Inventory. GOTO Menu. The GOTO Menu provides the following options: Next, Previous, First & Last Item. The GO TO menu allows you to move through the different products. It's easier to use your keyboard (PageUp and PageDown) to move through the products, but these have been included to provide an alternative option. Search. The SEARCH feature allows you to search for a product name, catalog number or other identifier. Look-up. The LOOK-UP feature provides a list of all products in the Product Information Database in alphabetical order. When you choose from the list, you'll be taken to the selected product. Find Product by Scanning Barcode. Level 5 and above. The GO TO menu also allows you to FIND PRODUCT BY SCANNING BARCODE. When you select this menu item, the Barcode dialog box appears. When you scan in the product's barcode, the product scanned will located and displayed. Note that before using this feature, the product's barcode should have been previously entered in the barcode field on the Product Information Screen. If you program your barcode reader with a F2 prefix, this dialog box will automatically open as soon as you scan a product. (When searching for a product and using a programmed barcode reader, be sure to position your cursor in any field other than the Barcode field. When your cursor is in the Barcode field, AnyOrder assumes you want to enter the barcode into the field, rather than search for it.) For more information on barcodes, see Barcode Features. Copy All Fields and Create New Item. Level 4 and above. If you have the Level 4 program or higher, you can use the menu option: COPY ALL FIELDS & CREATE NEW ITEM. This copies all the fields associated with a product currently showing on the screen. It then creates a completely new record and pastes all the copied fields in place. Use this when you need to create a new product which has similar characteristics of an existing product. Be sure to give the new product a different catalog number. TOOLS Menu. The TOOLS Menu provides the following options: Unlock/Lock Cost Blank. The first option in the TOOLS menu allows you to unlock the cost blank. The cost blank is kept locked to prevent accidental changes. It's also kept locked as a reminder that the program can calculate cost for you. However, it can be unlocked, and you can enter your own figure or make alterations to a program's calculated cost. Catalog Number Checking. The next choice in the TOOLS menu will turn off catalog number checking. As you page through the Product Information Database, AnyOrder checks to make sure that you do not have duplicate catalog numbers. If it finds a duplicate, it will notify you. Additionally, AnyOrder will not allow you to continue until you change the number. There may be times, however, when you want to turn off the catalog number checking feature. For example, you may wish to change the other duplicate catalog number, and not the one currently showing on the screen. You may also want to turn off catalog number checking after doing an import. In either case, you can do so by selecting TOOLS >> TURN OFF CATALOG NUMBER CHECKING. You should be careful about turning this feature off. Duplicate catalog numbers create problems in the program and you should use it only when necessary. Order. You can also change the order of the products by using the TOOLS menu. Normally, the products are in the order that you added them to the Product Information Database. You can also order them by Item Name, Catalog Number, ISBN (or Part Number), or Price. Configure for Quantity Price Breaks. Level 7 Feature. This allows you to configure the program for pricing breaks depending upon the quantity that the customer orders. More information. Categories. The Categories menu choice bring up a dialog box on which you set-up categories for your products. Rename User Fields. Level 6 - 7 Feature. This option allows you to name the two user defined fields on the Product Information Database Screen. Calculate Mark-up. Level 4 or Higher. The TOOLS menu can also be used to open the Mark-up Calculator. You can use this feature to calculate mark-ups on the cost of an item. Also in the tools menu, you'll find an option which allows you to provide your own labels for the User Fields. Barcode. Level 5 or Higher. The next series of menu choices in the TOOLS menu are only available on the Level 5 (or higher)program. If you are entering barcodes for your products, you can use the TOOLS menu to activate the Barcode dialog box. Scan in the product's barcode and the barcode numbers will appear in the Barcode field. (For more information on how to use this field, see the description above under the blue "Barcode" heading.) You can also press F8 to bring up the Barcode dialog box. Note that this Barcode dialog is different than the one found in the GO TO menu. Selecting GO TO >> FIND PRODUCT BY SCANNING BARCODE (or pressing F2) is used to find products. Selecting TOOLS >> SCAN BARCODE & PASTE (or pressing F2) is used to enter the barcode in the Barcode field in the Product Information Database. The TOOLS menu also may be used to copy the catalog number to the barcode field. Use this option if you setting up your own barcode system. (See more information in the description above under the "Barcode" heading.) Low Inventory Tools. Level 4 or Higher. The TOOLS menu you can access Low Inventory Tools. The Low Inventory Warning field is found on the Product Database Screen is used to trigger warnings when a product's inventory reaches a designated level. It is used in Inventory Reports and by Real Time Processing. From the Low Inventory Tools dialog box you can set a default value for the Low Inventory Warning field. Each time you create a new product, the default value that you designate will appear in the Low Inventory Warning field. Once you create a new product record, you can, if desired, change the Low Inventory value. Also in Low Inventory Tools, you can assign a Low Inventory value to all products with a zero (0) Low Inventory -- or you can change the value of all products (zero and non-zero) to a value that you designate. Finally, you can change the Low Inventory flag which appears on the Product Pop-up list. (The Low Flag is described in more detail along with temporarily out-of-stock and permanently out-of-stock, above.) The Low Flag can be changed directly on the Product Database Screen, but it is available here for convenience. Current Inventory. Level 2 or Higher. The TOOLS menu can be used to obtain inventory data or information on the current Inventory File. When you select "Current Inventory," AnyOrder will provide the most recent inventory available for the current product. (If you have Real Time inventory turned on, it will provide instantaneous inventory.) Inventory File Information. Level 2 or Higher. When you select "Inventory File Information," AnyOrder will provide helpful information on Inventory Files and display the data associated with the current product in the currently active Inventory File. Real Time Inventory Processing. Level 5 or Higher. This brings up a dialog box with information about Real Time Inventory Processing. It also allows you to determine how products with zero inventory are treated in relation to Real Time Inventory Processing. Here's some background: Normally, when you enter items in the Product Database, you'll also enter an inventory level. As long as a product has inventory, Real Time processing will track it. If an item doesn't have inventory (inventory of zero), then it's not tracked. That's quite handy if one or more of your products involved services. For example, you may be a graphic artist and you may charged by project. Or you may sell advertising. These are intangible items where inventory is not applicable -- and, of course, it's not necessary for the inventory levels of these items to be tracked. There is, however, another situation. You may have entered items in the product database which, as of yet, have no inventory. Consumers may order these items before you have inventory. Normally, Real Time Processing will not track these items, but, if desired, you can change this behavior and tell AnyOrder to track the non-inventory items too. That's done by placing a checkmark beside: "Include this Product in Real Time Inventory Processing Even if There's No Starting Inventory." Window Menu. The WINDOW menu allows you to move to different windows in the program without exiting from Product Information.
Additional Information about Products: Product Database Screen: Indicating a Starting Inventory Product Database Screen: Adding Inventory Entering Products on the Main Invoice Screen Entering Catalog Numbers on the Main Invoice Screen
|