| Import |
|
|
Import - First Dialog Box - Level 3 Programs and Above
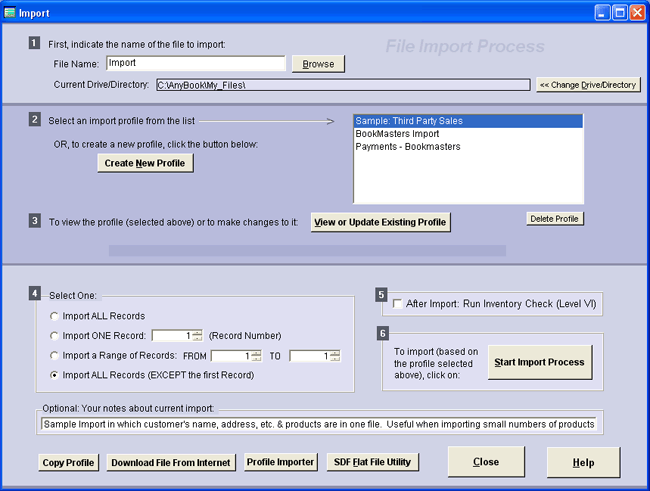
The Import feature is an extensive and versatile tool designed to move data from other programs into AnyOrder. Through the use of profiles, you are able to decide where the data from the import file should be placed and what form it should take. It will even convert different catalog numbers (and other data) into the format compatible with AnyOrder. This section covers importing invoices - or importing data to existing invoices. You can also import customers, products and contacts. The Import feature is reached by selecting FILE and IMPORT from the Menu Bar on top of the Main Invoice Screen. The Import dialog box appears: Note: this import process is for moving data to the Main Invoice Screen which contains the bulk of AnyOrder's data. But you can also import customers to the Customer Database, contacts to the Primary Contact Manager, and products to the Product Database. Click on the links for more Information on each of these other import processes. Type of Import Files Accepted. AnyOrder can import three types of files: Comma Delimited (the most common), Tab Delimited and dBase. The program can also import System Data Format (SDF) or Flat Files through the use of the Flat File Utility (see below.) For more information: Supported Import File Types. Almost every database, spreadsheet, or accounting program can provide files in one of these formats. Note also that AnyOrder can also import through the use of the clipboard. AnyOrder can work with Excel files save in one of the above formats, see Working with Import Files in Excel. Importing: Step by Step The following is a step by step process involved in importing: Entering the File Name. When you select FILE and IMPORT from the Menu Bar, the Import dialog box will appear. Near the top of the dialog box, is a place to enter the name of the file that you will be importing. It's highly recommended that you use standard naming conventions when naming the import file. Use ".csv" or ".txt" for Comma Delimited and Tab Delimited files and ".dbf" for dBase files. For more information: Supported Import File Types. Keep the File Name at Eight (8) Letters or Less. Because of different operating systems, if at all possible, keep the file name at eight (8) letters or less. Avoid spaces in the name. Change Directory. After entering the name of the import file in the File Name blank, change to the directory in which the file is stored. Avoid storing the file in directories with long directory names or names with spaces. Create a New Profile. When the file name is entered and the directory chosen, click on "Create New Profile." After clicking on "Create New Profile" a second dialog box (Import Profile) will appear. To continue the step by step procedure: Second Dialog Box
Details on Each Part of the First Dialog Box File Name. In the File Name blank, enter the name of the Import file. If at possible, keep the file at eight (8) letters or less. Avoid spaces in the name. For more information: Supported Import File Types. Directory. Select the directory in which the Import file is stored. Avoid storing the file in directories with long directory names or names with spaces. Create New Profile. A profile is a list of instructions which tells AnyOrder where to place each of the fields of the Import File. Whenever importing an entirely new type of import file, you'll need to create a profile. Before clicking on this button, be sure to enter the name of the file that you will be importing in the File Name blank. The contents of the file will be used to help you develop the profile. When the file name has been entered, and you're ready to go, click "Create New Profile." View or Update Existing Profile. Once you create a profile it is saved. That way you don't have to re-create the profile the next time you want to import a similar file. The "View or Update" button allows you to review or make changes to an existing profile. Delete Profile. If you no longer need to use a profile, you can delete it. Note that this will also delete any replacement tables that you have associated with the profile. To delete a profile, first highlight it on the profile list and then click "Delete Profile." Records. Before starting the import process, select which records from the import file you want to move into AnyOrder. You can import all of the records, one record, or a range of records. In most cases, you'll probably import all of the records, but there may be other situations in which you import one or two. When you need to import selected records from the import file and you're not quite sure which record numbers to use, the following procedure may be helpful: First, click on "View or Update Existing Profile." In the Profile dialog box that appears next, select a record from the "Record #" box and click "Show Import File Fields." The contents of the record will show up in the first box ("Fields Making up the Import File") on the bottom of the screen. Continue selecting records in this manner until you determine which record numbers you need. The last choice is "Import ALL records (Except the first record)." Use this when you are importing a file that has field names in the first record. By selecting this option, you'll be able to import all usable data, leaving out the field names. After Import: Run Inventory Check (Level VI). Level 6 - 7 feature. This feature allows you maintain instantaneous tracking of your inventory, even during the import process. If you are using Real Time Inventory Processing, you know that it will trigger a message and warn you if the inventory of any product goes out of stock, but it works only as you enter invoices on the Main Invoice Screen. This feature, also referred to as Inventory Batch Processing, extends Real Time Processing to imported invoices. By using it, you always know the exact inventory status of all products at any time. When you place a checkmark here, AnyOrder will run through all of the products on each of imported invoices. As it does so, it checks to make there is sufficient inventory available. If any product reaches the low inventory level that you've indicated in the Product Database, it will make a notation. If any product is previously out of stock -- or becomes out-of-stock, it will make another notation and automatically place the product on back-order status (by inserting a "B" sales code). If any product has been discontinued, it will insert the "N" sales code for No Longer Available. The process occurs just after the invoices are imported, and it moves from the first imported invoice to the last. Thus, if a product goes out-of-stock on one of the early imported invoices, it will appear as back-ordered in all subsequent invoices. Once the inventory batch process is complete, a summary report will appear. The report can be placed in the clipboard, or it can be saved to a file for future reference. After reviewing the report, you can, if needed, make individual adjustments in any of the imported invoices. It's also possible to make alternations in inventory levels and re-run the inventory check. For example, let's say that one of your products is listed as out-of-stock. But, after doing a physical count, you find that you still have another 12 still in stock. You can add the extra 12 by using Inventory Reconciliation and then re-run the inventory check by selecting PRODUCT TOOLS >> REAL TIME INVENTORY SETTINGS >> "Batch Processing." Since more inventory is now available, invoices will be corrected accordingly. In other words, "B" sales codes will be removed as each invoice is checked (until, and if, the additional inventory is exhausted). For more details on this and other aspects of this feature, see Real Time Batch Processing. Start Import Process. This is the button to click after you've typed in the name of the file you want to import and selected the appropriate profile. AnyOrder will then create a new invoice for each imported record, placing the information from the import file (as directed by the profile) into the proper place on the Main Invoice Screen. When the process is complete, exit from the Import dialog box and page forward through the new invoices. Double check to make sure everything came through ok. If not, you can remove the invoices by select FILE and REMOVE IMPORTED RECORDS. Be sure to check your imported records right away. Once you start adding new invoices on top of the imported ones, you'll no longer be able to undo the process. Copy Profile. If you've already set-up a profile and you need to set-up a new but similar profile, you can use the "Copy Profile" button. First select the profile you want to copy from the list. Then click "Copy Profile." The selected profile will be copied and given the same name with a "(2)" at the end of it. If you have replacement tables associated with the original profile, this will also copy the tables. Once the profile is copied, you can click on "View or Update Profile." Change the name to the desired new name and then make whatever adjustments are necessary. Profile Importer. The profile importer used when the developer makes new profiles available. Registered users are notified when new profiles are available. If you'd like to use one or more of the profiles, you can use the Profile Importer to add new profile(s) to your existing list. SDF Flat File Utility. Use this feature for importing System Data Format (SDF) or Flat Files. SDF and Flat Files are interchangeable terms for the same file type. (For more information on the structure of a SDF or Flat File see Supported Import File Types.) AnyOrder can't directly import a SDF file, but the Flat File Utility converts the file to dBase file (AnyOrder's native file format) which can be directly imported. More information: Flat File Utility
Sample Files AnyOrder comes with several sample imports. One is called: "Sample Third Party Sales." It's an example of a company, called "Sales Unlimited," that you can contract to sell your products over the Internet. As your products are sold, Sales Unlimited provides you with an import file which contains details on each sale. Included in the import file are the name and address of the customer, products sold and the total amount. To review the profile, start at the first dialog box in the Import series. Type-in "import.txt" in the File Name blank. "Import.txt" comes with the program and is found in the AnyOrder's program directory (C:\AnyOrder8 or whatever directory you've used for the program files). In addition to entering the file name, change "Current Drive/Directory to AnyOrder's program directory. Once AnyOrder knows the name of the import file and where to find it, you can move to the second dialog box (Import Profile). To see the records found in the import file (import.txt), choose record #1 and click on "Show Import File Fields." The first record in import.txt contains a list of the names of the fields. The second record contains the actual data to import. If desired, you can look at record #2 by changing to "2" and clicking "Show Import File Fields" again. You'll see that the profile for "Sample Third Party Sales" has a little of everything. (For more information on import profiles, see Profiles). One of the techniques used in this profile is that the word "Sales Unlimited" is set up as a "constant" and is imported into Billing Name on the Main Invoice Screen. That means that every record imported with have "Sales Unlimited" in the Billing Name blank. The customer to whom the sale was made is imported into Shipping Name on the Main Invoice Screen. Note that in "import.txt," the customer's name is provided in two fields: first and last name. The profile shows how to combine the two in Shipping Name. In the "Other Options" dialog box (the third dialog box in the Import series) you'll see that the profile uses a Catalog Number table. The table converts Sales Unlimited's catalog numbers into catalog numbers used in AnyOrder. Sales Unlimited also provides information on who referred the customer. Thus, a "Referrer's" table was set up which converts referrer codes provided by Sales Unlimited into the actual name of the referrer. To do an import using the sample, make sure that "import.txt" is in the File Name blank and "Current Drive/Directory" is AnyOrder's program directory. Select Record #2 from "Import ONE Record". Then click on "Start Import Process." The record will be imported to a new invoice. Click on "Close" and return the Main Invoice Screen. To see review the newly imported record, page forward or click on the "last invoice" navigation button. Since this is just a practice session, you will want to remove the imported record. Remove the imported record as soon as you're finished reviewing it. To remove it, select FILE and REMOVE IMPORTED RECORDS. Be sure to do this right away. If you add another invoice or exit the program, you'll no longer be able to remove it. Note that the Catalog Number replacement table used in the sample is based on the sample invoice files that come with the program. If you've deleted the sample invoices, you won't be able to import product data. All other data, however, will be imported. To get product information, you can either substitute the catalog numbers on the replacement with those of some your own products, or you can turn off the Catalog Number table in Other Options. Additionally, you'll find other sample import profiles included. More Information on Importing Import Profiles (Second Dialog Box) Other Options (Third Dialog Box) Working with Import Files in Excel
|