| Import Replacement Tables |
|
|
Import: Replacement Tables - 4th Dialog Box Level 3 and above Replacement tables are used in the Import process. The Import feature is reached by selecting FILE and IMPORT from the Menu Bar on top of the Main Invoice Screen. More information on Import. Replacement tables allow you to change the values in an import file to values compatible with AnyOrder. For instance if a company that you contract to sell your products uses different catalog numbers than those used in AnyOrder, you can use a replacement table to convert their catalog number to yours. For the sake of this discussion, we'll call a company that you hire to help sell your products a "sales contractor." To access Replacement Tables, click on the "Replacement Tables " button on the bottom of the second import dialog box, Import Profile) or on the bottom of the "Other Options" dialog box:
There are two types of replacement tables: Catalog Number and Additional Replacement Tables. A Catalog Number Replacement Table allows you to replace catalog number. For example, Sales Unlimited may use the catalog number: "9988" for one of your books. In AnyOrder, however, the catalog number that you use may be "BK/JUMPHI." You can set up a table to convert "9988" to "BK/JUMPHI." To convert catalog numbers or product names, click on the "Catalog Number Table" button. If you need to replace catalog numbers (or product names), click on "Catalog Number Table" button. (See "Catalog Number Table" below.) Additional Replacement Tables can also be set up. Let's say the import file contains a code number that indicates how the product was shipped. For instance, "U25" might mean the product was shipped UPS Ground. You can set up a replacement table that converts "U25" to "UPS Ground" (and other codes). To do so, you would give the table a name and click on "Create New Table." You can type in any name which helps you remember the table. Once you've typed in a name, click on "Create New Table." If you've already started a table and need to view it or modify it, select the appropriate table name from the list and click on "View or Update Existing Table." (See "Additional Replacement Tables" below.)
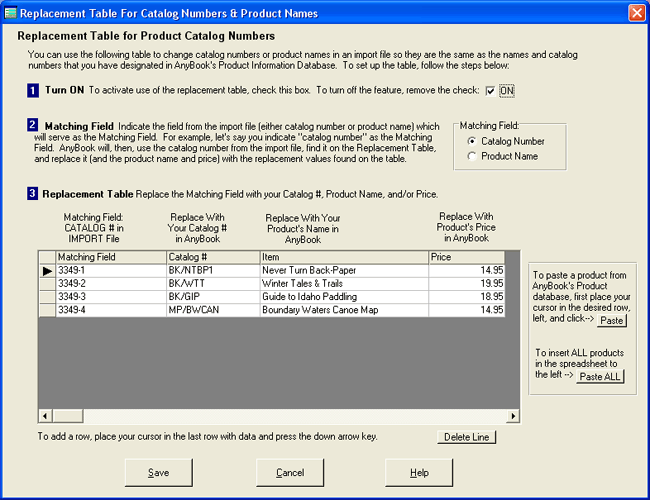
Catalog Number Table Turning it On. At the top of the "Replacement Table for Catalog Numbers" you can either turn the table on or off. To turn it on, place a checkmark in the "Turn On" box. Matching Field. A matching field is the field of the import file that you will use for comparison with either with AnyOrder's catalog number or product name. In most cases, the matching field will be catalog number. In some cases, however, a sales contractor may not use catalog number, but rather a product name. If that's the situation, select "Product Name" as the matching field. Replacement Table. In the replacement table, you indicate what values should be substituted for the matching field. If your matching field is catalog number, the first column of the table will list the catalog numbers used by the sales contractor. The second column of the table will list the catalog numbers found in AnyOrder. For example, lets say the sales contractor uses "B668" for a catalog number and that corresponds to "BK/BETTER" in AnyOrder. Thus, you will list "B668" in the first column of the table and "BK/BETTER" in the second column. In most cases, you'll also want to replace the product name with your own name. You could use the sales contractor's product name if desired, but using your own name is better. It provides consistency throughout your invoices. Therefore, in the third column, enter the name of the product. Finally, in the last column, you can enter the product's price. In most cases, you'll enter your normal retail price for the product in this column. However, if you have variable prices, and haven't established consistent retail prices, you may want to leave it out and use the price data from the import file. Pasting Products to the Table. To help make things easier in setting up the table, two buttons are included just below the table. These allow you to paste products from your product information database to the table. You can either paste one at a time or paste the entire database. To paste on at a time, place your cursor in the table where you want the product pasted and click on the +. If you need to delete a line from the table, click on "Delete Line." When finished building the table click on "Save." When the Catalog Number Exceeds 13 Characters. Let's say that you are importing a catalog number found in the third party import file which is 16 characters long. And let's say that you want to convert that catalog number using a Replacement Table to the catalog numbers that you've set up in AnyOrder. If you set up your profile to import to the AnyOrder's catalog number, you'll run into the 13 character limit. (Catalog numbers in AnyOrder can't exceed 13 characters.) But there's a trick you can use. In your profile instead of mapping the import field to AnyOrder's catalog number, rather map it to the Item Name. The Item Name has plenty of space. Then, when you set-up the catalog replacement table, select Item Name instead of catalog number. Essentially what that does is to allow you to import long catalog numbers and obtain the desired conversion to your own catalog number. Additional Replacement Tables. Important Note: Before starting work on an Additional Replacement Table, make sure you've finished creating an import profile in the second dialog box of the Import series. The profile values will needed as you build the table. Matching Field. At the top of the Additional Replacement Table dialog box, you'll be able to indicate the matching field and replacement field(s). In almost all cases the matching field and first replacement field are the same. Choose a matching field from the profile list and click the top most + to insert it in the matching field blank. If you make a mistake, you can remove it by clicking on the - sign beside the blank. Note that the list of fields from which you are selecting is from the profile that you developed in the second dialog box in the Import series. On this list, you are looking for the field from the import file that you'll be using for comparison. Let's say the sales contractor has different codes for the shipping method. One example might be that their code "U25" means "UPS Ground." If so, you would look in the profile list for the field that represents this code. It might look something like: 2) U25->Ship Via 48. Select this line and click on the top most + to enter it in the Matching Field blank. Replacement Field. Next, you'll need to indicate a replacement field. In almost all cases, this will be the same as the Matching Field. In the example above, you want to replace "U25" with "UPS Ground" in the Ship Via blank on AnyOrder's Main Invoice Screen. Thus, you would select 2) U25->Ship Via 48 and click on the second + to enter it in the Replacement Field1 blank. Different Replacement Field from Matching Field. There are occasions where you may wish to select a replacement field which is different than the matching field. The process is the same. From the profile list, select the field where you want the replacement to occur. When the process occurs, the replacement is made only in replacement field (and not to the matching field). Different Replacement Field: Setting up a Dummy Field. In most cases, the replacement field that you want will not appear on the profile list. That means that you need to set up a dummy field. Choose a field from the import file that you won't be using. There's always one or more fields in an import file that you will not be importing. Use one of those fields. Let's set up scenario where you might use this technique. Let's say that one of the fields in the import file is called "Miscellaneous" and we aren't importing any data from that field. Let's also say that you live in Indiana and you need to charge tax for all Indiana customers. That means for every Indiana customer, you'll want to turn on the "Taxable?" field on the Main Invoice Screen. (The Taxable field is a checkmark field. When it has a checkmark, tax will be added to the customer's sale.) Thus, you'll need to include "Taxable" in the profile. When setting up the dummy field, you'll connect "Miscellaneous" (the unused field in the import file) with "Taxable" (the field you need to turn on or off in AnyOrder). It will look something like: 16) Miscellaneous -> Taxable 23 With that in mind, let's run through the scenario from the beginning. You would start by choosing a Matching Field. In this case, we want the billing state. We need billing state because if the billing state is Indiana, then we want to turn on the Taxable field in AnyOrder The matching field that we select will look something like: 5) Billing State -> Billing State 8. Next we need the Replacement Field. As discussed above, we will be changing the Taxable field in AnyOrder. It doesn't really matter what field we use from the Import file, just as long as it is not a field that we are importing. In this case, we've chosen the "Miscellaneous" field from the import file, The Replacement Field will look something like: 16) Miscellaneous -> Taxable 23. With that out of the way, we move down to the Replacement Table. The Replacement Table is the spreadsheet which occupies most of this dialog box. The spreadsheet has several columns (more on the Replacement Table, below). In the first column, the "Matching Field" column, you would type in "IN." ("IN" is the state abbreviation for Indiana). In the Replacement field, you would type in "TRUE." (Since "Taxable?" Is a checkbox field, it is either true or false, so our replacement value must be either True or False.) When the import is done, any customer with a billing state of IN, will have the Taxable? checkbox turned on, and the customer will be charged tax. The Taxable checkbox remains turned off for any customer not from Indiana. Replacement Table. The replacement table is the spreadsheet at the bottom of the dialog box. It is filled out much like the Catalog Number table discussed above. You indicate the value from the import file in the leftmost column. The replacement value to use in AnyOrder is indicated in the next column. Using the UPS example, you would type in "U25" in the first column and "UPS Ground" (the replacement value) in the second column. You would continue to type in the shipping codes in the first column and the replacement values in the second until the table is finished.
Indicating Blank (Empty) Fields. If for some reason, you want a blank for a replacement value. Type in three carrots (^^^) in the second column. Other Replacement Fields. You can also replace two other fields if desired. This isn't very common, but AnyOrder provides the opportunity if you need it. For example, let's say you'd like to include a copy of the sales contractor's shipping code in the Notes area for your own reference. If so, the following values should appear on the profile (which would have been previously set-up in the 2nd dialog box): [C] Shipped Via -> Notes 52 2) U25->Notes 52 At the top of the Additional Tables dialog box, you would select 2) U25->Notes 52 as Replace Field2. Then, as you type in replacement values in the Replacement Table, you would enter: "U25 (UPS Ground)" as the replacement value for the third column (Replace Field2). When you actually do the import, the following will appear in the Notes Area of the Main Invoice Screen: "Shipped Via: U25 (UPS Ground)." Import Button If you click on the "Import" button, you'll be able to select from two datasets which, depending on your needs, may cut back on the amount of work necessary building a replacement table.
AnyOrder has two built in datasets. The first dataset can be used to convert US states and Canada provinces from full words to two-letter abbreviations approved by the US and Canadian postal authorities. This is handy if the third party file you are importing includes states or provinces that are spelled out fully. You can't import the full names of states and provinces since AnyOrder is expecting abbreviations. (State and province abbreviations are used on the Main Invoice Screen). If you are faced with that situation, you'll need to build a replacement table to convert full names to abbreviations. That can be a lot of working typing in the names and abbreviations, but by selecting this dataset and clicking the "Start Import" button, AnyOrder will do the job for you, automatically populating the Matching Field column with full names and the Replacement Field1 column with the appropriate abbreviation.
The second dataset converts two-letter country codes to full country names. This is handy if the third party file you are importing includes countries that are abbreviated using two letters. AnyOrder uses full names for countries. That's a requirement of the US Post Office and other international postal agencies. If you are importing a third party file with country abbreviations, this dataset will save you the trouble of typing in all of the countries abbreviations and their full name in the Matching and Replacement fields columns.
You can access either of these tables by clicking on the "Import" button and selecting the appropriate conversion table. Upon doing this, AnyOrder will automatically insert the names and abbreviations in the Matching Field and Replacement Field1 columns. If you make a mistake, exit from the dialog box by selecting "Cancel" and the information will be deleted and you can start over. Or if the replacement table is already saved, you can delete the table and start over.
More Information on Importing Import Profiles (Second Dialog Box) Other Options (Third Dialog Box) Working with Import Files in Excel
|