| Using Email to Approve PO's: Preparing the Program |
|
|
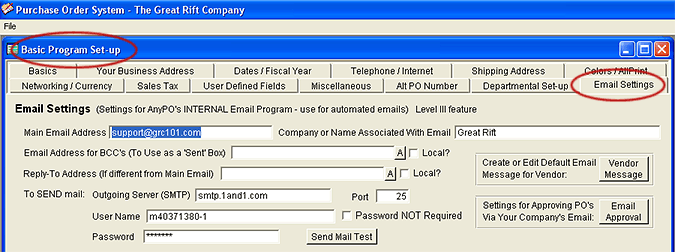
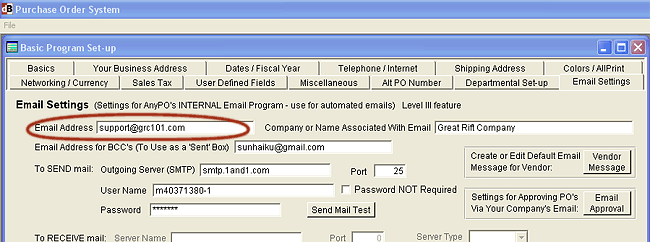
This is a Level III feature You can use the internal email program built into AnyPO for PO approval purposes. AnyPO will remember one or more department directors (or individuals who have approval authority). You can then choose the appropriate person and send an email requesting that they approve a PO. Note that following information describes how to configure the program for email approval. A detailed description on how the process works in practice is found here. You have your choice of two different methods: Method 1. Send an email to the director with a copy of the PO attached. The director can look over the PO, and he or she can respond to the email notifying you whether it's been approved or not. For example, if the director approves the PO, they would indicate it by sending a return message: "PO Approved" This provides a documentation trail since approved messages are keep in the mailbox. This type of approval procedure works on either a single user or network system. Method 2. If you have AnyPO installed on a network, you can send an email to the director with a special encoded attachment. When director receives the email and opens the attachment, the AnyPO program automatically starts on the director's computer. The director logs into AnyPO. A special approval dialog box opens and the director is immediately taken to the PO that needs approval. Using AnyPO's built in approval system, the director clicks on the "Approved" button. In order to use either Method 1 or 2, you must, first, enter some information in Basic Program Set-up. To reach the Email Set-up page, start at the Main Purchase Order Screen and select FILE >> BASIC PROGRAM SET UP from the Menu Bar. Click on the "Email Set-up" tab on top of the page. The Email Set-up page will appear as shown below. (For details on how to fill out email settings, see: Email Set-up Page )
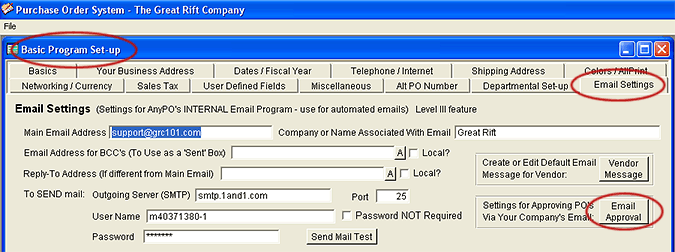
IMPORTANT NOTE: to use AnyPO's internal email program, the email account that you use must be with an Internet Service Provider (ISP). AnyPO's internal email is not designed to work with Yahoo, Gmail, HotMail and other web-based email. We can customize the program to work with web-based mail, but it does required extra charges in order to do that. ISP email accounts are very inexpensive (some less than $20 US a year). You can have multiple accounts and pick your own identifiable domain name. Before setting up the PO approval system, be sure enter the email settings (shown above) which will allow AnyPO to access your Internet Service Provider's (ISP's) email server. You can use the "Send Mail Test" button to assure that all of the settings are correction. More information on each of the settings is found here: Email Set-up Page Once the internal email system is working properly, you can set-up the PO approval system. Begin by clicking on the "Email Approval" button shown below:
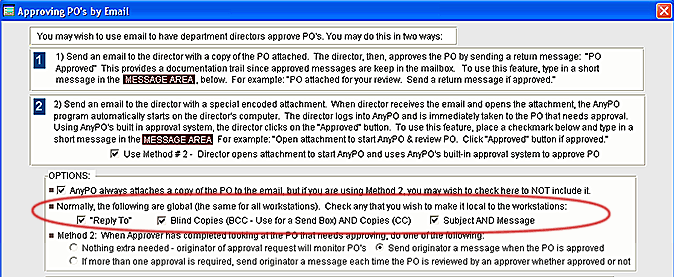
After clicking the Email Approval button, the following dialog box appears:
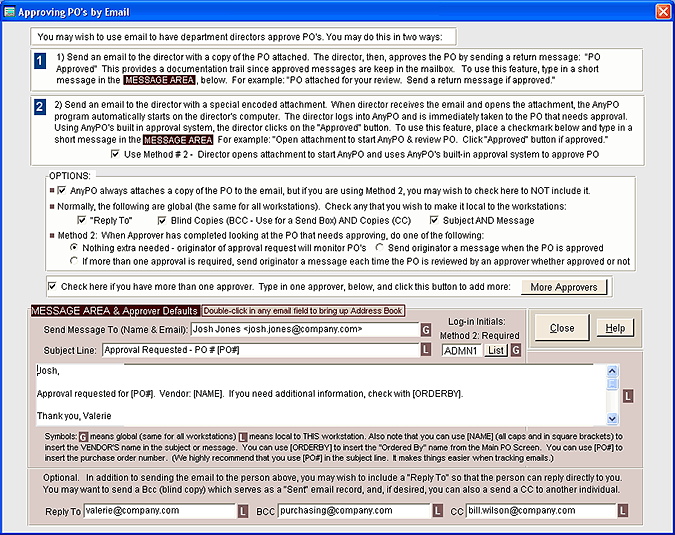
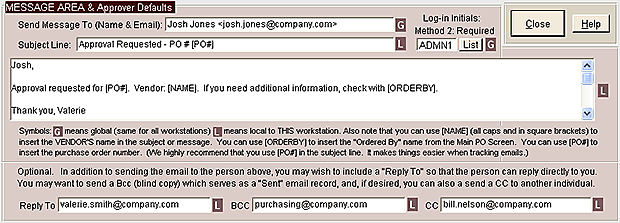
The first method (shown on the above screen) is quite simple. You send the approver or director an email with a copy of the PO attached. That's done at the Main Purchase Screen by finding the proper PO and then selecting ORDER TOOLS >> SEND EMAIL FOR APPROVAL from menu. The email is sent. The director looks over the attached email and sends a reply message to the "Reply To" person either approving or not approving the PO. The email response serves as documentation for tracking purposes. If you decide to use this method, here's a brief summary of the set-up steps. (This assumes that you are on the "Approving PO's by Email" dialog box, shown above.) 1. Type in the director's name and email address 2. Create a message, subject line and indicate any Reply-to, BCC, or CC Addresses. Let's explore these steps in more detail . . . u To use this method, begin by typing in the director's name and email address in the "Send Message To" field (shown above). Use this format: name <email address>. In the illustration above, the director is Josh Jones <josh.jones@company.com>. u AnyPO requires a subject line, and you'll want to type in something like "Approval Requested." Additionally you can include the PO number by the use of the substitution variable: [PO#]. We highly recommend that you include the PO number. It helps from a documentation and tracking standpoint. u Enter the approver's log-in initials. You can enter those easily by clicking on the "List" button and selecting from the list of initials. (It isn't absolutely necessary to enter initials for Method 1, but if you ever decide to switch and use Method 2, you'll be set and won't have to add this information at a later date.) u Type in a brief message. The message can be generic, something that works with all PO's. One suggested way of phrasing it is shown in the illustration above. Note that you can also use the substitution variables of [NAME] for the vendor's name and [ORDERBY] for the name of "Ordered By" person. u If you have more than one approver, click on the "More Approvers" button to add more. More information: Adding More than One Approver If you have more than one approver, note that you can't delete the first approver. For example, Josh Jones would be the first approver (as shown in the screen display illustrated above). If some time in the future you need to remove him, replace him with one of the other approvers from your list. Let's say that Ingrid Johansen is one of your other approvers. Type in Ingrid's name and email address over the top of Josh Jones' name. Then delete Ingrid's entry from her original position on the list so that Ingrid doesn't show up twice. u If you are on a network system, you can also indicate whether you want the settings to be local or global. That's explained in more detail here: Local & Global settings. For more information on Reply To, BCC, and CC, see Reply To & Recipient Email Addresses
Let's take a quick look at how Method # 2 works in practice. Before doing that, let's briefly define the individuals involved in the process.
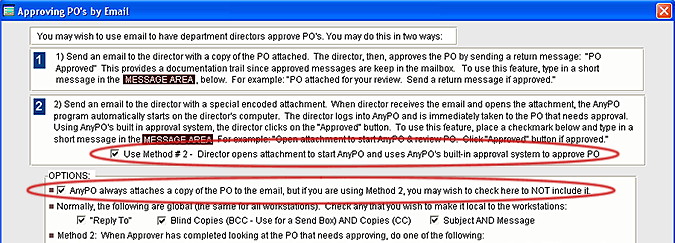
Here's a snapshot of the work flow: The originator starts at the Main Purchase Order Screen and prepares a purchase order. When the purchase order is ready, he select ORDER TOOLS >> SEND EMAIL FOR APPROVAL from menu. AnyPO will ask the originator to double check to make sure you are on the correct PO. If the PO is the right one, it is sent email to the approver. The email will be sent with a special encoded attachment that looks something like 3254.zyz. When the approver opens the attachment, the AnyPO program on his computer starts up. She logs into AnyPO. A special approval dialog box opens and the approver is immediately taken to the PO that needs approval. To approve the PO, the approver clicks the "Approve" button. (Note that when the approver clicks on the attachment, AnyPO should be closed and not running. If it is running, close it first, then open the attachment.) If you decide to use this method, here's a brief summary of how to get things set up. Following this brief summary, we'll look at each step in more detail. 1. Start at the "Approving PO's by Email" dialog box (shown above). 2. Place a checkmark beside: Use Method # 2 - Director opens attachment to start AnyPO and uses AnyPO's built-in approval system to approve PO 3. Place a checkmark beside: AnyPO always attaches a copy of the PO to the email, but if you are using Method 2, you may wish to check here to NOT include it. 4. Decide whether or not you want a message sent to the originator when the PO is approved, and, if so, select from one of two options (more below). 5. Type in the approver's name and email address. 6. Create a message, subject line and indicate any Reply-to, BCC, or CC Addresses. 7. Configure the Windows operating system with a .zyz file association. Now let's look at each of the above steps in more detail . . . u If you have two or more approvers and/or two or more originators to enter, it is helpful to start by entering each of their names and email addresses in the Address Book. The Address Book is reached from the Main Purchase Order Screen and selecting OTHER TASKS >> VIEW/EDIT EMAIL ADDRESS BOOK. You don't need to do this but it makes the following procedure go much quicker since you can paste the appropriate addresses from a list, rather than doing a lot of typing. Once you've updated the Address Book, you can access it by double clicking in any address field. u Start by placing checkmarks beside: "Use Method # 2 . . ." and "AnyPO always attaches . . ." circled in red below.
Why the second checkmark? Since Method # 2 starts the AnyPO program on the approver's computer and goes to directly to the PO, there's no need to include it. The approver can examine the PO in the AnyPO program. If you include it, the approver ends up with two attachments. That makes it more confusing which attachment should be opened to start the AnyPO program. It's much simpler to leave it off. u If desired, once the PO has been approved, you can have AnyPO send the originator an email. If your company requires more than one person approving a PO, you can also have the originator sent an email each time the PO is reviewed. You have three choices.
u Next, type in the approver's name and email address. Use this format: name <email address>. For example, you might have Josh Jones <josh.jones@company.com>. u AnyPO requires a subject line, and you'll want to type in something like "Approval Requested." Additionally you can include the PO number by the use of the substitution variable: [PO#]. We highly recommend that you do include the PO number. It helps from a documentation and tracking standpoint. See illustration below:
u Enter the approver's log-in initials. You can enter that information easily by clicking on the "List" button and selecting from the list of initials. Note: if in the future, you change an individual's in the user set-up part of the program, be sure to change them here too. u Type in a brief message. The message can be something generic that works with all PO's. One suggested way of phrasing it is shown in the illustration above. Note that you can also use the substitution variables of [NAME] for the vendor's name and [ORDERBY] for the name of "Ordered By" person, the same name found on the Main Purchase Order Screen. u If you have more than one approver, click on the "More Approvers" button to add more. More information: Adding More than One Approver If you have more than one approver, note that you can't delete the first approver. For example, Josh Jones would be the first approver (as shown in the screen display illustrated above). If you need to delete him, use one of the other approvers from your list. Let's say that Ingrid Johansen is one of your other approvers. Type in Ingrid's name and email address over the top of Josh Jones' name. Then delete Ingrid's entry from her original position on the list so that Ingrid doesn't show up twice. u You can also indicate whether you want the settings to be local or global. That's explained in more detail here: Local & Global Settings. For more information on Reply To, BCC, and CC, see Reply To & Recipient Email Addresses. If you use local settings (and that's really handy for Reply-to addresses, then once you get your approvers entered, you need to go to each user's computer and enter any local information (such as a Reply-to address). After entering the information on the user's computer, do a local back-up. u Method # 2 also requires that you make an adjustment in the Windows operating system. That's described next in "File Association Setting."
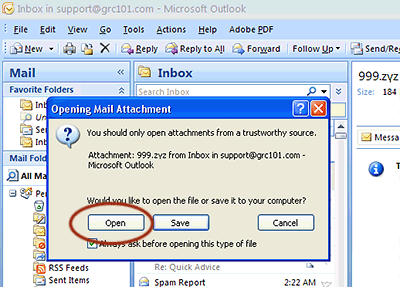
Method # 2 - File Association Setting In addition to the procedure outlined above, Method # 2 requires a configuration setting in the Windows Operating System. This setting is required on all of the directors' (approvers') workstations. When an email is sent to the approver, it includes an attachment. The attachment looks like 3455.zyz. The approver opens the attachment and AnyPO starts. When AnyPO starts it opens the Special Approval Dialog Box and goes right the PO's to be approved. Note: if for some reason, you can not configure your operating system as described below - or if you simply do not want to use the attachment method, there is an alternative that you can implement. That's explained here: No Attachment. In order for this to work, the approver's operating system must be configured to start a special program named StartPO.exe whenever it opens a .zyz attachment. (The .zyz extension has been chosen so that it doesn't conflict with any other types of attachments.) StartPO.exe is found in the AnyPO directory. First, make sure you have followed the directions above and have at least one approver set-up. To make the proper adjustment in the operating system, send a test email to an approver. We'll use Outlook Email on a Windows XP computer as a starting point. The procedure is very similar for Vista and Windows 7. Any changes between the operating systems are noted below. Additional information on other email programs are noted at the end. On the approver's computer, open the email and then open the attachment. A message will appear, asking whether you want to open or save the file. Click on the "Open" button shown below:
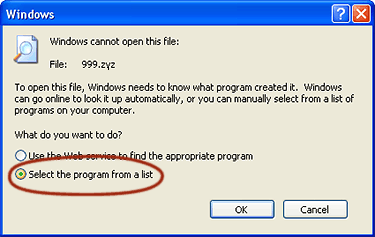
Next, the Windows operating system will trigger a message saying that it is unable to open the file. Choose: "Select the program from a list." Then click on OK as shown below:
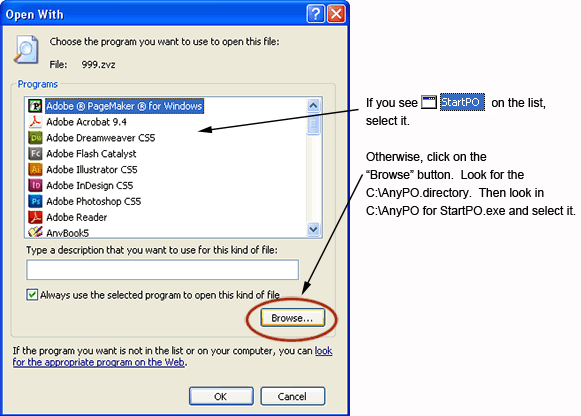
At that point, you will be given a choice of programs. (In Vista or Windows 7, you'll probably see StartPO.exe and you can select it from the list.) For all other operating systems, click on the "Browse" button (shown below)
After clicking on the "Browse" button. Look for the C:\AnyPO directory. Within the AnyPO directory, look for StartPO.exe. Remember you are looking for StartPO.exe. You do not want AnyPO.exe or any other EXE program. You want StartPO.exe. Select StartPO.exe. After selecting StartPO.exe, the following dialog box appears. StartPO should be highlighted. Check to make sure it's highlighted. Also, one other important step. Make sure there is a checkmark beside: "Always use the selected program to open this kind of file." Then click OK.
AnyPO will open. The director will need to log into the program. Once the director logs in, the program will go immediately to the proper PO. At this point, the director can approve the PO. Note that AnyPO can not be running when clicking on the attachment. Whenever you open the .zyz attachment always start with AnyPO closed. You'll need to follow the same procedure, above, for each director that can approve PO's. Note that if, for some reason, you change the AnyPO installation directory after running through the process above, you'll need to re-set the file association. Here's how to do it: Windows XP Users: click the Windows "Start" button and select "Control Panel." Once in the Control Panel, select "Folder Options." Click on the "File Types" tab. Scroll down and until you find "ZYZ File." Select it. Click the "Change" button. Click on the "Browse" button to browse to "StartPO.exe" in the new AnyPO installation directory. Then click OK. This re-sets the file association to the new directory. Windows 7 & Vista Users: click the Windows "Start" button and select "Control Panel." Once in the Control Panel, select "Default Programs." Click on "Associate a File Type with a Program." Select "ZYZ." Click "Change Program." Click "Browse." Find the new AnyPO directory and highlight "StartPO.exe." Click "Open" and OK. The file association is re-set to AnyPO's new directory.
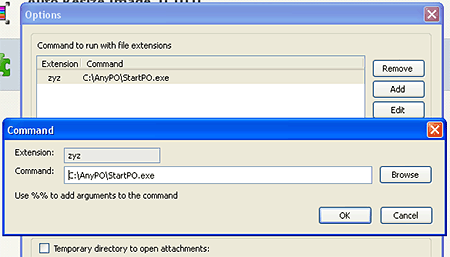
Other Email Programs. The .zyz file is a text file and some email programs, such as Thunderbird may open Windows Notepad instead of AnyPO. Thunderbird users can install an extension that corrects this behavior. It's free. It's called OpenAttachmentByExtension and you can download it from the Kaosmos Website. Install the extension to your Thunderbird program. (See Thunderbird's help documentation on how to install extensions). Once you have it installed, click on "Options" and enter the extension as zyz and the command as C:\AnyPO\StartPO.exe. (Shown below)
Once you have entered the extension and command, you're set to go. Whenever you open the .zyz attachment, AnyPO will start.
No Attachment: An Alternative Method If the ZYZ Attachment is Not Used As explained above, Method # 2 requires a configuration setting in the Windows Operating System. When an email is sent to the approver, it includes an attachment. The attachment looks like 3455.zyz. When the operating system is configured properly and when the approver opens the attachment, AnyPO starts up and immediately goes to the PO's requiring approval. If for some reason, you can not configure your operating system in this manner - or if you simply do not want to use the attachment method, there is an alternative method that you can implement. This alternative method is actually quite useful in some business situations. The process is very easy for the approver. Using this method, it's not necessary for the approver to open the emails. Once the approver notices some email requests in their inbox, they just open the program, and it immediately goes to the PO's requiring approval. The method involves using a command line argument. A command line argument is a way of starting AnyPO which tells it to behave in a certain way. In this case, AnyPO is started, the special approval dialog box appears, and it goes immediately to a PO that needs to be approved. What you do in this method is create two icons on your desktop which start AnyPO. One of the icons starts AnyPO normally. The other icon starts AnyPO, but it goes immediately into approval mode and allows you to approve PO's. It's a nice way of handling things when you don't use the attachment method. Here's how to set things up: 1. On the Windows Desktop, find the AnyPO icon. Right click on select "Copy." 2. Move your mouse to an empty area of the Desktop, right click and select "Paste" This makes a copy of the icon. 3. Right click on the newly created AnyPO icon and select "Rename." Rename the icon: "AnyPO For Approving" 4. Right click on it again and select "Properties." 5. In the Properties "Target" blank, type in: C:\AnyPO\AnyPO.exe /APV Note if you have AnyPO installed to a different directory or drive, make the appropriate correction. For example, if you have AnyPO installed to the F:\AnyPO directory, you would enter: F:\AnyPO\AnyPO.exe /APV. If you have it installed to the C:\Program Files directory, surround both parts with double quotes: "C:\Program Files\AnyPO" "/APV" 6. Click on "OK" to close the Properties dialog box. The extra "/APV" is the command line argument. It tells AnyPO, upon starting, to immediately go to a PO that needs to approved and it displays the approval dialog box. If there are other PO's that need approval, the approval dialog box will cycle through those as well.
Reply To & Recipient Email Addresses In AnyPO, you are dealing with several email address. To help explain each of the addresses, we'll use an approval request being sent to Josh Jones:
Now, let's define each:
Local & Global Settings: Reply To, BCC, CC To best understand the following, be sure that you have read the above section: Reply To & Recipient Addresses Let's take a look at Local and Global settings in relation to Reply-to, BCC, and CC. If you look at the screen displays immediately above, you'll see that Local and Global are indicated by an L or G. Global means that email address is the same for all computers on the network. There are two addresses that you can't change and which are always global. The first is your company's or purchasing department default address. That's always global. The second address that's always global is the person to which you sending the email. In the example above, all workstations on your network will have Josh Smith listed and all would be able to send him an email if needed. Reply-to, BCC and CC, however, can be either global or local. Local means that the Reply-to, BCC and CC addresses are only available to that workstation. For example, in the illustration above, let's say that an email is sent to Josh Smith, the "Reply-to" address would be "valerie.smith@company.com." This a local address (there's an L beside it), and that means if an email is sent to Josh Smith from another computer, the Reply-to address would be different. (You could repeat "valerie.smith" again if needed, but it's not automatically picked up another computer. You have to manually enter the address again.) Important: In order to use local settings, you must enter the information on the user's computer. For example, if you want reply-to addresses to be local, then you must go into Basic Program Set-up on her computer and type-in Valerie Smith's reply-to email address (valerie.smith@company.com). If you don't enter the address on her computer then it won't show up when it comes time to send the email. One other important point. On the server, global and local are the same thing. It's all global on the server. So when it comes the server, you can't set up local values. And one more helpful hint: When AnyPO does a normal back-up, it doesn't back-up local settings and if you are entering local information, you'll want to use the "Local Back-up" process. Information is found here: Local Back-up and Restore. You can adjust whether you want global or local by making the appropriate selection in the "Options" section (circled below):
Local & Global Settings: Subject & Message You'll notice that in addition to Reply-to, BCC, and CC (described above), you can also designate whether the Subject and Message are global or local. This allows you to tailor the message directly to the person you are sending it to. For example, the message (illustrated above) is address to Josh and Valerie has signed it. Since the Message is Local (it has an "L" beside it), you can personalize it in this manner. If it's global, however, you'd want to address it more generally. For example, you might leave out the greeting and signature entirely and use simply the main body of the message, so end up with the following simple statement: "Approval requested for PO # [PO#] for vendor: [NAME]. If you need additional information, check with [ORDERBY]. Important: In order to use local settings, you must enter the information on each user's computer. If you want the subject and message to be local, then that means you must go into Basic Program Set-up on the user's computer and type-in the subject and message. If you don't, then the program will use global settings instead. Also, just a reminder: on the server, there is no difference between global and local. Everything you do on the server is global. If you are working on the server, be aware that you can not set up local values. One last hint: When AnyPO does a normal back-up, it doesn't back-up local settings, so once a user's computer is configured, you'll want to use the "Local Back-up" process. Information is found here: Local Back-up and Restore.
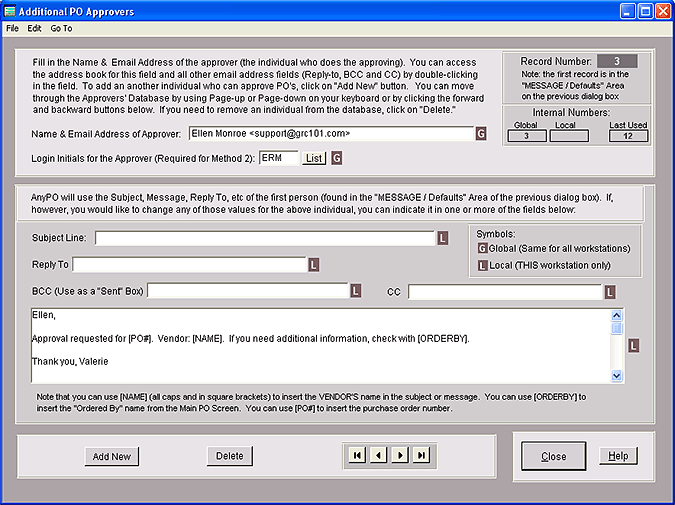
If you have more than one individual that can approve PO's, you can add them. Here's how to do it: 1. Type in the first approver in "Message Area & Approver Defaults" (see illustration, above) In the example above, Josh Jones is the first approver. 2. Then place a checkmark beside: "Check here if you have more than one approver." 3. Then, lastly, click on the "More Approvers" button. After you click on "More Approvers," the following screen appears:
In the above dialog box, two fields are required: "Name and Email Address of the Approver" and "Log-in Initials" of the approver. You can enter the initials easily by clicking the "List" button. The rest of the fields are optional. If you don't enter any information in these fields, then AnyPO will pick up the values from the first approver. (The first approver serves as the default for the rest of the approvers.) In our example, above, Josh Jones is the first approver. So the Subject line, Reply To, BCC, and CC addresses for Ellen Monroe will all come from him. Note, however, that the message (above) is required because the message to Josh Jones has been written specifically to him. If you leave Ellen's message blank, then it would pick up Josh Jones message which begins with "Josh" You wouldn't want that. Thus, the message, above, is addressed directly to Ellen. To add new approvers, click on the "Add New" button. As you add approvers, you can move back and forth through the list by using PageUp and PageDown on your keyboard. You can delete approvers by clicking on the "Delete" button. Note that you can't delete the first approver. In our example, Josh Jones is the first approver and you can't delete him. If you need to delete him, replace his name with one of the other approvers from your list. Let's say that Ingrid Johansen is one of your other approvers. Type in Ingrid's name and email address over the top of Josh Jones' name. Then delete Ingrid's entry from her original position on the list so that Ingrid doesn't show up twice. If needed, you can use the same substitution variables that are available to the first approver. [PO] will insert the PO number; [NAME] will insert the vendor's name; and [ORDERBY] will insert the name of "Ordered By" person. If you have local settings, such as a "Reply To" address, then you need to enter that information on each user's computer. When AnyPO does a normal back-up, it doesn't back-up local settings, so once a user's computer is configured, you'll want to use the "Local Back-up" process. Information is found here: Local Back-up and Restore.
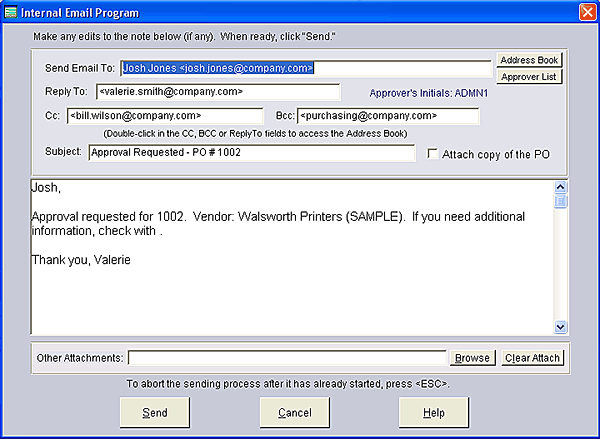
Sending the Email to the Approver Once the above preliminaries are out of the way, the process is quite simple. On the Main Purchase Order screen go to the purchase order that requires approval. Select ORDER TOOLS >> SEND EMAIL FOR APPROVAL from menu. You can also use the quick key combination: CTRL+Q. The email message screen will appear.
If need be, you can make any adjustments to your message. For example, if there's something else the approver needs to know about the PO, you can add an extra note. You can also add other attachments to the PO. For instance, you might want to attach a spreadsheet or price comparisons. You may notice the following message (in red) on the email screen:
When you see the above message, it means that you are using local settings (see Local & Global Settings), and you haven't entered the necessary information on the user's computer. In the above example, the subject and message have not been entered on the user's computer. To fix this, you need to go into Basic Program Set-up on the user's computer and type in the subject and message. Along the same lines, if you have local settings for Reply-to, CC, or Bcc and you forget to enter them on the user's computer, then these fields will remain empty when the email screen appears. If the fields are empty and you have local fields, invariably it will be because the information hasn't been entered in Basic Program Set-up on the user's computer. If everything looks right, click the "Send" button. The message will be sent to the approver. To keep track of emails sent to approvers, AnyPO will enter the approver's initials and date in the Notes area of the Main Purchase Order Screen. It will look something like: <RDW: 12/12/15>. That's it. The process just takes a few seconds to execute. For an explanation of how things work from the approver's end of things, see Approval System.
|