Details on the "Basics" Page


|
Basic Program Set-Up: Details on the "Basics" Page |
|
|
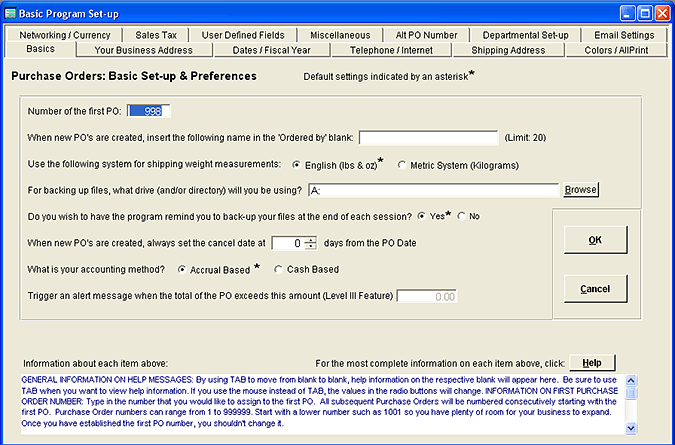
To reach the Basics page, select FILE and BASIC PROGRAM SET UP from the Menu Bar. The Basics page will appear:
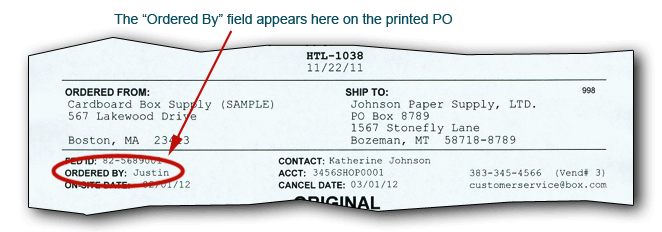
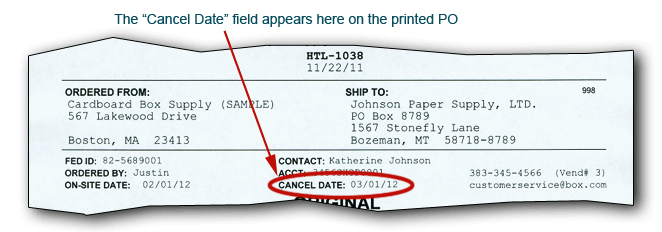
Parts of this screen include: Number of first purchase order. Type in the number that you would like to assign to the first purchase order. All subsequent purchase orders will be numbered consecutively starting with the first purchase order. Purchase Order numbers can range from 1 to 999999. Start with a lower number such as 1001 so you have plenty of room for your business to expand. Once you have established the first purchase order number, you shouldn't change it. Note that you can also create your own number with prefixes and suffixes. These are called Alternative PO Numbers, while this number is called the Internal Number. When you use Alternative PO Numbers, AnyPO will still maintain it's own internal number. When new PO's are created, insert the following name in the 'Ordered by' blank: This allows you to insert your name - or another person's name - in the 'Ordered By' blank on the Main Purchase Order Screen each time a new PO is created. This is handy if only one person does the ordering. For networked system, this is a local setting. In other words, the person's name that you enter here will appear only on that computer. By the same token on a networked system, if there is not name here, AnyPO will look on the server computer and use that name. Use the following system for shipping weight measurements You have two choices for shipping weights: English or Metric. If you primarily work in the English system (pounds and ounces) select the English system. Or if you primarily work in kilograms, select the Metric system. For backing up files what drive will you be using? Since your purchase orders files are critically important, you'll want to keep a back-up of them. (More information no backing up files is found here.) Each time the program exits, the program will automatically back up your files to a specified drive. You can indicate the drive letter for a flash drive, Zip, CD, DVD, or a second hard drive. If desired, you can also designate a specific directory on the drive for the back-up files. Be sure to select a drive that is different than your main hard drive. Often when a failure occurs, it occurs with the hard drive. It's very important that you back-up your files to a separate disk. For back-up purposes, it's easiest to use a flash drive, but, if necessary, you can use CD's and DVD's. To back-up to a CD or DVD, you need to format the disk first. Normally, you can't copy files directly to a CD or DVD. The usual process buffers the files first. The buffering process, unfortunately, takes too long, and that makes it impractical for back up purposes. But if you format the disk, then you can copy files to it in much the same way that you copy files to a floppy disk or removable drive. To format a CD or DVD, you'll need a copy of a software program called Roxio Easy CD Creator or equivalent. Use Roxio's Direct CD Format Utility and format the CD or DVD. Formatting a CD or DVD takes quite a while so start the format before you go to lunch. When you come back the CD will be ready to use as a back-up disk for AnyPO. Do you wish to have the program remind you to back-up your files at the end of each session? Since the files that hold your purchase orders and vendors are extremely valuable, you should back them up on a regular basis. By saying YES, each time you end a session, the program will ask you to put the back-up diskette, or other type of media, in a drive so the program can back-up your files. AnyPO is primarily a database program. Unlike word processing programs where information may be broken down into a variety of different document files, all data in a database program resides in a several key files. If you lose or damage one of the files, you can lose a year or more of valuable data. AnyPO has many file protection features built in, but the most important is the back-up procedure. We can't emphasize enough how important it is to back-up your files each time you exit, and we highly recommend that you select YES. When new PO's are created, always set the cancel date at ___ days from the PO Date One of the fields on the Purchase Order Screen that you may want to use is the Cancel Date. The Cancel Date, if used, appears on the printed purchase order. It tells the vendor that if they haven't shipped your order by that date, then they should cancel your order.
You can have AnyPO automatically insert the Cancel Date for you. To turn on the automatic insert feature, indicate how many days from the PO Date that the Cancel Date should be set at. In other words, let's say the PO Date of your purchase order is May 1st. If you set the number of days to 60, the Cancel Date appearing on the printed PO will be July 1st. If you don't want to use this feature, keep the number of days set to zero (0)." What is your accounting method? This is an optional field which is currently not being used, but we may implement future features which will take advantage of it. If you know your accounting method, enter it. If not, leave it as is. Trigger an Alert Message When the Total of the PO Exceeds This Amount This is a Level III feature. In the AnyPO III program you can have an indicator appear on the Main Purchase Order Screen when the total of Purchase Order exceeds a certain amount. This is may be helpful if you work in a business where PO's of pre-determined amount require additional approval procedures. If you do not wish to use this feature, leave zero (0) in the blank. If you wish to use it, type in the amount. Whenever a PO exceeds this amount, a colorful "NOTE AMT" will appear between the Vendor and Shipping address areas on the top of the Main Purchase Order Screen.
|