Net Days - Taxable - Ship Via
Shipping - Consigned Item - No Royalty


|
Parts of the Invoice Screen: Net Days - Taxable - Ship Via Shipping - Consigned Item - No Royalty |
|
|
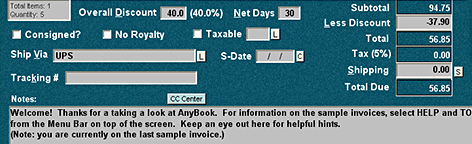
Parts of the lower portion of the Main Invoice Screen include:
Net Days (Terms - Dating) In the "Net Days" blank, indicate the number of days from the date of invoice that you allow the customer before payment is due. Normally, customers are given a grace period in which they can pay their bill. Commonly this is 30 days, but it might be 60, 90 or 120-days depending upon the customer. When the invoice is printed, the grace period will be stated like this: "TERMS: NET 30 DAYS." In other words you are saying to the customer that you have terms for providing them credit to buy products from you. Those terms are that you expect them to pay the net amount ("net amount" means no further discounts) of the invoice in 30 days. This is the most common way of dealing with dating periods. To use AnyOrder's internal billing engine, you'll want to keep your terms to 30, 60, 90 or 120. In other words, do not use such numbers as 45, 70, 115, or other odd intervals. If you don't plan to use AnyOrder's internal billing engine, then you can use whatever intervals you desire. AnyOrder always checks the Net Days blank before it sends an invoice to the printer and will not allow you to continue with the printing process if the blank is empty. This is a safety mechanism built into AnyOrder. Without having some indication of a grace period, the billing portion of the program has no way to figure out when a customer's payment is due. Net Days (Terms) & Early Payments (Level 4 and above) Some businesses offer discounts if a customer pays earlier than the grace period. For example, you may offer the following terms: 2% 10 Days, Net 30. This means the customer would get a discount of 2% if the invoice is paid within 10 days and full amount if paid before 30 days. You can include such terms on the printed invoice by the use of a code. Terms codes are two-digit negative numbers and can set up by selecting MAIN TASKS>>CODE LISTS>>INVOICE TERMS. Once you get your terms set-up, you can access them by placing your cursor in the Net Days blank and double-clicking or pressing CTRL+L. A list of terms will appear. Select the one you want and the code will entered in the blank. When printed, the appropriate terms will appear on the invoice. More information: Terms An additional feature that is available allows you to add a note to the invoice reminding the customer of an early payment discount. Here's an example: "You may deduct an additional 2% (4.55) for a total of 222.85 if your payment is RECEIVED by 10/11/2005." You can set-up your terms codes so that they automatically generate an early payment note. That's done by selecting MAIN TASKS>>CODE LISTS>>INVOICE TERMS Net Days - Built-in Terms Additionally, AnyOrder has several other built in terms. These are useful for situations when you may not want terms printed on the bottom of the invoice. Or you may wish to indicate that payment is due immediately, not in 30 days. These and other alternative terms messages can be trigged by using one-digit negative numbers:
You can bring up a list of these options by double clicking or pressing CTRL-L when the cursor is in the Net Days blank.
Taxable? Check the "Taxable" box if the customer should be charged sales tax. The program will automatically add tax to the customer's total based on the tax rate that you entered in Basic Set-up (or according to a tax code, described next.) Invoices can be coded to apply different tax rates to the items sold. This is an important function if you need to charge different tax rates depending upon the type of products sold--or where products are sold. (If you only need to charge one tax rate, however, you can set it up in Basic Set-up and you won't have to worry about again.) When the taxable box is checked, all products listed in the item area will be taxed. However, there may be situations where you may not want everything on the list taxed. To designate a product as non-taxable, type a "\NT" (for non taxable) after the product's name in the item column. (If a product's name fills the entire column, you may need to slightly abbreviate the name.) You can also do this automatically by clicking on the item and selecting PRODUCT TOOLS >> DESIGNATE AS NON TAXABLE ITEM. More information If all or most the invoices that you issued should be taxed, you can set the program to check the taxable box each time a new invoice is created. To do so, select GO TO >> DEFAULT VALUES FOR NEW INVOICES. Place checkmark in the Taxable box. All new invoices will automatically be taxed. (If you have an occasional invoice that should not be taxed, you can turn off the taxable setting on the new invoice by removing the checkmark.) If the "Taxable" box should always be checked for sales to a specific customer, you can set it up in the Customer Number Database. To do so, select MAIN TASKS >> CUSTOMER ADDRESSES AND NUMBERS. Place checkmark beside: "Taxable sales." You can also assign a consistent tax code for sales to the customer by entering the code in the appropriate blank. Variable Tax Rates (Level 4 and Above) If you live in a state or a country where you must change the tax rate depending on where you sell items, then you'll want to use AnyOrder's variable tax rate feature. To set-up different tax codes and associated rates, select INVOICE TOOLS >> TAX RATES >> SET-UP VARIABLE TAX RATES AND CODES. Once you have codes set-up, you can access them by placing your cursor in the blank following the "Taxable" checkbox. Double-click and press CTRL+L to bring up a list of codes. Select the appropriate code and the invoice will be taxed at that rate. More information: Variable Tax Rates It is also possible to change the tax rate on individual invoices by selecting INVOICE TOOLS >> TAX RATES >> CHANGE TAX RATE. The option is available, but it's not recommended. It throws off the figures in a sales report. If you use tax codes, however, the sales report will provide taxable amounts for each tax code. For more information on taxes, see: Sales Tax Report (Primary Rate) Designating Items as Non-taxable Variable Rates, Tax Codes, & Tax Code Reports
Ship Via Type in the shipping method. Possibilities include: UPS GROUND, UPS AIR, USPS AIR MAIL, USPS PRIORITY, USPS MEDIA RATE, etc. Include both the shipper and the shipping method. You can also click on the "L" button (for "List") or double click in the blank to bring up a list of shipping methods. To modify or enter new shipping methods, select MAIN TASKS >> SHIPMENT METHODS & SHIPMENT PACKAGING >> VIEW/MODIFY SHIPPING METHODS. For more on setting up your own shipping methods, see Shipping Method List. Note that the dialog box with a list of shipping methods (which is activated by clicking the "L" button), has two buttons. The button you'll use the most is "Paste" which will paste the shipper-plus-shipping method to the Ship Via field. It also has a "Paste with Defaults" button. That's used if you are utilizing AnyOrder's on-line shipment processing features and you've set up defaults for your shippers. For more information, see Shipping Defaults. If you always--or nearly always--ship by one method, you can set up a default by selecting GO TO >> DEFAULT VALUES. Type in the appropriate method in the Ship Via blank. Whatever you enter will appear on every new invoice created. If desired, you can also set-up a default shipping method for a specific customer. That's done in the Customer Information Database (MAIN TASKS >> CUSTOMER ADDRESSES AND NUMBERS).
Shipping Enter any shipping charges in this blank. If you do not wish to charge the customer for shipping, double click in the blank. The "Shipping Weight and Shipping Charges" dialog box will appear which allows you to indicate that shipping expenses should not be charged to the customer. Also found on this dialog box is the combined weight of the products. And, if you have the Level 5 (or higher) program, from this dialog box, you can also access a list of packages, weights and tracking numbers for multi-package orders. (The "Shipping Weight and Shipping Charges" dialog box can be reached by several other methods: click the S-button to the right of the shipping blank, select SHIPPING TOOLS >> SHIPPING WEIGHT & CHARGES, or click the text button "Shipping."). Whenever shipping is not charged, it will appear in blue print. Shipping which is charged will appear in black print. More information: Shipping Charges.
Consigned Item? (or Consigned?) Check this box whenever you are dealing with consigned items. Consigned items are those which you give to a vendor, and the vendor doesn't pay you until the items are sold. Consigned goods are not considered sold--nor are they considered an account receivable--until the vendor notifies you that they have been sold. When you first place goods on consignment, you'll need to issue an invoice and use the "C" code for consigned item (See Sale Type Codes) in the S-column along with the item's name and price. The consignment box will be automatically checked whenever you use the "C" code. If you are dealing with a vendor both on a consigned and regular sale basis, do a separate invoice for the consigned items. Later when the vendor reports that the consigned items are sold, you would issue the vendor a new invoice. The new invoice would list the items again, but this time using the "S" code (for a sale). You would also check the "Consignment Item?" box on the Invoice Screen to indicate that it was a consignment sale. By checking the box, the program will be able to keep track of consignment items for inventory purposes. Inventory reports include a special section which keeps track of how many items have been placed at consignment sites, how many have been sold, and how many are still left. If you work with one or more wholesalers or distributors on a consignment basis, you'll want to review the information that we have prepared in the section entitled Consignment Wholesalers and Distributors. It can greatly help reduce some the guess work involved when working with such distributors. If you have indicated that you will be paying royalties in Basic Set-up, "Consigned Item?" will be appear instead as "Consigned?" This is done to leave room for the "No Royalty" checkbox described below.)
Tracking # If tracking numbers are important in your business, use this blank for that purpose. Tracking numbers are normally included on the invoice and packing slip. If desired, however, you can have them removed. (To remove them, select the appropriate setting in "More Options" from the Print Dialog box.) The Tracking Number blank has a special Speed Menu (activated by right clicking) which allows you to paste a number from the clipboard and paste the current date at the same time. If you have the Level 5 (or higher) program, you can double-click or press CTRL+L to access a list of tracking numbers or to enter tracking numbers for multi-packageorders. To save typing, tracking numbers can be scanned directly into the multi-package list or into the blank on the Main Invoice Screen. To do so, place the cursor in the Tracking # field and scan the package. Note: if you are scanning in products, your cursor should be located in any other field other than the tracking number, otherwise the product's barcode will be pasted in the Tracking # blank. Additionally, if you have the Level 5 (or higher) program, you can scan the tracking number to locate an invoice. That's done by selecting GO TO >> FIND BY SCANNING TRACKING # from the menu at the top of the screen. If you have the Level IV program and you have more than one tracking number, you can include the additional numbers in an invoice message (select EDIT >> ADD/EDIT INVOICE MESSAGE). Invoice messages appear on the printed invoice.
S Date The S-date blank is optional, but most people will use it to indicate when the order was shipped. It may also be used as a subscription date. If you have products that you ship on a regular interval, the S-date can be used as a reminder when the next shipment should occur. Subscription products include regular book updates, newsletters, magazines, club and organizational memberships, software updates, product-of-the-month programs, etc. To find specific S-dates on the Invoice Screen use Advanced Search. To display a range of S-dates, use the Filter function. The S-Date blank has a special Speed Menu (activated by right clicking) which allows you to paste the current date. Because of space limitations, the S-Date blank doesn't have a "C" (Calendar) button beside it but you can activate the Pocketbook Calendar by double-clicking in the blank. The current month will appear. You can change the month by using the right or left arrows. Double-click on the desired date to have it inserted in the S-Date blank.
No Royalty If you have indicated that you will be paying royalties in Basic Set-up, the "No Royalty" checkbox will appear on the invoice screen next to "Consigned?" (If you won't be paying royalties, then the checkbox will not appear.) This box is normally not checked. The only time it is checked is when you do not want a particular sale to be included in an author's royalty calculation. You don't have to worry about checking the box for promotional items. Promotional items are automatically left out of royalty calculations. One example of its use is when you have given one of your customers a particularly deep discount and you do not want to pay royalties on that sale. By checking the box, the sale will be left out of the author's royalties. Royalty reports produced by the program will list any "No Royalty" sales as "Sales Ineligible for Royalty." If for some reason, you have returns or damages associated with "No Royalty" sales, you should check the "No Royalty" box when making out an invoice for the returns. Otherwise, the author ends up being penalized since the returns will reduce the author's accumulative sales. When the box is checked, however, the author is compensated appropriately. If the No Royalty box should always be checked for sales to a specific customer, you can set it up to do that in the Customer Information Database. To do so, select MAIN TASKS >> CUSTOMER ADDRESSES AND NUMBERS. Place checkmark beside: "No royalty paid on sales to this customer." Other Parts of the Invoice Screen: Invoice # - Customer # - Drop Shipment PO Number - PO Date - Invoice Date Item Area: Quan - Cat # - Item - S-Code - Price Item Area: Add, Place & Toggle Buttons Code Box - Discount - Less Discount Payment Box (Payment1, Date1, Payment2, Date2) Credit Card # - Credit Card Name - "1", "2" - Notes Invoice Screen Buttons: Navigation (VCR Buttons), Calculations, Help |