| Payments by Customers |
|
|
The Payment Area is located on the right side of the Main Invoice Screen. This is where you enter customer payments. This help page includes detailed information on how to use this part of the program. Additionally, we have prepared an illustrated guide which supplements this information. You can reach the guide by clicking here: How to Record Payments in AnyOrder
General Information There are two methods of entering payments by customers. The first is to manually enter payment amounts in the "Payment Box" (lower right-hand corner of the Invoice Screen). Two blanks ("Payment1" and "Payment2") are available on each invoice. After typing in a payment, enter the date ("Date1" or "Date2") when you received the payment. In most cases, you'll only use the first box ("Payment1"). However, occasionally you may have a customer who pays off a single invoice in two payments. The second method of entering payments is to use the "Mark Paid" feature, described in the next section, below. No matter what method you use, the one general principle of recording payments is that you should always record the customer's exact payment. Resist the temptation to add a couple of the customer's checks together. Even if it takes several payments to pay off one invoice, you want to record each payment separately. This way you and your customer have an accurate record of each and every payment.
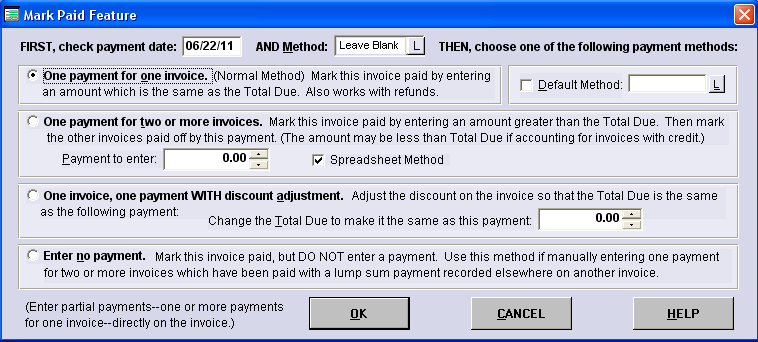
Mark Paid Feature You may manually type the customer's payments as described above, but there is a better way. The program includes a tool to help you keep track of which invoices are paid and which are not. To access it, select INVOICE TOOLS and choose MARK INVOICE PAID. It can also be accessed by pressing the right mouse button and selecting Mark Paid from the Speed Menu. And, finally, it can be accessed by clicking the word: "Payments." The Mark Paid dialog box appears:
What's so nice about the Mark Paid feature compared to other small business software systems is that it duplicates how people work in a real world situation. While it might not be important for large businesses with teams of accountants, small businesses want to keep track of individual invoices--and whether or not they are paid. A time-tested method of keeping track of invoices is to write (or stamp) "PAID" on top of the invoice. Many computer software programs, however, don't use the system, rather relying on a separate payment register which is detached from invoices. The Mark Paid feature, however, keeps things simple by printing "PAID" in the Payment Box on the Invoice Screen and keeping invoices and payments together.
Payment Method & Default Method When you use the Mark Paid dialog box, you can select the payment method type: cash, check, card, etc. That's done by clicking on the "L" button beside "Method." This allows you to create deposit reports or other reports itemizing the amounts received vis-à-vis the method. Additionally, if you have a series of checks (or cards, etc.), you may wish to use the default feature. The default is set by placing a checkmark beside "Default Method" and selecting the default method (by clicking on the adjacent "L" button). Let's say you select "Check" as the default. If you do, each time you bring up the Mark Paid dialog box, "Check" will automatically appear in the "Method" field -- which, of course, will save you time if you're entering a series of checks.
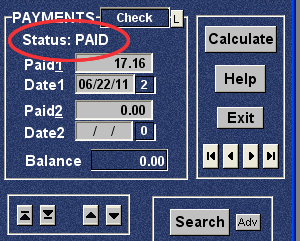
One Payment for One Invoice First Option on Mark Paid Dialog Box. When the Mark Paid dialog box appears, you'll have three choices. If the customer made one payment and paid off the invoice, the select the first or default choice on the Mark Paid dialog box. The program will enter the date and proper amount in "Payment1." Once you select this option and the dialog box has cleared, you'll see the notation "Status: PAID" in the Payment Box. Here's an example of how this works. Let's say a customer has one outstanding invoice of $75. When the customer sends you check, you would find the appropriate invoice. (Often the customer will write the invoice number on the check, and you can use the Search feature to quickly go to it). When you have the customer's invoice showing, select TOOLS and MARK INVOICE PAID from the Menu Bar. From the Mark Paid dialog box which appears, select the first option "One Payment for One Invoice" (It will already be selected since it is the default choice on the dialog box). After clicking OK, $75 will be entered in the "Payment1" blank, and the date in "Date1." "Status: PAID" will appear in the Payment Box. That's it. The payment is recorded, and you're all set to enter other payments. If desired you may also select the payment type from the list: check, cash, credit card or other. This is optional, but if you use it, you'll be able to get a summary of how much of each payment was made when a deposit report is created. For more information: Deposit and Payment Report. If you make a mistake, you can remove the paid status by using Remove Payment Status The "PAID" notation makes it easy for you to page through the invoices and spot those which are paid or unpaid. Using this feature also works nicely for billing statements. Any unpaid invoices appearing on the statement will have an asterisk beside it. The asterisks make it convenient for both you and your customer to keep track of invoices that remain unpaid.
One Payment for One Invoice: Dealing With a Refund First Option on Mark Paid Dialog Box. You can use the Mark Paid feature to indicate that a refund check has been sent to a customer. If you are not planning to issue a refund, but rather will be applying the customer's credit to future purchases, then don't use Mark Paid yet. Leave the Payment Box as it is. The credit will later be accounted for when the Mark Paid feature is used when customer pays off other invoices (See: "One Payment for Two or More Invoices: Dealing With Credits," below). If you are doing a refund, wait until you have prepared the refund check before using Mark Paid. When the check has been sent, find the invoice on which the customer's credit is recorded. Select MARK PAID from the Menu Bar. A message will appear reminding you only to use the procedure with customers receiving refunds, and it asks you whether or not you want to continue. Select YES, continue. The Mark Paid dialog box will appear. Choose the first or default option ("One Payment for One Invoice"). Click on OK. When the dialog box closes, you'll see that the Balance will now be 0, and the Payment Box will show "REFUND ISSUED." If you make a mistake, you can remove the Refund Status by using Remove Payment Status
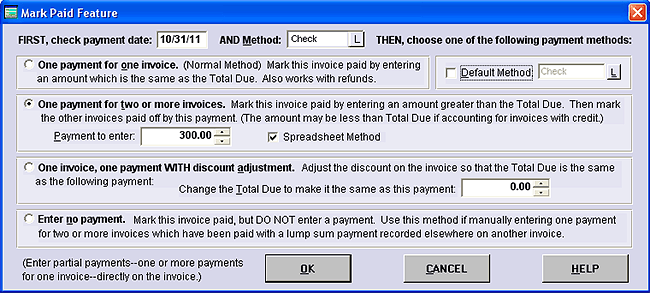
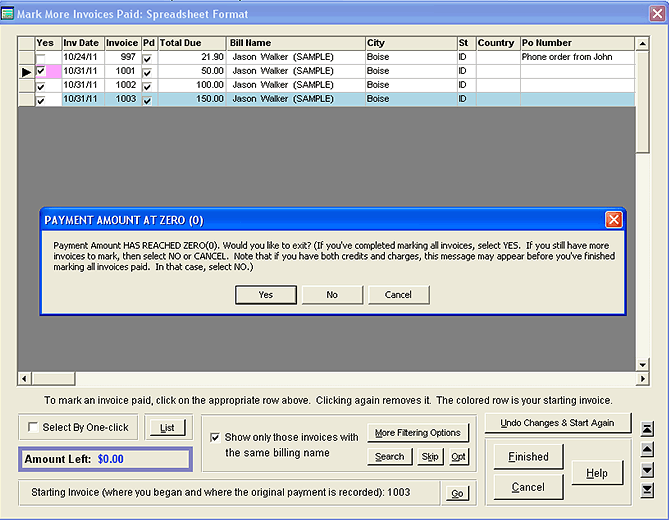
One Payment for Two or More Invoices Second Option on Mark Paid Dialog Box. If a customer pays off more than one invoice in a lump sum payment, choose the second option on the Mark Paid dialog box. Enter the total payment amount in the "Payment to Enter" blank. When you press OK, a second dialog box will appear and you'll be able to indicate the other invoices which were also paid off by the customer's payment. For an example, let's say that a customer has three unpaid invoices. The oldest invoice is for $50, the next oldest is $100, and the most recent is $150. The customer sends you a check for $300 to pay off all three invoices. Go to the oldest invoice, the $50 invoice. Select MARK PAID from the menu, and the second option ("One Payment for Two or More Invoices"). Type in $300 in the "Payment to Enter" blank, and, if desired, select the payment type from the list: check, cash or credit card. (See below)
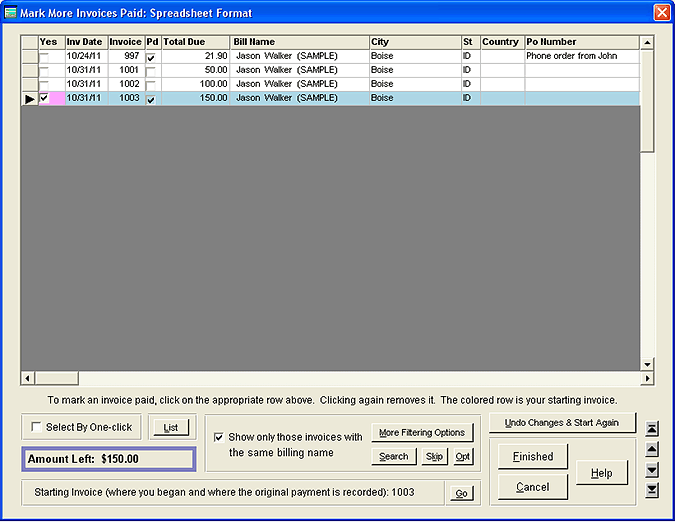
After pressing OK, a second dialog box ("Mark Other Invoices Paid") will appear. The "Mark Other Invoices Paid" dialog box consists of a spreadsheet showing all of the customer's invoices. Each invoice is shown on a separate row. This way of doing things is called the Spreadsheet Method.
(There is also a second way of marking other invoices paid. It's called the "Form Entry Method." Instead of picking invoices from a spreadsheet, you enter the numbers one by one on a form. It isn't as easy to use as the spreadsheet method, but if desired, you can access the "Form Entry Method," by removing the checkmark from "Spreadsheet Method" on the first Mark Paid dialog box. More information: Form Entry Method.) When the second dialog box appears, you select the invoices that should be included with the payment. To make a selection, double click on that invoice's row. (You can also single-click if you put a checkmark beside "Select by One Click.") When you double-click (or single click) a checkmark appears in the first column, meaning that the invoice will be marked paid along with the starting invoice and any others you select. Keep clicking rows until you've marked all the invoices that should be included in the payment. If you wrongly mark an invoice, you can remove the checkmark by double clicking (or clicking) again. As you mark invoices paid, the amount remaining from the original payment will be shown at the bottom of the screen. After you've marked all of the invoices paid, the amount remaining will reach zero(0). At this point, the program will ask if you want to exit; select "Yes" and you're all finished.
For more details on this second dialog box, see Mark Other Invoices Paid.
One Payment for Two or More Invoices: Dealing With Credits Second Option on Mark Paid Dialog Box. You can also use the second option on the Mark Paid dialog box when a customer pays off more than one invoice with a lump sum payment that includes at least one invoice with a credit. In this case, always start with an invoice with a positive total due. In other words, don't start with an invoice with a credit on it. (If you start with a credit invoice, the program assumes you are trying to mark it as a refund. In this case, however, you are not issuing a refund. You are combining the customer's credit with other invoices.) Go to one of the invoices (with a positive total due) that the customer is paying off. Then follow the same procedure you would any time you are dealing with one payment for two or more invoices. Select MARK INVOICE PAID from the Menu Bar and click on the second option. Enter the total payment amount in the "Payment to Enter" blank. When you press OK, a second dialog box will appear and you'll be mark each of the other invoices which were also paid off by the customer's payment. Included among those invoices can be any with a credit. When you are finished with the Mark Paid process, you can page through the invoices and you'll see that those with a positive total due will be marked "PAID (Elsewhere)." That means that the invoice has been paid by a lump sum recorded on another invoice. And those with a credit (negative total due) will marked "CREDIT (Covered)." That means that the invoice's credit has been included in a payment on another invoice. When you are finished, the NOTES on the bottom of the Invoice Screen will include the numbers of all invoices processed. Any credit invoices will have a "(cr)" after the invoice number. If you make a mistake, you can remove the "Paid (Elsewhere)" or "Credit (Covered)" Status by using Remove Payment Status
One Invoice, One payment WITH Discount Adjustment Third Option on Mark Paid Dialog Box. You can use this option for one of two purposes. Let's say you've invoiced a customer for $25.05. When the check comes, it's made out for $25.00. It will cost you much more than .05 when you figure the time involved in calling or sending out a statement, so rather than try to collect such a small amount, the discount on invoice is upped slightly so total comes out to $25.00. By selecting this option and indicating the amount, the discount will automatically be adjusted. To provide you with a record of the change, the notation will be placed in the Notes area. The notation looks like: ADJ/DISC: $25.05. This means that the invoice was originally issued for $25.05, but you've adjusted the discount to the Total Due ($25.00) now showing on the screen. Secondly, this option can be used in a situation where you need to adjust the discount for an Early Payment Discount. Early Payment Discounts are extra discounts that you provide to the customer for expediting payment of an invoice. For example, you may provide an additional 2% discount if a customer pays within 10 days. By selecting this option and indicating the amount, discount will be automatically adjusted. A record of the adjustment appears in the Notes area. We do want to caution you about use of this method. Some accountants feel that you should issue a credit invoice for early payment discounts instead of adjusting the discount. We'll leave this up to you whether you want to use this method or not. This is quick and easy to use, but you should discuss it with your accountant about before implementing it. Note that if a customer is paying off several invoices with one payment, and is taking advantage of an Early Payment Discount, then you'll need to issue a credit invoice. This method can only be used when the customer is making one payment for one invoice.
Enter No Payment Fourth Option on Mark Paid Dialog Box. You won't have to use the fourth option in the Mark Paid dialog box very much, but it is available in the event you want to manually mark invoices paid. It can be used in the situation where two separate invoices have been issued to the same customer, and the two invoices balance each other out. For example, one invoice is $15 and the other is a credit of $15, leaving a balance of 0. If possible, when this situation arises, try to record the activity on one invoice. Since the amounts on the invoice will balance out, no other work will be involved on your part. But that is not always possible. With two balancing invoices, no payment is necessary on the part of the customer. However, you may want to mark the invoices as paid for your own reference, and you may want to mark them paid so that the invoice with a positive total due doesn't show up on the billing statement as unpaid (marked with an asterisk). In either of these cases, you can use the third option in the Mark Paid dialog box. Go to the invoice with a positive balance, and select MARK INVOICE PAID from the Menu Bar. From the dialog box, select the third option ("Enter No Payment") and click on OK. The invoice will be marked "PAID (Elsewhere)." In the NOTES area, type a note to yourself that the invoice is being applied against an equal amount of credit on another invoice. Include the other invoice number. If you'd also like to account for the credit on the other invoice, follow a similar procedure. Go to the invoice with a negative balance, and select MARK INVOICE PAID from the Menu Bar. A message about refunds will appear. Disregard the message and select YES to bring up the Mark Paid dialog box. Select the third option in the dialog box and click on OK. The invoice will be marked "CREDIT (Covered)." In the NOTES area, type in a note to yourself that the invoice's credit was applied against an equal amount due on another invoice and include the invoice number. If you make a mistake, you can remove the paid or credit status by using Remove Payment Status You can also use the third option to mark several invoices paid as sort of a manual version of the second option where one payment pays off two or more invoices. For an example, let's say a customer owes you for two invoices. The oldest invoice is $75 and the most recent invoice is $25. The customer sends you a check for $100. Start with the oldest invoice and type in $100 in the "Payment1" blank. The program will automatically bring up the second of the two Mark Paid dialog boxes (Mark Other Invoices Paid). Cancel this dialog box. Then go to the oldest invoice. Select MARK INVOICE PAID from the menu, and choose the third option ("Enter No Payment"). The invoice will be marked as "PAID (Elsewhere)." It's actually much easier to let the Mark Paid feature take care of all this for you, but it is available if you want to have full flexibility in dealing with payments.
Invoices Not Fully Paid Another situation that may occur is when a customer doesn't fully pay off the invoice, making two or more partial payments. In this case the Mark Paid feature is not used, and you enter the payment directly in the available payment blank ("Payment1" or "Payment2"). Let's say the customer owes $200 on an invoice, and the first payment is $100. You would type in $100 in "Payment1." A message will appear: "This payment doesn't fully pay off the invoice." You are given two choices: 1) The first (and default) choice is "Not Fully Paid Yet." This means that the customer has only made partial payment and you expect another payment sometime in the future. The invoice payment status will remain unpaid. 2) The second choice is: "Mark invoice paid and account for credit." This means that you want to combine the current invoice with another, and on other invoice, the customer has a credit. When you combine this invoice with the credit invoice, the two balance out and customer is paid up. (You also can do this with the Mark Paid feature using the second option, "One Payment for Two or More Invoices"). After choosing the second option, the Mark Other Invoices Paid dialog box appears and allows you to enter the number of the invoice that has the credit on it. After you type-in the other invoice number, a message will inform you that the balance is 0. When the dialog box clears, "PAID (Has Credit)" shows in the Payment Box, indicating that the payment accounts for some credit on another invoice. The other invoice number (with the credit) will be entered in the NOTES area on the Invoice Screen.
More than two payments made to pay off an invoice If it takes more than two payments to pay off an invoice, create an additional invoice with just the customer's name and address at the top and no products listed. In the PO Number Blank, type in "Payment on Account." The invoice serves no other purpose other than to record payments. The total due on the invoice will show 0, but what's important is in the Payment Box. Use the two payment blanks ("Payment1" and "Payment2") to enter the additional payments made by the customer. You can add as many "Payment on Account" invoices as it is necessary for the customer to pay off the original invoice. All payments will show up on the customer's billing statement. You probably won't use this method very much since most businesses using this software will be dealing with customers that, for the most part, will be paying the full amount of the invoice.
Other Payment Situations Below are a couple of other payment situations that you may encounter from time to time: Under Payment. Let's say a customer owes $50, and only makes a payment of $40. The customer still owes $10. (When a customer makes an under payment, enter the payment manually. In this case, you would enter "40" in the "Payment1" blank. A dialog box will come up on which you would select "Not Fully Paid Yet" button. See "Invoices Not Fully Paid", above for more information.) Later, on another invoice the customer is charged $100. To compensate for the $10 previously owed, the customer pays $110. The way to handle this is to go to the $100 invoice and select INVOICE TOOLS and MARK INVOICE PAID from the Menu Bar. When the Mark Paid dialog box comes up, choose the second option ("One Payment for Two or More Invoices"). Type-in "110" in the "Payment to Enter" blank. The next Mark Paid dialog comes up and asks for the first of the other invoice numbers. Type-in the number of the invoice on which the customer still owes $10, and press "Mark Above Invoice Paid" button. A message will appear informing you that a payment is already recorded on the invoice, and asks whether or not you want to combine the payments. Select YES, you want to combine the payments (otherwise the old payment will be erased). That will bring the overall balance to 0. You're all finished with the process. Over Payment (and Refund Issued). Let's say a customer owes you $80. The customer makes a mistake and sends you a check for $95, over paying you by $15. If you don't do much business with the customer, you may decide to issue them a refund. The way to handle this is to enter the payment and the refund manually. In the "Payment1" blank, enter "95." (The Mark Paid dialog box will be automatically triggered. Disregard it and press Cancel.) Then later, when you issue the refund check, enter "-15" in the "Payment2" blank. After doing so, the balance will show 0. Make a note to yourself in the NOTES area that you have issued a refund check for the over payment. You're all finished. Over Payment (Accounted for on Another Invoice). We have the same situation as above. A customer owes you $80 and sends a check for $95, over paying by $15. In this case, however, you do business with the customer on a regular basis. Thus, the customer will compensate for the over payment by paying $15 less on a future invoice. The way to handle this is to go to the original $80 invoice, and enter "95" in "Payment1" blank. The Mark Paid dialog box will be automatically triggered, but for the time being, cancel it. Wait until the customer pays again on a future invoice. Let's say the next invoice the customer pays off is for $200. Instead of paying $200, however, the customer pays $185 to compensate for the $15 over payment. On this invoice, bring up the Mark Paid dialog box (select INVOICE TOOLS and MARK INVOICE PAID). When the dialog box appears, choose the second option ("One Payment for Two or More Invoices"). Type-in "185" in the "Payment to Enter" blank. The next Mark Paid dialog comes up and asks for the first of the other invoice numbers. Type-in the number of the invoice on which the customer over paid $15, and press "Mark Above Invoice Paid" button. A message will appear informing you that a payment is already recorded on the invoice, and asks whether or not you wish to combine the payments. Select YES, you want to combine the payments (otherwise the old payment will be erased). That will bring the overall balance to 0, and you're finished with the process. Customer's Computer Calculates Discounts Differently Than AnyOrder. You may find that some of your customers will calculate the discount of an order in a slightly different manner than AnyOrder. We've never seen the difference amount to more than one penny. Nevertheless, they'll only accept their way of doing things. When the difference is very small (within a cent or two), it's easiest for you to simply accept their calculations. If you try to correct it, you'll find yourself sending out statements, making phone calls, and generally expending much more effort than it's worth. If one payment is paying off one invoice, then you can use the third method on the Mark Paid Dialog Box ("One Invoice, One payment WITH Discount Adjustment") See the explanation above for more details. If the customer is paying off two or more invoices with one payment, you'll need to adjust one of more the invoices to match their calculations. Here's an example of how to adjust one invoice to match their calculations: Let's say that one of invoices to Baker and Taylor is for a total of $39.95, but Baker and Taylor says you owe $39.94. To make the adjustment, first find the appropriate invoice. Then select INVOICE TOOLS >> CALCULATE DISCOUNT from the Menu Bar. In the dialog box that appears, enter: $39.94. After you click on OK, AnyOrder will automatically readjust the discount to match Baker and Taylor's.
Quick Keys When you have a series of payments to enter, it's faster if you don't have to use the mouse. Selections in the Mark Paid dialog box can all be made by using key combinations. To activate the dialog box from the Main Invoice Screen, use CTRL+P. To move to different parts of the dialog box, press ALT plus the underlined letter. For example, to move to "Payment to Enter" use ALT+P. Another handy key combination is ALT+M. That opens up the Payment Method list. While in the Payment Method list, you move through the list by typing in the first letter of the desired item. For example, if you type in a "C," it takes you to "Cash." If you type in a "C" again, it takes you to "Check." Once you've have the right method, click on "Enter" on your keyboard, and the method is pasted in the Mark Paid dialog box.
|