Alt PO Number - Job # - PO Date - Arrival Date - Cancel Date


|
Parts of the Purchase Order Screen Alt PO Number - Job # - PO Date - Arrival Date - Cancel Date |
|
|
The following parts are located mid way down the Purchase Order Screen:
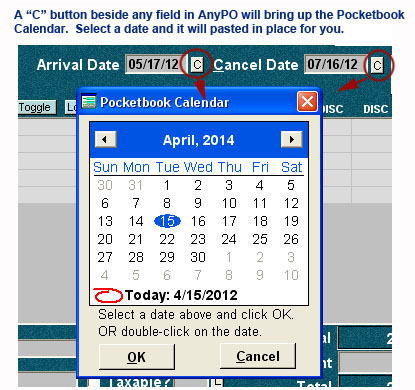
Alt PO Number (Alternative Purchase Order Number) - Level II - III If for some reason, you want to alter the internally generated Purchase Order Number (which appears at the very top left-hand corner of the screen), you can do so here. Any combination of numbers or letters may be entered in this blank. When AnyPO prints a Purchase Order, it looks at this field first. If it finds a value here, it will print it as the PO number on the printed purchase order. If nothing is found in this field, then it prints the internally generated number. You should also be aware that this field is used for prefixes and suffixes and other alternative numbers. AnyPO II and III has a number of different numbering options. In Basic Setup, you can indicate whether you want to add a prefix to the purchase order number. For instance, you can have a purchase order with the following number: "CAL938." Or you can add a suffix to the number, i.e. "983NR." Various auto-numbering options are also available. When AnyPO adds a prefix or suffix, it will place the newly created number in the Alt PO Number field. If for some reason, you don't want a particular PO with a prefix or suffix, delete the contents of the "Alt. PO Number." When the "Alt PO Number" field is blank only the internally generated number will appear on the printed Purchase Order. Job # The Job # field can be used for different purposes. It can be used to group several purchase orders under one project or job code. Another common use of it is for Account Codes. It's an optional field. If you leave it blank, it won't show up on the printed purchase order. This particular field has a pop-up list associated with it. The pop-up list is activated by clicking on the "L" button. For example, you could build a pop-up list of account codes. The account codes will be listed in the pop-up list, and upon selecting one, the code will pasted in place for you, saving you the trouble of having to type it out. To prepare and enter codes in the pop-up list, select OTHER TASKS >> EDIT VIEW JOB CODE LIST. You can change the label of the Job # field. For example, you might change it to Accnt #. Changing the label is done in FILE >> BASIC PROGRAM SET-UP & PREFERENCES (click on the "User Defined Fields" tab). A number of helpful functions have been built into the program which makes using Job or Account codes easier. If you need to associate a job number (or account number) with a particular product that is being ordered, you can activate the Job/Account pop-up list and insert the number in place. To do this, you'll utilize the "Your Cat #" column found in the Item Area. "Your Cat #" is an adaptable column and can be used for other purposes. One commonly used purpose is for job or account numbers. (You can change the name of the column by selecting FILE >> BASIC PROGRAM SET-UP & PREFERENCES and clicking on the "User Defined Fields" tab. For example, you can change it to "Your Job #"). To activate the pop-up list, place your cursor on the appropriate row in the Item Area and select STOCK TOOLS >> INSERT JOB/ACCOUNT CODE. Or you can use CTRL+I or CTRL+Double-click as short-cut keys. Select from the list and the code will be entered for you. Also, you can instruct the program to paste the same Job # (or Account #) in all rows of the Item Area. (To turn this feature on, select FILE >> BASIC PROGRAM SET-UP & PREFERENCES and click on the "Miscellaneous" tab). When this feature is turned on, and upon selecting from the Job/Account code pop-up list, all rows will pick up the same number. If some of the rows should have a different job numbers, once the rows are filled, you can manually change those as needed. This can speed up things since AnyPO will do the heavy work of filling in the most common job # and you can make any adjustments afterwards. Finally, if you have a business situation where every PO must have a job (or account) code, you can instruct the program to require a code before closing a PO. ("Closing" a PO is done by clicking the "Closed" checkbox on the upper right hand corner of the Main Purchase Order Screen). To turn on the "code required" feature, select FILE >> BASIC PROGRAM SET-UP & PREFERENCES and click on the "Miscellaneous" tab. PO Date (Purchase Order Date) PO Date means Purchase Order Date. The PO Date appears with the current date each time you create a new PO. Generally, you don't have to worry about the PO Date, but it can be changed if desired. In easy way to change it is to click the "C" (Calendar) button. The Pocket Calendar appears from which you can select the appropriate date. Arrival Date This is the date that you would like to receive the items from the vendor. You may or may not use it. It's up to you whether you utilize it. You may find it handy for pre-season orders or special orders where timing is important. The Arrival Date appears on the printed PO and makes it clear to vendor when they should ship the product. You can change the name of this field if desired. The name is changed in Basic Setup. You can type a date directly into the space or you can click the "C" (Calendar) button. The C-button activates the Pocket Calendar from which you can select the appropriate date.
Cancel Date The cancel date means that you want the vendor to cancel the order if they are unable to ship the products by this date. It's optional. You don't have to use it. If you do, it appears on the printed purchase order. You can type a date directly into the space or you can click the "C" (Calendar) button. The C-button activates the Pocket Calendar from which you can select the appropriate date. In Basic Set-up, you can configure the program to automatically calculate this date for you each time you create a new purchase order.
Other Parts of the Purchase Order Screen: Purchase Order # - Vendor # - Drop Shipment Item Area: Quan - Your & Cat # - Item Description - Price - Disc & Disc Total Item Area: Add, Place & Toggle Buttons Closed - Purchase Order Code- Overall Discount - Less Discount Terms - Taxable - Shipping Method - FOB - Shipping - Ordered By Purchase Order Screen Buttons: Navigation (VCR Buttons), Calculations, Help Other Buttons: VC Center, Revised?
|