Quan - Cat # - Item Description - Price


|
Parts of the Purchase Order Screen: Quan - Cat # - Item Description - Price |
|
|
The middle portion of the Main Purchase Order Screen consists of the Item Area.
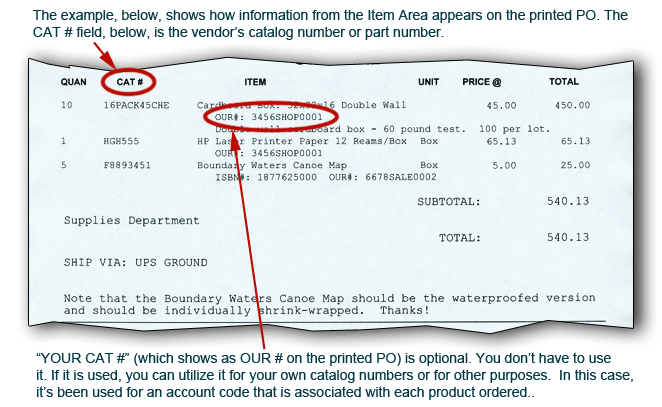
The products that you sell are entered in the "Item Area" of the Purchase Order Screen. In the appropriate columns, you can type in the quantity, catalog number (if you have assigned one to the product), the name of the item and its price. Your Cat # Your Cat # number can be used for several different purposes. It can be used for a catalog number, a job code, or an account code. If you are a re-seller, you will use this column to enter your own catalog number, ID Number or SKU (Store Keeping Unit). You'll also use this column if you use AnyPO along with AnyBook or AnyOrder. It's not required, but it's helpful to assign your own catalog number to the products that you purchase. By providing a catalog number, AnyPO is better able to distinguish between different products. An easy way to assign catalog numbers is to make your catalog number the same as the vendor's. Some businesses who use AnyPO, however, may not have their own catalog or ID numbers. In situations like this, you'll leave it blank, but it can be used for other purposes if needed. One use of this field is for account numbers or job codes. AnyPO has a feature which allows you to select from a pop-up list and paste to this field. It's the same pop-up list used by the Job / Account Code field. (More Information: Item Area Insert). Note that the 'Your Cat #' field appears on the Main PO Screen and the printed purchase order. (On the printed purchase order, it appears as "OUR #.") If you do use it, be aware that its contents will also be seen by your Vendors.
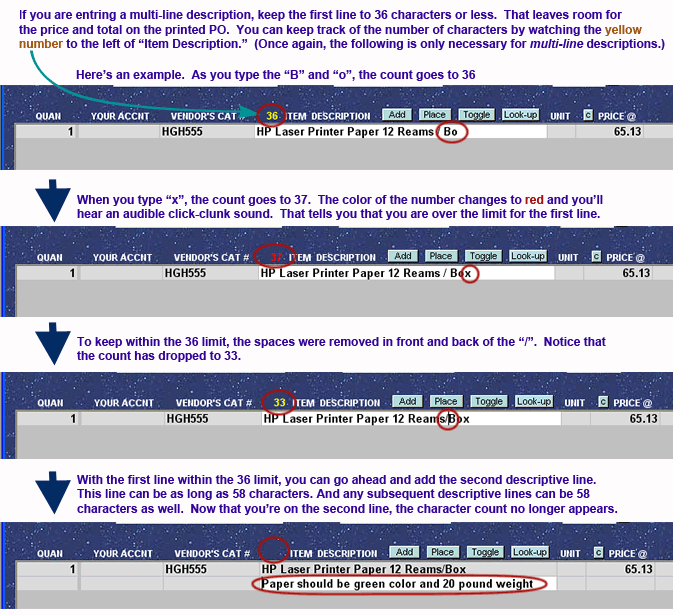
If needed, you can also change the label of this field. That's done in FILE >> BASIC PROGRAM SET-UP & PREFERENCES. Important Note: If you plan to use the program in conjunction with AnyBook (book publishing software) or AnyOrder (mail order software) and keep track of your inventory, the use of the "Your Cat #" column is a must. AnyPO will use your catalog number to automatically make adjustments in your inventory levels. Vendor's Cat # The vendor's catalog number is the catalog number, part number or SKU assigned by the vendor. You can type the number directly into the Item Area. Or, if you order a product frequently, you can type the number and other information into the Stock Ordering Database. (The illustration, above, shows how the vendor's catalog number appears on the printed PO.) Once you have created an entry in the Stock Ordering Database, you'll be able to easily enter products on the PO form by clicking on the Add or Place buttons. (You can also place your cursor on the desired row and double click in the unused, dark gray area in the Item Area.) From the list, you then select the product, and the item and price are automatically entered on the Purchase Order Screen. You can also use the Look-up button which provides list of past ordered items from which you can select. Unit If you are ordering products by weight (lbs, kg, oz), length (in, ft, cm), volume (gal, ml, ft2), time (hrs), package (pkg), box, case (cse), etc, you'll want to enter the unit of measurement here. Otherwise, you can leave it blank. If you need to order a product which is sold in decimals, such as 1.55 yards, use the Alternative Product Entry Screen. Price The price of the item is entered in the "Price" column. The total will automatically be calculated by taking the quantity times the price. Normally, the price column is configured with two decimal places. If you order specialized products which are sold in a tenth of penny (i.e. 2.345 per meter), you can re-configure the column so that it includes an extra decimal place. See Basic Set-up for more details. Item Description A description of the item is placed here. You can use as many lines as needed to fully describe the item. The first line, however, should always be a short, concise description of the product. If needed, you can follow up the first line with extra lines of descriptive information. While you can use extra lines, if possible, try to keep descriptions to one line. If you do, you'll be able to use the Look-up feature which eases the task of entering products. If you do use extra line, you'll notice that the quantity and price columns will show zeros. That's fine. That's what you want. It tells AnyPO that you're adding descriptive information to a product. When the next item is started, be sure to include a number in the "Quantity" column. This signals to AnyPO that the description for the previous item has been completed and you're starting on a new item. Note that as you type in the "Item" column" the number of characters that you have typed appear to the right of the "Toggle" button. The number will turn red when you reach 37 characters or greater. That's quite all right if you have a one-line description of the product you are ordering. If you have a multi-line description, however, you'll want to pay attention to this number. (See "Multi-line Descriptions," below, for details). Disc. (Percentage Discount) This column is used when the vendor provides varying discounts for items it sells. For example, the vendor may allow you to discount one item at 25% and another item at 40% and another at 0%. AnyPO will automatically take into consideration the different discounts and calculate the total for you. (Note if all of the products are discounted at the same percentage, use the Overall Discount blank on the bottom right of the screen Disc. Total. (Discounted Total) This column show the total after the discount indicated in the "Disc" column is removed. AnyPO will take care of this for you. You don’t have to worry about doing any of the calculations. (Note that this figure is rounded to the nearest hundred. Because there is rounding involved, the sum of the discounted total column may be slightly different than the Total figure, just below the Item Area.) Entering Fractional Quantities. AnyPO includes a special feature which allows you to create purchase orders for items which are sold by weight, length, volume, etc. Normally, you can't enter fractions in the "Quantity" column in the Item Area, but you can activate a feature which allows you to enter measured quantities. For example, let's say you are purchasing 2.5 yards of a fabric. The cost of the fabric is $10 per yard. AnyPO can do the calculations for you and include them on the printed purchase order. For more information on how to activate this feature and enter fractional quantities, see Alternative Product Entry Screen. General Information on the Item Area You can move into the Item Area by tabbing to it, or clicking on it with the mouse. Once in the Item Area, you can Tab from column to column--or you can move from column to column by pressing the Right or Left Arrow key on your keyboard. After you type in the information for the first row, you can move to the next row by pressing the Down Arrow key. That will create a new blank row on which you can type in a different product. There are NO limits to the number of different products you can enter. The Item Area of the Purchase Order Screen has unlimited rows. It will keep scrolling down, allowing more space for more products. You move up and down the list of products by using the scroll bars, or the Up and Down Arrow keys on your keyboard. (You can't use Page Up or Page Down to move up and down in the Item Area since those keys are used to moved to different purchase orders) In order to conserve space, the Item Area allows only one blank row at a time. If you press the Down Arrow key once, it creates a new blank row. But if you press it once more, no new rows are added. The same happens if you use Tab. The width of the columns in the Item Area can be changed. To do so, click on the "C" button, just to the left of the word "Item." After clicking, the names of each column will appear. On either side of the names, hold the left mouse button down and move the column line to the desired width. The column width that you set will be in effect for all purchase orders in the file. You can return to the default size of the column by refreshing the screen. To do a Refresh, select ORDER TOOLS and REFRESH SCREEN from the Menu Bar. Whenever you do a Refresh, the purchase order screen is re-drawn in its original format and the column widths will return to the default sizes. There are limits to the size of the numbers in the quantity, price and total columns. For a list of these and other limitations, see Program Limits. It's best to try to keep item descriptions to one line. However, some products that you order may require more than one-line to describe the product. If you have included the product in the Stock Ordering Database, AnyPO will automatically enter the product in the Item Area for you (when you select from the pop-up list). It enters each line of the description in a separate row. The first line is the important line. It contains the price and catalog numbers. If you need to change the quantity (or make changes to catalog numbers), be sure to do it to the product's first row. The subsequent rows are used only for descriptive information. You may not always have the product included in the Stock Ordering Database, and the following information will help if you manually enter multi-line descriptions. Note: you don't have to do it exactly as shown below. AnyPO allows plenty of leeway, but it does keep the arrangement of products in a more organized manner and that's helpful when you later export data and create reports. If you need more than one line to describe a product, you need to create a new blank row for each separate line. The description is typed in the "Item" column. You should keep the description in the first row at 36 characters or less. (This allows room for the price and total on the printed purchase order). As you type into the Item column, the number of characters you've typed appears as a small number to the right of the "Toggle" button. As soon as you go over 36 characters, the number will turn red. It's important to keep track of the number of characters if you have multi-line descriptions. You don't want to exceed the 36 character limit for the first row. (For descriptions which occupy only one line, however, you do not need to keep track of the number of characters). You also do not have to keep track of the number of characters on subsequent lines of multi-line descriptions. Any additional lines after the first line can exceed 36 characters. See below for an illustration.
(Note that the character count feature is only activated when you actually type into the Item column. If you move out of the Item column and back into it, you'll need type a character or two to activate the counter.) What's the reason for the 36 character limit on the first line of multi-line descriptions? AnyPO needs enough room to include the price and total on the printed purchase order. By keeping the length at or under 36, AnyPO will have the necessary room to include this information. Let's summarize multi-line descriptions with an example. Let's say you need two lines to describe a product that you wish to order. Create a new row by placing your cursor on the last row in the Item Area and pressing the Down arrow key on your keyboard. A blank row will appear. Type in your catalog number (if you have one for it). Type in the manufacture's catalog number (if there is one.) Indicate the quantity and price each. Then type in the first line of the description of the product in the "Item" blank. Make sure that you don't exceed 36 characters. Now you're ready to move on to the second line of the description. First, you need to create a new blank row. Do that by placing your cursor on the last row of the Item Area and press the Down arrow key on your keyboard. A blank row will appear. In this row, type in only the second line of the description in the Item column. The 36 character limit doesn't apply and you can type in as much as the field will allow. Do not enter anything else. In other words, do not indicate the price or catalog number. When you need more than a one line description, the product's first row is the only one that you should use to indicate catalog numbers, quantity and price. On all subsequent rows, you should only use the "Item" column, and all other columns should be left blank. Now, having said all this. What if you don't keep the first line to 36 and what if you end up entering the quantity and price on the last line of a multi-line description? Well, to tell you the truth, it works fine. It won't cause any problems with the program. It is helpful from the perspective of creating reports, so if you can, place the quantity and price on the first line, but the world won't fall apart if you forget. Item Summary The Item Summary is small shaded rectangle located just below the Item Area on the left edge of the screen. The Item Summary includes two numbers: 1) the number of different items listed; and 2) the total quantity of all items combined. Alternative Product Entry Screen In addition to the Item Area, you can also enter products in the Alternative Product Entry Screen.)
For more information on different aspects of the Item Area of the Purchase Order Screen: Item Area: Quan - Cat # - Item - S-Code - Price Item Area: Add, Place & Toggle Buttons Alternative Product Entry Screen
Other Parts of the Purchase Order Screen: Purchase Order # - Vendor # - Drop Shipment Item Area: Quan - Your & Cat # - Item Description - Price - Disc & Disc Total Item Area: Add, Place & Toggle Buttons Closed - Purchase Order Code- Overall Discount - Less Discount Terms - Taxable - Shipping Method - FOB - Shipping - Ordered By Purchase Order Screen Buttons: Navigation (VCR Buttons), Calculations, Help Other Buttons: VC Center, Revised?
|