Second Dialog Box (Export Profile)


|
Export & Report Generator: Second Dialog Box (Export Profile) |
|
|
Export & Report Generator: Creating the Profile - 2nd Dialog Box Step By Step Procedure (Developing the Profile)
(The second dialog box in the Export series is reached from the first box by clicking on either "Create New Profile" or "View or Update Existing Profile.) The following screen displays:
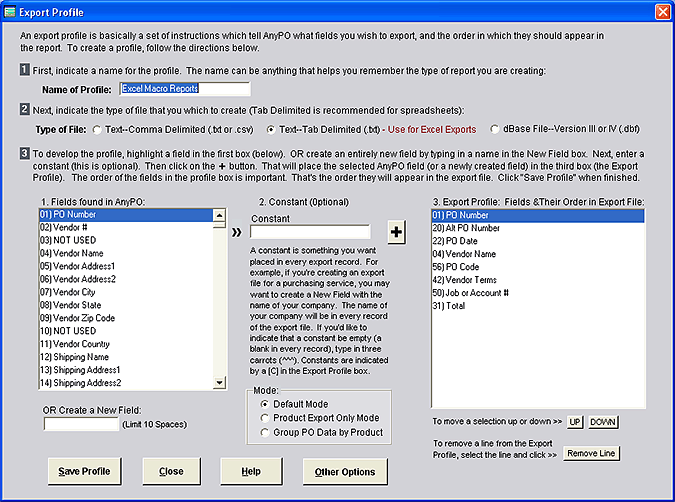
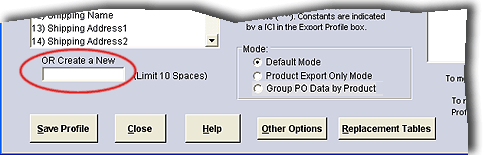
Step # 1 (Name of Profile) The "Export Profile" dialog box will appear after you select "Create New Profile." At the top of the dialog box, enter a name for the profile. Type in something that will help you remember what sort of data is being exported, i.e. "Email List " or "Vendors From New York", etc. Indicate the type of file that you wish to create. You have three choices: Comma Delimited, Tab Delimited, and dBase. If you plan to send the data to Excel or a spreadsheet of your choice, select the "Tab Delimited" option. More information: File Types. Step # 3 (Building the Profile) Now take a look at the leftmost box on the bottom of the screen. In this first box, you'll see that each field in AnyPO is numbered: 01) PO Number 02) Vendor # 03) Not Used 04) Vendor Name The number is the position of the field in AnyPO's data base files. You can disregard the numbers. They are there to help guide AnyPO's internal export process. You'll notice that a number of fields are labeled "Not Used." These are fields that are currently not used but are available for future updates of the program. To develop the profile, select a field in the first box by clicking on it to highlight it . Then click on the large + sign. The field will be moved to the second box (the profile box). Here's an example of what a profile in the second box might look like: 04) Vendor Name 05) Vendor Address1 06) Vendor Address2 07) Vendor City 08) Vendor State 09) Vendor Zip The above profile means that the first field in the export file will be Vendor Name, the second field will be the Vendor Address1, and so on. On a spreadsheet, the fields become columns. So the first column will be Vendor Name, the second column will be Vendor Address1, the third column will be Vendor Address2, and so on. The order the fields appear in the second box is important. This will be the order they appear in the export file. If you make a mistake, you can remove a line by selecting "Remove Line." You can also change the order of the field list in the Profile box. When you use the + button, it always inserts the select field at the bottom of the list, but you can move a highlighted field up the list by using the UP button. Or you can move it down by using the DOWN button. You don't have to use all the fields in the first box, just those that you want to be placed in the export file. Building the Profile: Using AnyPO's Fields More than Once You can use the fields on the first list as many times as you need. For instance, let's say you are exporting information for use in file used by another software program. The other program's file has a place for the customer's name and an additional place for the vendor's name in a "Contact Name" field. You can export Vendor Name from AnyPO to both locations by placing Vendor Name on the Profile list twice. Building the Profile: Creating a New Field This feature creates a new blank field. It doesn't have much of an application for report creation, and you'll probably rarely use it. It is available, however, for other purposes. It's mostly used when moving data from AnyPO into another software program which expects a certain number of fields. For example, let's say you are moving the data from AnyPO into a web application. The web application expects you to import vendor name, address, a blank field, and the purchase number. To make a blank field, use the "Create a New" box (shown below).
Blank fields are useful to keep the order and number of export fields the same as those of the input application. To create a new field, type in a short descriptive name of 10 characters or less in the New Field blank. The name can be anything that helps you remember what it's being use for. Let's look at another example. Let's say you are creating an export file to be used in an application which has places for 3 address lines (Address1, Address2, and Address3). Since AnyPO has only 2 address lines (Address1 and Address2), you can export a blank address line to line up with the third address line in the other software program. In this case, you might name the new field "Address3" Type in the New Field name and then click on the + button. AnyPO will number any New Field with a double zero, i.e. 00) Address3. New Fields can also be used in conjunction with Constants (described below). Building the Profile: Constants Between the two profile boxes, you'll see a field for "Constants" (shown below):
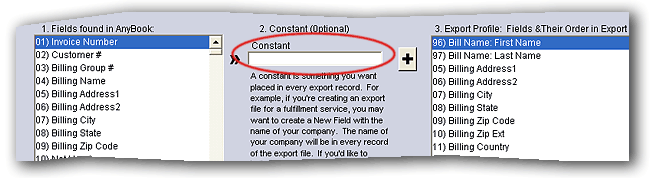
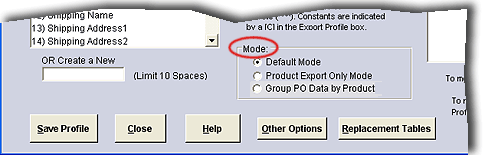
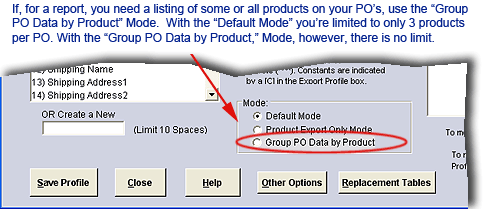
This is another feature that is rarely used for reports. Like the "Creating a New Field" (above), it's primary use for moving data into another software program. In such cases, you may need to include a constant in the export profile. A constant doesn't come from any of AnyBook's fields. It's a value that you designate and which will be inserted in every export record created. For instance, let's say you are providing purchase order information to one of your partner companies overseas, and you want to make that they understand that the amounts associated with the data are in US dollars (USD). Let's say that we decide to use "User Field 3" for this purpose. That means that we want contents of the field "40) User Field 3" to be "US CURRENCY" on every record of the export file. You can do this by highlighting "40) User Field 3" in the first box, typing in "US CURRENCY" in the Constant blank, and then clicking the + button. You'll see the following in the Profile box: 40) User Field 3 [C] US CURRENCY The [C] indicates a constant. It means that when User Field 3 is exported, it doesn't matter what's in the field on the Main Purchase Order Screen, the value will always show up as "US CURRENCY" in the Export Field. Constants can be assigned to New Fields. As an example, let's say that you want the name of your company in every record of the export file. The name of your company is "XYZ Company." Start by typing in "MyCompany" in the New Field blank. In the Constant blank, type in "XYZ Company. Click on + . The Profile (the 2nd box) will look like: 00) MyCompany [C] XYZ Company Thus, every record that is exported will contain the name of your company. Here's another example. Let's say that have contracted some of your purchasing duties to a contractor. We'll call the contractor Purchasing Unlimited. Every so often you provide Purchasing Unlimited with an export file of purchases you want processed. In such cases, you may wish to have your company name on every record, so there's no mix up on whose order they are processing. To include your company name, you would follow the same procedure as the previous example. Type in a name ("MyCompany") in the New Field blank. In the Constant blank, type in your company's name ("XYX Company"). Click on + to move the information to the Profile (the 2nd box). When you send the export file to Purchasing Unlimited, your company name will be in every record. One more note about constants. You can create an empty field by using the New Field method described above, but you can also use constants to create a blank field. If you'd like one of the fields that you're exporting from AnyPO to always be blank, place three carrots (^^^ ) in the Constant blank. Mode is used to control the type of fields and how they are exported. Mode is found on the lower part of the dialog box:
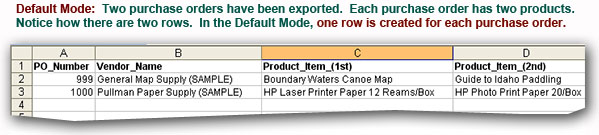
There are three modes: 1. Default Mode. When you use this mode, you'll be able to export any or all of the fields on the Main Purchase Order Screen. There is, however, a limit on the number of products that you can export. (These are the products that you've ordered and which are entered in the Item Area on the Main Purchase Order Screen.) With this method, the maximum number of products that can be exported from each purchase order is three (3). Here's an example with two purchase orders:
When you do the export, one export record is created (which turns into one row on a spreadsheet) for each purchase order. This mode is normally used when you are creating reports for general purchase order data such as the billing name and address. If you need general purchase order data and product data, then the "Group PO Data by Product" Mode, below is the best choice.
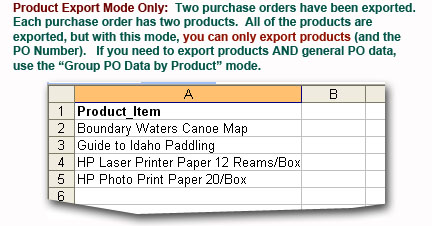
2. Product Export Only. In this mode, only product information (and PO numbers) are exported. In the default mode (above), you are limited to 3 products. In this mode, however, there is no limit. If there are 10 products on a purchase order, then all 10 are exported. When you do the export, one export record is created (which turns into one row on a spreadsheet) for each product found on the PO. (See "Use two files to export invoice data and products" for how you would use this mode.) Here's an example:
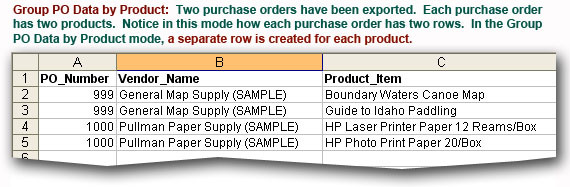
3. Group PO Data by Product. When you use this mode, you can export any of the fields available on the Main Purchase Order Screen AND you can export product data. You are not limited to 3 products as in the Default Mode. When you do the export, one export record is created (which turns into one row on a spreadsheet) for each product found on the PO. Any PO data from the same purchase order is repeated with each product exported:
More information on this mode is found here: Group Invoice Data by Product. Important Note: if you select this option, you'll often go into "Other Options" and turn on this feature: "Exported product rows normally include only those with an item description and a NON-ZERO price, check here to INCLUDE product rows with a zero (0) price" (Click here for more details.)
Building the Profile: Products You have a couple of choices when you need to create reports that include general purchase order information along with the products that have been ordered. You can use the "Default Mode" to create a report with general information and products, but you are limited to three products. This method works fine if you only need information on the first, second or third product listed in the Item Area on the PO. When setting up the profile, select the product fields from the box on the left and place the field names in the Profile box on the right (by clicking on the + ). In other words, you'll select the three products (1st, 2nd and 3rd product), and other product information and other product information, such as: Product Quan (1st), Product Cat # (1st), etc. AND Product Quan (2nd), Product Cat # (2nd), etc. AND Product Quan (1st), Product Cat # (1st), etc. If you need to export more than three products (which is usually the case), then you'll need to use one of the next two techniques. (Most likely, you'll be using the first one.) The "Group PO Data by Product" mode is used extensively when creating reports. Use it when you need to export general purchase order data and product data. The "Default" mode is limited to exporting only 3 products, but there is no limit to the number of products when using "Group PO Data by Product."
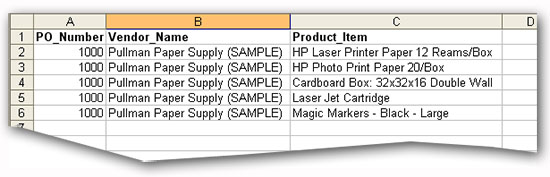
When using this mode and building your profile, you only need to use the first product: Product Item (1st), Product Price (1st), Product Quantity (1st) and so. It's not necessary to use the 2nd or 3rd product. What it does is to duplicate the PO data for each product showing in the Item Area. Let's say that you've set up simple profile consisting of the Vendor Name and Product Item (1st). Let's also say that you will be exporting only one invoice. The invoice has 5 products on it. If you tried to use the "Default Mode," only the first 3 products would be exported. But if you select the "Group PO Data by Product" mode, the resulting export file will include all 5 products. The five products would show up on the spreadsheet in 5 five rows. The vendor name will be repeated on each row. The first row would have the vendor name and the name of the first product. The second row would have the same billing name and the name of the second product, and so on. In other words, general PO data is repeated for each product on the item list. Illustrated, below, is a very simple report using this mode, but it shows how it would appear on the spreadsheet:
This is a very common way of creating reports since it doesn't matter how many products are listed on a PO. All of the products on each of the PO's that you export will be listed on the spreadsheet. If you have items listed on the PO without prices (a price of zero) and you want those to appear on the spreadsheet, then make sure that you go into "Other Options" and place a checkmark beside: "Exported product rows normally include only those with an item description and a NON-ZERO price, check here to INCLUDE product rows with a zero (0) price" (Click here for more details on this option.) When you are not getting the right number of products on your spreadsheet, this is often the cause.
Use two files to export Purchase Order data and products. This method uses two files to export data. You'll probably rarely ever use this method of exporting data. It has very little application when creating reports, but it is, however, useful if you ever need to move data from AnyPO into another software program which expects the data to come in two files. The first file of the two-file set contains general purchase order data (vendor names and address, etc), while the second file contains only product information. Like the "Group PO Data" Mode, above, the two file system does not have any limitations in regards to products. You can have as many products as needed. The files are so-called "related" files. The way related files work is there must be a common field that connects the two. The connection that AnyPO uses is the Purchase Order number. Thus the Purchase Order number must appear in the general purchase order data file and it must also appear in the Product file. Third party software and contractors use a variety of terms when they talk about export files. It's helpful to look at few terms. Understanding what they mean will help you decide on what export method will work best for you. As was mentioned, the general purchase order file contains general purchase order data like the vendor name and address. Another name for it is the "Parent File" since it is parent to one or more children records of the product file. Or it can also be called the "Header File" since it contains "header" information about the common field which connects it to the product file. The product file is sometimes called the "Child File" since one or more child records (products) will be attached to each record of the Parent File. And finally, it's also called the "Detail File" since it provides the details to go along with the "Header" file. The profile for a general purchase order data file (or Parent or Header File) is set-up as you would any file. Pick the fields that you want in the export file: Vendor name, address, shipping charges, total due, etc. Be sure to include the Purchase Order Number. Then save the information under a profile name that helps identify that it contains general information: "Purchasing Unlimited: General" is an example. Return to the first dialog box in the Export series. Next, set up the product profile. From the first dialog box in the Export series, click on "Create New Profile." Give the new profile another name, but reference the first file so that you know they are related. If "Purchasing Unlimited: General" is the first file name, the second might be: "Purchasing Unlimited: Products." In the middle bottom of the second dialog box, you'll see the "Mode" box. Select the "Product Export Only Mode." As soon as select the Product Export Mode, the fields contained in the first box will change to product fields only. This indicates to AnyPO that you want to create a product only profile. From here the process is just like the general purchase order data file. This time, you are only working with product fields. Pick those fields that you want in the export file. Then save the profile. When it comes time to do the export, what you need to do is to run the export process twice. First do the export for the general purchase order data file (or Parent or Header File). Then using the same Purchase Orders, do the export a second time for the product file (or Child or Detail File).
To continue the step by step procedure: Third Dialog Box More Information on Exporting Export & Report Generator (First Dialog Box) Other Options (Third Dialog Box)
|