Third Dialog Box (Other Options)


|
Export and Report Generator: Third Dialog Box (Other Options) |
|
|
Export and Report Generator: Other Options - 3rd Dialog Box Step By Step Procedure (Other Options)
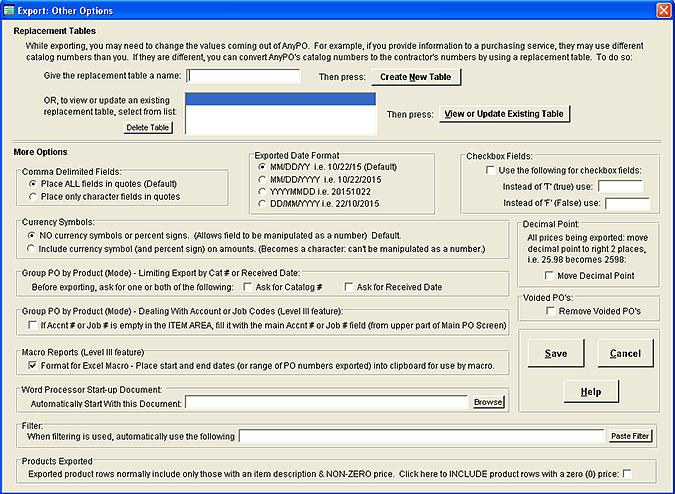
Other Options is reached by clicking on the "Other Options" button on the bottom of the Export Profile dialog box. The following screen appears:
Replacement Tables In this section of the dialog box, you can set up one or more replacement tables. Replacement tables are used to convert values coming out of AnyPO so they can be used in other applications. For an example, let's say you employ a contractor to handle some your purchasing needs, and you periodically provide them with an export file of items required. The contractor uses a code for the shipping method. They might use "U25" for UPS Ground. You, however, use the more common "UPS Ground" on your purchase orders. You can use a replacement table to convert "UPS Ground" to "U25" or to make any other shipping method conversions. To do so, begin by giving the table a name. Then click on "Create New Table." More on Replacement Tables. Other Options In addition to the replacement table, you also have several other options from which to choose: Comma Delimited Files If you are creating a Comma Delimited file, you can select whether you want all the fields contained in quotes or whether you want the quotes removed from numbers. In most cases, you'll probably keep all fields in quotes (the default). In some cases, however, it may advantageous to leave numbers unquoted. A number of software programs will recognize imported data without quotes as a number and formatted it as such. This allows you to manipulate it as number field in the other software program. Exported Date Format Several date formats are available. The date field in AnyPO is normally formatted as Month/Day/Year (mm/dd/yy). You may wish to change the format to match that used in another application. Checkbox Fields AnyPO has a number of checkbox fields. When checkbox fields are exported, they appear a T (for true, the box is checked) or F (for false, the box is not checked). The software program that you are exporting to may require the fields in a different format. For instance, the program may require the fields to be YES or NO. This allows you to change the fields to the required format. If need to make a change, be sure to place a checkmark beside "Use the following for checkbox field." Currency Symbols AnyPO normally doesn't add the currency symbol to numbers which are being exported, and normally you don't worry about it at this stage in the game. If you are creating reports and sending them to Excel (the usual situation), you'll format the column in Excel as currency. But if you are moving the data into another software program, you may need to have the currency symbol included. If so, move the select dot to "Include currency symbol." Note that when you do this, the software to which you are exporting can no longer work with the field as a number. You'll need to experiment a bit to find out what's the best setting for the input application. One last note, if you are exporting to a Comma Delimited file, you can't turn off the quote marks and include the currency symbol (see "Fields in Quotes, above). When you include the currency symbol you are treating the field like a string and all strings must have the quote marks. Decimal Point AnyPO formats monetary amounts with a decimal point: 34.67. However, some software applications may not use the decimal point: 3467. If you are using such applications with the export file, you can have AnyPO remove the decimal point. To remove the decimal point, place a checkmark in the box. Group PO Data by Product (Mode) - Limiting Export by Catalog Number or Received Date This is an option that is available if you have selected the "Group PO Data by Product" mode found on the previous dialog box. When using the Group PO Data mode, general Purchase Order data is repeated for each product on the Purchase Order. For example if you have a Purchase Order with 3 products, three separated records will be created for the export file. Each record will have the same general purchase order data (vendor name, vendor address, etc.), but will have a different product. If you place a checkmark on "Ask for Catalog Number," AnyPO will stop the export process and ask you to indicate which product you want to export. It will then run through a series of Purchase Orders and create records for the selected product. This allows you to create a report specifically tailored to one of the products ordered. If you place a checkmark on "Ask for Received Date," AnyPO will stop the export process and ask you for the "Received Date." This is the date that the product has been received. (The Received Date is indicated by clicking on the "Inventory Mode" button on the right side of the Main Purchase Order Screen.) AnyPO will then run through a series of Purchase Orders and create records for the indicated date. If desired, you can place checkmarks in both "Ask for Catalog Number" and "Ask for Received Date." In that case you can limit the report to a designated catalog number and received date. Group PO Data by Product - Dealing with Job or Account Codes - Level III feature This function is available if you have selected the "Group PO Data by Product" mode (which is found on the previous dialog box). As mention above, in the Group PO Data mode, general Purchase Order data is repeated for each product on the Purchase Order. If, for instance, you have a Purchase Order with 3 products, then three separated records will be created for the export file. Each record will have the same general purchase order data (vendor name, vendor address, etc.), but each will have a different product. This function is useful for a situation where you have set-up the program to have job numbers or account numbers. These numbers are entered in the Job/Account number field (middle of the Main Purchase Order Screen, just below the address area). But you also may need to use the "Your Cat #" column found in the Item Area. And, in that case, you probably have re-named it to "Your Cat #" to Job # or Accnt #. When you have a situation like this, in the majority of cases, entering a number in the Job/Account Number field works fine. But at times, you may have one job or account code associated with one product that you are ordering, and another job or account code associated with another product that you are ordering. In those cases, the account code is entered alongside the product's name in the Item Area (in what was the Cat # column). If you are preparing a report and you need to obtain totals of the items ordered for each job or account code, it would be difficult to obtain the information you need when the codes are in one of two fields. This function allows you to have the codes placed in just one field. All codes are placed in the Item Area "Cat #" field. To use this function, make sure you do the following: 1. "Group PO Data by Product" is turned on in the previous dialog box. 2. Make you sure place a checkmark beside "If Job # or Accnt # is empty in the ITEM AREA…" 3. When you select fields for the profile, you must select 50) Job or Account # and you must select 03) Product Cat # (1st). 4. In you profile list, order is important: 50) Job or Account # must be before 03) Product Cat # (1st). You can any number of fields between the two, just make sure the Job or Account # comes first. Macro Reports - Level III Feature If you have the Level III program, you'll be able to download a series of Excel macros. You can obtain the macros by selecting Help >> Obtaining Report Macros. A dialog box will be triggered which provides a link to the AnyPO website. After clicking on the link, a webpage appears with information on the various macros available. You'll also find a download link and information on how to install the macros in your copy of Excel. If you use any of these macros, then you should place a checkmark beside: "Format for Excel Macro - Place start and end dates (or range of PO numbers exported) into clipboard for use by macro." (Note: that this feature will be turned on already if you use the "Excel Macro Reports" profile that comes pre-loaded with the program.) When this feature is turned on, AnyPO will move data into the clipboard. As each of the macros run, they look to the clipboard and extract the information found there, using it as part of formatting process. The webpage that you access by selecting Help >> Obtaining Report Macros provides lots of details on how to run and use the macros. Word Processing Start-up Document In the first dialog box of Export (at the bottom), you can turn on a feature which will automatically start a word processor when the export process is complete. This is exceedingly useful feature, particularly with combined with a start-up document. In this field you can indicate a mail merge document that you want your word process to start with. It could be an email letter, labels, or a form. That means as soon as the export is finished, your word processor will start with the document in place and fields merged already. Filter One way of selecting the purchase orders you want to export is by the use of a filter. There are two options on the Export's first dialog box that can utilize this feature: Use Filter & Use Filter With Dates. When either one of these options are selected, AnyBook will display the "Filter Purchase Orders" dialog box. In the blank on top of the dialog box you can enter a filter formula or choose one of the options at the bottom of the screen. Only those purchase orders which are filtered will be exported. After you exit from the Filter dialog box, an export file will be created according to the filter. One nice way of getting the filter sorted out before using Export is to set the filter when working in the Main Purchase Order Screen. When you have the filter adjusted so it working correctly, return to this dialog box (Other Options) and click on the "Paste Filter" button. The filter formula will be pasted in the blank for you. For step-by-step instructions on how to create reports using filters, see Creating Reports With Filters. You also can, if desired, adjust the filter by running several exports. Once you have the filter decided upon, and it's a filter that you want to use each time you run the export, you can save the filter formula in here in this field in Other Options. Delete the formula from the blank if you no longer wish to use a filter. Note that the filter that you enter here is only used if you have selected one of the following two options on the first dialog box:
Exported product rows normally include only those with an item description and a NON-ZERO price, check here to INCLUDE product rows with a zero (0) price. Whenever AnyPO includes products in the export, it runs through each row in the Item Area (on the Main PO Screen). If a row doesn't include an item name and the price is zero, it leaves out that row. This helps eliminate extraneous information that may not have relevance for export purposes. Primarily, it leaves out extra explanatory lines. For example, you may list the following on two lines in the Item Area: Quan Item Name Price Total 1 Gone With the Wind 10.00 10.00 (Complete DVD Set) 0.00 0.00 The first row has a quantity, item name and price, but second row consists only of extra explanatory information in the item name column. In most cases, when you do an export, you don't need to export the second row, and, by default, AnyPO leaves it out of the export file. As long as the price is non-zero, it leaves it out. However, you can include the second row by selecting this option. By selecting this option, AnyPO will include rows with either non-zero or zero prices.
To continue following the step by step procedure: Starting the Export Process More Information on Exporting Export & Report Generator (First Dialog Box) |