| Export and Report Generator |
|
|
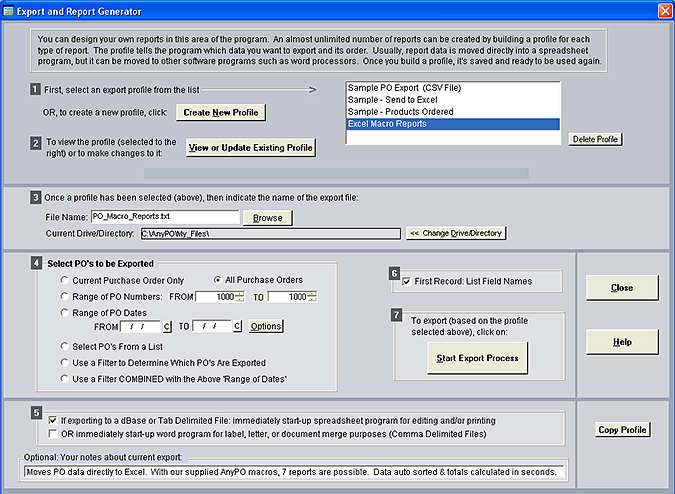
Export and Report Generator - First Dialog Box
The Export and Report Generator feature is an extensive and versatile tool designed to move data out of AnyPO and into other programs and applications. Primarily, it is used to create reports, but it can be used for other purposes. To control which fields are exported, the Report Generator uses something called a profile. The profile is a list of instructions to AnyPO which drives the export process. In addition to profiles, you can also control other aspects of the export process. The advantage of using an export process to create reports is its flexibility. Almost an unlimited number of different types of reports can be created. You can design the reports around your business needs. Once the profile is completed, AnyPO remembers the settings, and it's just a matter of running the process. You can even instruct the program to immediately start-up your spreadsheet program as soon the export is finish. AnyPO comes with a number of built-in reports in which the profiles have already been constructed. You'll find complete information here: Built-in Reports. Additionally, we have prepared a summary of how to create your own reports, including a couple of examples: Creating Your Own Reports. The information, below, is about the Report Generator's first dialog box. Constructing profiles and running reports all begin here. This part of the program is reached by selecting FILE >> EXPORT AND THE REPORT GENERATOR from the Menu Bar on top of the Main Purchase Order Screen. The following screen appears:
Type of Export Files Produced. AnyPO can produce three types of export files: Comma Delimited, Tab Delimited and dBase. Most commonly, you'll move report data directly into a spreadsheet program, and you'll primarily use Tab Delimited files. But the other file types are available should you need them. For more information: Export: Supported File Types. Almost every database or spreadsheet program can import data in one or more of these formats. Exporting and Creating Reports: Step by Step The following is the step by step process involved in exporting and creating reports. Start By Creating a Profile. When you select FILE >> EXPORT AND THE REPORT GENERATOR from the Menu Bar, the Export dialog box will appear. Click on the "Create New Profile" found near the top of the dialog box. To continue following the step by step procedure: Second Dialog Box Details on Each Part of the First Dialog Box Create New Profile. A profile is a list of instructions which tells AnyPO which fields to export and in what order. When you create your first export file, you need to start here and click on "Create New Profile." View or Update Existing Profile. Once you create a profile, it is saved. Since it's saved, you won't have to re-create the profile the next time you need to make a similar export file. The "View or Update" button allows you to view an existing file, or, if desired, to make changes. Delete Profile. If you no longer need to use a profile, you can delete it. Note that this will also delete any replacement tables that you have associated with the profile. To delete a profile, first highlight it on the profile list and then click "Delete Profile." File Name. In the File Name blank, enter the name of the export file that you want to create. It's important to keep the file at eight (8) letters or less. Avoid spaces in the name. For more information: Supported File Types. Directory. Select the directory where you want the export file stored. Avoid storing the file in directories with long directory names or names with spaces. Select PO's to be Exported. Before starting the import process, you have a variety of choices of what Purchase Orders you want to export. You can export the current PO or a range of Purchase Order numbers. You can select a range of PO numbers or date, select from a list or set a filter. Current Purchase Order. Exports the current purchase order, the purchase order showing on the Main Purchase Order Screen. All Purchase Orders. Exports all purchase orders in your data files. Range of PO Numbers. Select a range of PO numbers that you want to export. Range of Dates. Select a range of PO dates that you want to export. Select from a List. When you choose this option and click OK, AnyPO will provide a list (in a spreadsheet format) of all of your PO's. You can page through the list and select those records that you want to export by clicking with your mouse on the appropriate row. When you click with your mouse, a checkmark will appear under the "Yes" Column. This means that YES, this record will be exported. Records without a checkmark will not be exported. To remove a checkmark, click again with your mouse. Use a Filter to Determine Which Records are Exported. When you choose this option and click OK, AnyPO will display the Filter Purchase Orders dialog box. In the blank on top of the dialog box you can enter a filter formula or choose one of the options at the bottom of the screen. Only those Purchase Orders which are filtered will be exported. For more information, see Filter dialog box. After you exit from the Filter dialog box, an export file will be created according to the filter. When you are finished selecting records, press OK and the all records marked with a "Y" will be placed in the export file. Note that once you have the filter decided upon, and it's a filter that you want to use each time you run the export, you can save the filter formula in Other Options. If there's a filter entered in More Options, then the filter dialog box will not show and AnyPO will automatically use filter as entered. If you enter a filter in a More Options, AnyPO only uses the filter when this option or the next option (described below) have been selected. Use a Filter COMBINED with the Above Range of Dates. This option is very similar to the one described immediately above. It displays the Filter Purchase Orders dialog box. Or if you have indicated a filter in Other Options, AnyPO will use it instead of displaying the filter dialog. But, in addition to using the filter, it also will limit the purchase orders exported to the dates from the "Range of Dates" option. Note: you'll need to type in a "From" and "To" date, but, when finished, make sure that you have this option selected. In other words, make sure the selection dot is beside: "Use a Filter COMBINED with the Above Range Dates." For an example, let's say you wish to produce a report for a PO Code of "ABC." And, you wish to limit the report to PO's issued in the month of April. Here's a quick run down on how you would do it. First, type in the dates 04/01/09 to 04/30/09. Second, select "Use a Filter COMBINED…" Third, build and save your profile. Fourth, in Other Options, enter appropriate filter (in this case it would be InvCode="ABC"). (For more information on setting up filters, see Filter dialog box.) Fifth, make any other choices on the first export dialog box, and then run the export. The result would be only those PO's with a code of ABC and with an purchase order date that falls in the month of April. First Record: List Field Names. If you would like the first record of the export file to contain a list of fields, place a checkmark here. When you check this box, the first row of the spreadsheet will include the names of the columns. The column names will be the same as the field names which appear in the profile box on the second dialog box of the Export series. You'll find this very helpful when creating reports, and you'll almost always place a checkmark here. Start-up Programs. One very convenient feature that you'll almost always use is the ability to start-up a spreadsheet or a word processing program immediately after the export process is complete. If you are exporting to a Tab Delimited or dBase File, you can start up Excel (or a spreadsheet program of your choice). If you are exporting to a Comma Delimited File, you can start-up MS Word (or word processor of your choice). Check either box if you'd like to use this function. Start Export Process. This is the button to click after you've selected the appropriate profile, typed in the name of the file to which you want to export, and selected which PO's to export. Copy Profile. If you've already set-up a profile and you need to set-up a new but similar profile, you can use the "Copy Profile" button. First select the profile you want to copy from the list. Then click "Copy Profile." The selected profile will be copied and given the same name with a "(2)" at the end of it. If you have replacement tables associated with the original profile, this will also copy the tables. Once the profile is copied, you can click on "View or Update Profile." Change the name to the desired new name and then make whatever adjustments are necessary. Sample File AnyPO comes with sample export profiles. For more information, see Built-in Reports.
More Information on Exporting Export Profiles (Second Dialog Box) |