| Shipment Form |
|
|
This is a Level 4 and higher feature. The shipment form is used when you want to utilize AnyOrder's internal shipment features such as on-line shipment processing. You can also use it if you export to UPS WorldShip or need to prepare a Bill of Lading form. Or you can use it if you just want to keep track of your shipments. Accessing the Shipment Form In order to access the Shipment Form, you must turn it on. To do so, select FILE >> ACTIVATE SHIPMENT & USER DEFINED FIELDS from the menu bar on top of the Main Invoice Screen. To turn on the shipment fields, place a checkmark beside "YES," shown below:
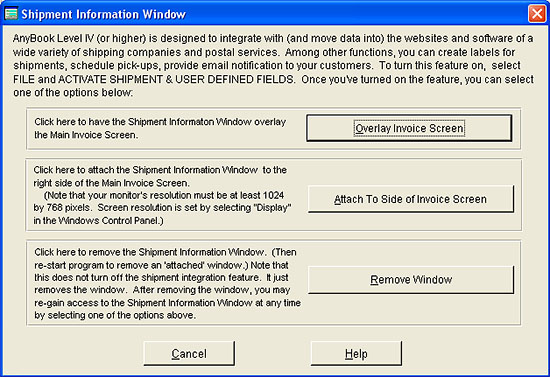
Once you've activated Shipment Fields, you can access them by selecting WINDOW >> SHIPMENT WINDOW from the menu bar. The following dialog box appears:
You'll notice on the dialog box that you have two ways of accessing shipment fields: The first is to have the Shipment Form overlay the Main Invoice Screen. Here's what it looks like:
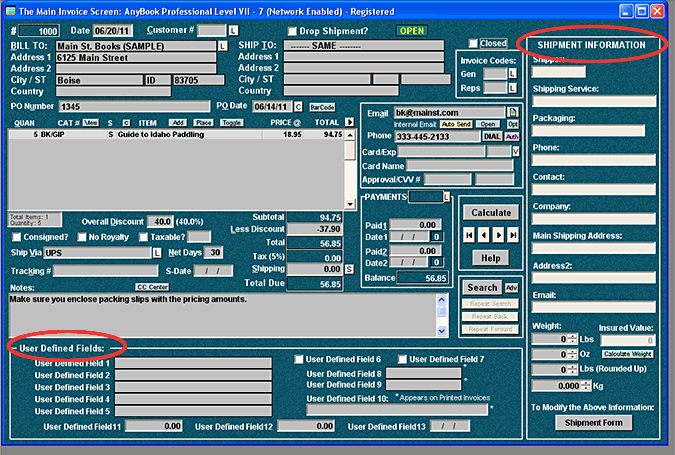
The second is to attach the Shipment Window to the right side of the screen. In order to use the attachment option, you will need to have your monitor resolution set at 1024 by 768 pixels or greater. The illustration, below, shows the Shipment Form attached to the side of the invoice screen. (It also shows the User Defined Fields Windows attached to the bottom of the screen)
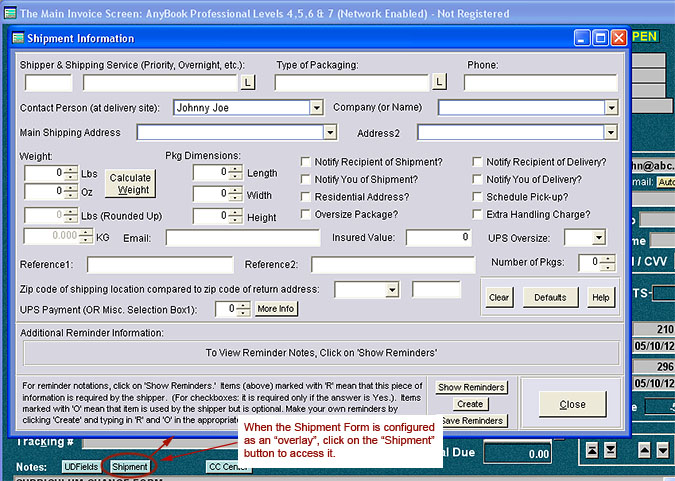
When the Shipment Window is attached, you can see the values in the fields but you won't be able to edit them. The side attachment, however, allows you to view shipment data as you page through the invoices. To make changes to shipment information, you'll need to access the Shipment Form which overlays the Main Invoice Screen. To reach the Shipment Form, select SHIPPING TOOLS >> SHIPMENT FORM (Shipping Details). Or click on the "Shipment" button at the bottom of the Main Invoice Screen (see illustration above). Or, if the shipment window is attached, click the "Shipment Form" button found at the bottom of the attachment window. This brings up the Shipment Form which provides you a full range of features for adding or changing shipment information. Filling-out the Shipment Form Shipper & Shipping Service (Priority, Overnight, etc.) Click on the "L" button (to the right of the Shipper and Shipping Service fields). A pop-up list of shippers and shipping services will appear. AnyOrder comes with a number of pre-loaded shipping services, but you can add and modify the list by selecting SHIPMENT METHODS & SHIPMENT PACKAGING >> VIEW/MODIFY SHIPPING METHODS LIST. (More information: Shipping Methods) For most situations, you just select the shipper and service you want and click on "Paste." The information will be pasted in the appropriate field. If, however, you are preparing the shipment for export to UPS WorldShip be sure to select "Export (UPS WorldShip)" prior to clicking on Paste. Note: If you want the form filled with default values that you have established for the shipper, click on "Paste with Defaults." In addition to filling out the regular fields on the form (described below), default values will also be entered. For more information: Shipping Defaults. As soon as you select a shipper, AnyOrder will fill-in some of the fields on the Shipment Form. In addition to the shipper and service fields, it will also attempt to fill in contact name, company and address. To do so, AnyOrder uses a small artificial intelligence routine that has been built into this part of the program. You'll need to check things over and make some final adjustments, but this feature should help save time in filling out the form. UPS Notes. If you are preparing a UPS shipment, be aware that the shipping services available to you depend upon where your customer is located. Standard, Express, Expedited, Express Plus are all for international shipments. For example, the service "UPS Standard" is used for shipments from the US to Canada. If you using AnyOrder's auto-fill function on the UPS website and the on-line form stops filling at the "Service" field, then you've probably selected a service that is not available to that location. Reminders. AnyOrder will show reminder notations as soon as you select the shipper and shipping service from the pop-up list. Reminder notations are red letters enclosed in boxes beside each of the fields on the Shipment Form: R - Required. An "R" means that this piece of information is required by the shipper. If you will be utilizing AnyOrder's on-line shipment features, you must enter a value in each of the "R" fields. If you don't, it will generate an error when the on-line forms are filled. Note: if a checkbox field has an "R" beside it, place a checkmark in it if you need that service. Otherwise leave it blank. O - Optional. An "O" means that this piece of information is used by the shipper but is optional. Enter information in the field only if you need that service. Blank - If there is no letter, then this piece of information is not used by the shipper. Note that AnyOrder comes with several pre-loaded shippers. Reminder notes are included with the shippers. If you are setting up your own shippers, you can create your own reminder notations. See "More Information on Reminder Notations" below. Type of Packaging. Click on the "L" button for a list of packaging choices. Be sure that you choose a packaging choice that is provided by shipper that you've selected. AnyOrder comes with a number of pre-loaded packaging options, but you can add or edit this list by selecting SHIPMENT METHODS & SHIPMENT PACKAGING >> VIEW/MODIFY SHIPMENT PACKAGING CHOICES. Contact Person (at delivery site). AnyOrder will take guess at the contact name. Check to make sure the name is correct. If not, and the contact name appears on one of the fields on AnyOrder's Main Invoice Screen, click on the down arrow and a list of field contents will appear. Select the correct one. If the name doesn't appear on one of the Main Invoice fields, type in the contact name -- if required by the shipper (in other words, if there is an "R" beside the field). FedEx Note. If you are preparing the shipment for FedEx, the Contact Name is required. You'll see an "R" (for "Required") beside the field. FedEx uses an individual's first name and last name for their on-line form. AnyOrder will take the name in the Contact field and divide it into two parts. The first part becomes the first name and the second part becomes the last name. When processing a FedEx shipment be sure to look at the Contact name and make any needed adjustments before going on-line. Company (or Name). AnyOrder will take a guess at the company or individual's name. Check to make sure it is correct. If not, and the company name appears on one of the fields on AnyOrder's Main Invoice Screen, click on the down arrow and a list of field contents will appear. Select the correct one. If the name doesn't appear on one of the Main Invoice fields, type in the name -- if required by the shipper (in other words, if there is an "R" beside the field). Main Shipping Address. AnyOrder will take a guess at the main address. Check to make sure it is correct. If using non-post office shippers, the address should be a street address. If the proper address is not showing, click on the down arrow and a list of field contents will appear. Select the correct one. If the address doesn't appear on one of the Main Invoice fields, type in the address. Address 2. Check to make sure the second address is correct. If not, click on the down arrow and a list of field contents will appear. Select the correct one. Weight. If you've entered weights in the Product Information Database, AnyOrder will calculate the weight for you by clicking the "Calculate Weight" button. Once the weight is calculated, you can adjust it upwards, if need be, to account for packing materials. If desired, you can also wait, finish packaging the items, and manually enter the weight. Reference1 and Reference2. Shippers like UPS and FedEx have two or more places for reference numbers. The most used reference numbers are invoice and purchase numbers. If you need this information on the shipping documents, indicate the number here. Zip Code of Shipping Location Compared to Return Address. These fields are used by the U.S. Post Office (USPS). You can disregard them if you are working with other shippers. For USPS shipments, when you are shipping from the same zip code as the return address that will appear on the package, select "Same" in the first box. If you are shipping from a different zip code as the return address, select "New" and type in the zip code of the shipping location in the second box. UPS Payment or Misc. Selection Box. This field can be used for the UPS Payment Method on the UPS site. OR it may be used for a miscellaneous selection box on another shipper's website. You must indicate a number for this field. The number should correspond to where the desired selection item appears on the selection list. (Note: on many websites, the first selection is often considered 0). For the UPS Payment Method, you have five choices in the following order: 0) None Selected, 1) Shipper's UPS Account, 2) Credit Card, 3) Receiver, 4) Third Party. If you want 'Shipper's UPS Account' to be your choice, you would select '2' since it's the second choice on the list. If you wanted 'Third Party' to be your choice, you would select '5,' and so on. If desired, the same can be done with a selection list on another shipper's site. Defaults. You can set-up default values for each of your shippers. To do so, click on the "Defaults" button. For more information: Shipping Defaults. Clear Form. If you've accidentally entered the wrong information, you can start over by clearing the form. To do so, click on "Clear." It is particularly important to clear the form if you made changes to the invoice or you need to select another shipper. This will assure that all previous values are removed providing you with a clean slate to work from. Shipping Form: Additional Information on Reminder Notations How to Edit or Create New Reminder Notations. You can create your own reminder notations -- or you can alter the reminder notations that came with the program. To modify or create your own, click on the "Create" button at the bottom of the Shipment Form. This unlocks all of the reminder boxes and allows you to type directly into the small red boxes. If you are creating reminders for a new shipper, type an 'R' in the box if that piece of information is required by the shipper. Type an 'O' in the box if that information is optional. Leave the box empty if the information is not used by the shipper. Additionally, you can include a couple of short, abbreviated notes on the bottom the Shipment Form. When you've completed adding or editing the reminder notations, click on "Save." By clicking on "Save," the reminder notations are save to the file. The little red boxes are locked so they can't be altered. However, if you need to re-edit them, click on "Create" again. Showing Reminders. The reminder notations appear in one of two ways: 1) Whenever you select a shipper and service by clicking the "L" button, the reminder notations will appear. 2) Reminders also appear when you click on the "Show" button. Reminder notations don't normally appear unless you click the "Show" button. That helps minimize the use computing resources as you page from invoice to invoice. However, whenever it's needed, you can always view the reminders by clicking on "Show."
On-line Shipment Processing Links: On-line Shipment Process - General Information WebLinks (WebLinks Properties Dialog Box) Trouble Shooting On-line Shipment Problems Macros (Developing Your Own or Editing Existing Macros) Macros (How to Turn On Error Checking)
|